From Text to a Cool Extruded-3D with After Effects
Let the Games Begin
As cool as 3D is in After Effects, there’s no doubt that an extrude tool is something we all wish for. While there are a few plug-ins that handle such a task (Zaxwerks Invigorator PRO being one of my favorites), there’s a cool way to achieve a true 3D look (more or less) using the 3D effects in Illustrator. Add to this mix some cool particles, lights, and shadows (and some Energi studio techniques) and we’ll show you how to turn simple text into a cool extruded-3D scene inside After Effects. Let the games begin!
If you’d like to download a finished movie for this tutorial, just click here. All files are for personal use only.
1 CREATE ILLUSTRATOR TEXT
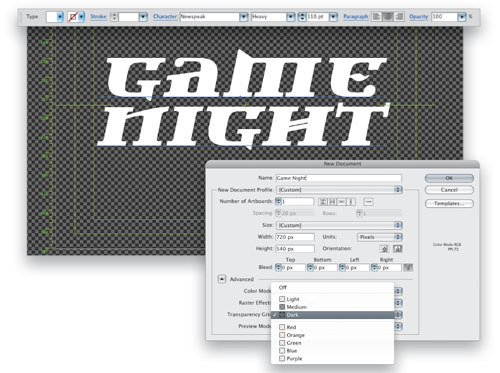
Create a new Adobe Illustrator document (File>New), name it “Game Night,” select Video and Film in the New Document Profile drop-down menu, and set the size to 720×540 pixels. Under the Advanced option, choose the Dark preset for the Transparency Grid—this will ensure our white text will be visible as we work on it. Click OK. Select the Type tool (T), click on the page, and add your type, choosing the font and size to suit your design. Here, we’ve used a font from www.veer.com called Newspeak-Heavy, which will look great when extruded. Set the Fill color to white and the Stroke to none.
2 CONVERT TO SHAPES; RELEASE TO LAYERS
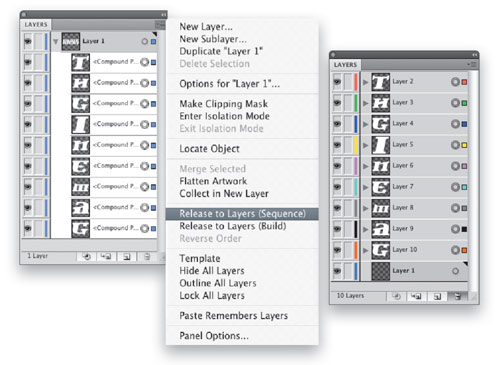
Select the type with the Selection tool (V), then go to Type>Create Outlines. Now we need to divide the type so that each letter is on a separate layer, so go to Object>Ungroup, then from the Layers panel flyout menu, choose Release to Layers (Sequence). Shift-click all the resulting sub-layers to select them and drag them up above Layer 1 in the Layers panel. Drag Layer 1 to the Trash icon to delete it, as we don’t need it. Now we’re ready to apply the 3D effect to each one of the shapes and tweak it as necessary.
3 ADD 3D EFFECTS
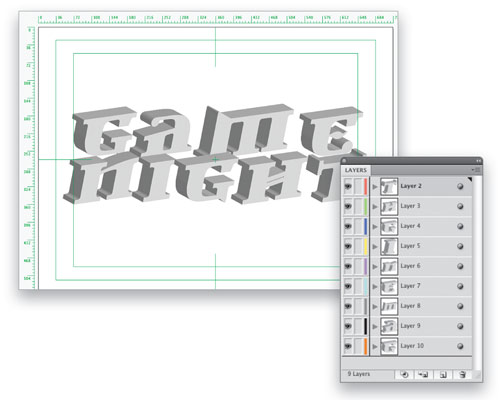
Select the first letter shape, choose Effect>3D>Extrude & Bevel, and then simply press OK to exit the dialog—we’ll return shortly to adjust it. Shift-click all the other letters on the artboard to select them and choose Effect>Apply Extrude & Bevel. This applies the effect to each letter individually. At this stage you might want to choose View>Hide Transparency Grid to make the 3D shapes easier to see. Now that every layer has its own 3D effect, we’re free to adjust the Extrude & Bevel properties on each letter to make the design much cooler.
4 EDIT 3D STYLES
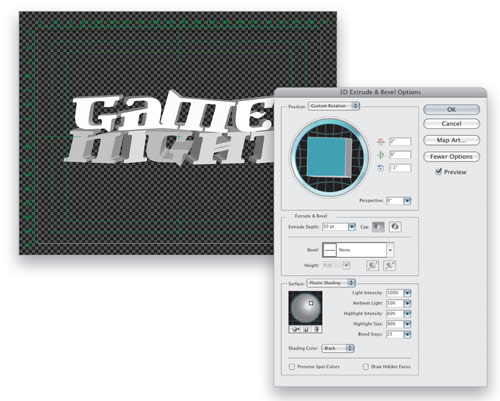
Select a letter, and in the Appearance panel (Window>Appearance) click 3D Extrude & Bevel. Adjust the rotation and camera perspective values to angle the letter slightly and give the extrusion some perspective. Adjust the Extrude Depth value and add some extra lights if desired—this is a creative process—you’re in control of the final look. When done, click OK, then repeat this process for each letter. Rearrange the layers and use the Selection tool to move individual letters so the word “Game” appears to be sitting on top of the word “Night.” When finished, be sure to Save the document.
5 IMPORT TO AFTER EFFECTS; PRE-COMPOSE
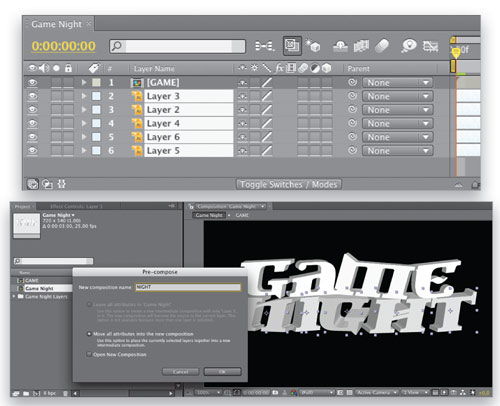
In After Effects, go to File>Import>File and select the Illustrator document. Choose Composition in the Import As drop-down menu and click Open. Double-click the new Game Night comp to open it, press Command-K (PC: Ctrl-K), set the size to 720×540 px, the Duration to 5 seconds, and click OK. In the Timeline, Command-click (PC: Ctrl-click) the layers that make up the word “Game” to select them, choose Layer>Pre-Compose, and name it accordingly. Repeat this process for the other word—now we have only two layers, which are much easier to control. Import a texture image to use as a floor. The one used here is free, found in the concrete section of www.textureking.com.
6 DESIGN 3D SCENE
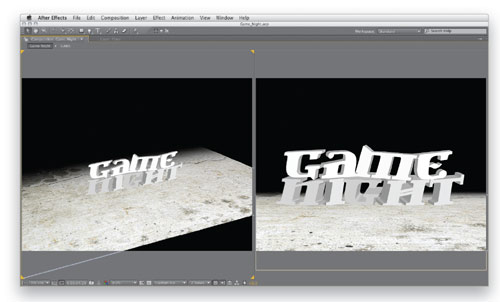
Drag the texture image into the Timeline, rename it “Floor,” then double-click it to open it in a Footage viewer. Use the Rectangle tool (Q) to draw a mask around the entire layer. Grab the Selection tool (V) and drag the mask down about a fifth of the way from the top edge. Hit F for Mask Feather, unlink the Chain, and set the Vertical axis to 300 pixels. Close the Footage Viewer, then click the 3D Layer switch for all the layers. Select the Floor layer, press R, and change its Orientation to 270° on the x-axis. Drag it down to the bottom edge of the comp. Move the word layers to rest on the floor and each other.
7 APPLY BASIC ANIMATION
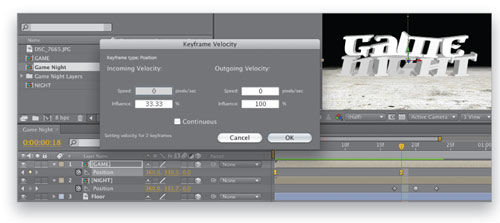
Select the GAME layer, go to frame 18 in the Timeline, and hit Option-P (PC: Alt-P) to set a Position keyframe. Return to the beginning of the Timeline (Home), and drag the layer upward on the y-axis until it’s offscreen. Shift-click both keyframes to select them and go to Animation>Keyframe Assistant and apply the Easy Ease velocity to them. Now, go to Animation>Keyframe Velocity, and set the Outgoing Velocity Influence to 100%. To enhance the effect, feel free to add Position keyframes to the NIGHT layer for a slight position shift at the moment of impact.
8 LIGHTS & SHADOWS
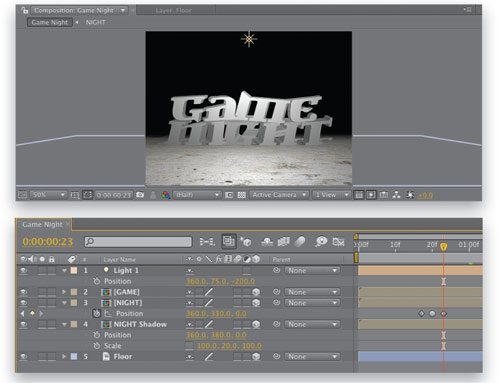
Go to Layer>New>Light, change Light Type to Point, set the Intensity to125%, turn Casts Shadows off, and click OK. Press P and adjust the Position attributes to 360, 75, and –200. Since the elements we’ve created are without true 3D extrusion, we need to add their shadows manually. Select the NIGHT layer, press Command-D (PC: Ctrl-D) to duplicate it, and rename it “NIGHT Shadow.” Delete any position keyframes, and hit S to show the Scale property. Unlink the Chain icon, scale the Y value to 20%, then press R and set the X Orientation to 270°, and move it to just on top of the Floor layer.
9 MORE SHADOWS!
With the “NIGHT Shadow” layer still selected, go to Effect>Generate>Fill, and then choose Effect>Blur & Sharpen>Fast Blur. In the Effect Controls panel (ECP), set the Color to black, and set the Blurriness value to 20. Now repeat Steps 8 and 9 to create a shadow for the GAME layer: duplicate it, rename it, remove any keyframes, scale its height, rotate it (you may have to experiment with the angle of rotation), move it up to appear on top of the NIGHT layer shapes, fill it with black, and blur it. Hit T for the Opacity value, and drop it to 80%.
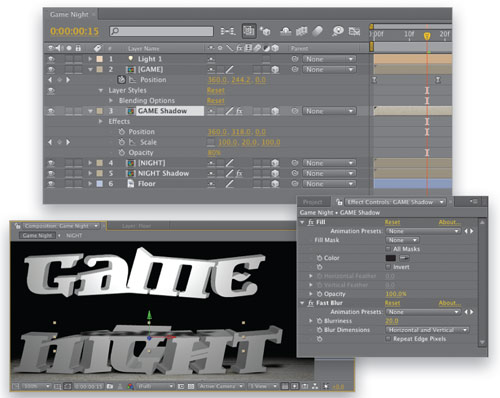
10 ANIMATE SHADOW SCALE
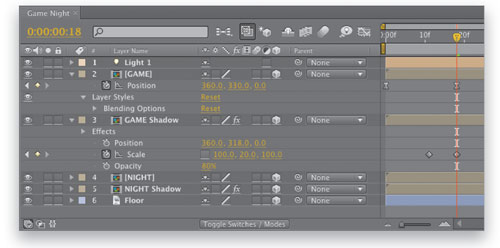
Now we need to animate the GAME Shadow to follow the animation of the word falling. Select the GAME Shadow layer, go to frame 18 in the Timeline, and hit Option-S (PC: Alt-S) to set a Scale keyframe. Now move back around 10 frames, and set the X and Y scale to 0. This nicely enlarges the shadow as the word falls from the top of the screen. For more reality, you could also keyframe the layer Opacity, getting darker as the word gets closer.
11 ADD PARTICLES
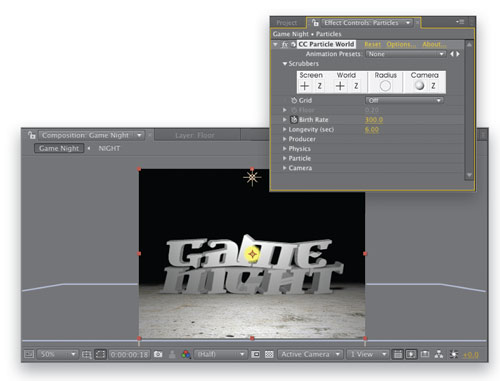
Go to Layer>New>Solid, name the solid “Particles,” click the Color swatch, choose a white color, click OK, click Make Comp Size, and click OK again. Drag the layer to start at 18 frames in the Timeline, then go to Effect>Simulation>CC Particle World. In the ECP, set the Grid to Off, then change the Birth Rate to 300, and click the Stopwatch to apply a keyframe. Move one frame forward (Page Down) and set it to 0 so there are no new particles after this point. Adjust the Longevity to 6 seconds, which should be enough for our 5-second comp.
12 BASIC PARTICLE SETTINGS
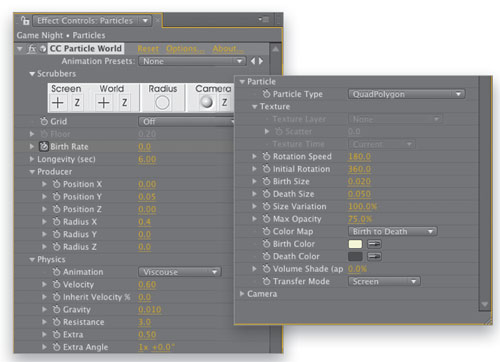
Twirl down the Producer in the ECP, change the Position Y value until it sits between the word layers (around 0.05 should do the trick) then set the Radius X to 0.4—this will spread particles across the width of the whole NIGHT layer. Under Physics, change Animation to Viscouse, Velocity to 0.60, Gravity to 0.010, and Resistance to 3.0. Under Particle, change Particle Type to QuadPolygon, Birth Size to 0.020, Death Size to 0.050, and Size Variation to 100%. Sample from the floor’s bright color for the Birth Color and its dark color for the Death Color, and set the Transfer Mode to Screen.
13 ADVANCED PARTICLE SETTING
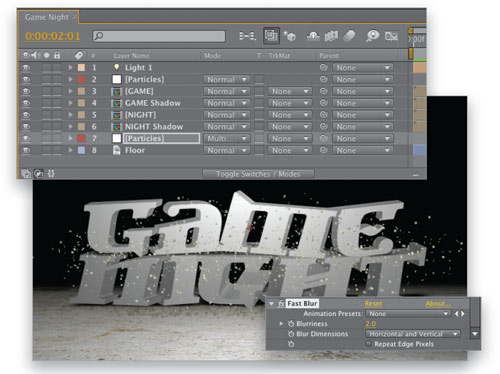
In the ECP, click the word “Options” near the name of the effect, then click Opacity Map in the resulting dialog. Choose Constant from the Presets drop-down menu. Click OK twice, then duplicate the Particles layer for a shadow version. Select the duplicate, return to the effect’s Options again, click Rendering, and set Render Animation to Projected on Floor. Click OK twice, then position this layer between the Floor and NIGHT Shadow layers in the Timeline. In the ECP, change the Particle Birth Color to be the same as the Death Color. Click the Toggle Switches/Modes button, change the layer blend mode to Multiply in the Timeline, then add a Fast Blur effect with a Blurriness of 2. Perfect!
14 FINAL EMBELLISHMENTS
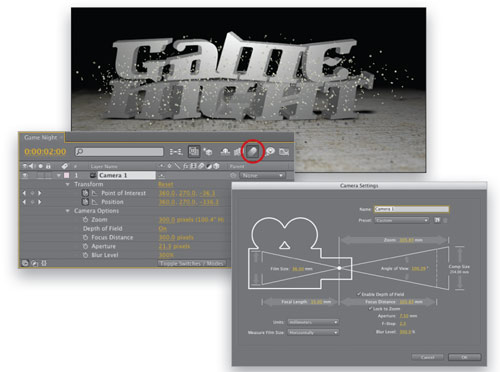
Go to Layer>New>Camera, choose the 15mm Preset and turn on Enable Depth of Field. Set the F-Stop to 2.0, the Blur Level to 300%, and click OK. On frame 16, twirl down the Camera layer and then twirl down Transform. Move the Camera slightly back on the z-axis, and set a keyframe for both Position and Point of Interest. At frame 18, move the camera on the z-axis towards the type, and then on the last frame in the Timeline, move it a few more pixels. Select all the new keyframes and apply an Easy Ease. Enable Motion Blur for All Layers, and render. True 3D? You tell me…. Enjoy!
ALL IMAGES BY STEVE HOLMES UNLESS OTHERWISE NOTED

