Extracting Soft Edges in Photoshop

By Corey Barker
Excerpt from Photoshop Down & Dirty Tricks for Designers, vol. 2
Sometimes getting an accurate selection means going beyond using normal tools and methods and using more experimental techniques. I say experimental because these techniques are worth trying, but are not always effective. They may require some tweaking, depending on the image, but they are sometimes pretty effective.
STEP ONE:
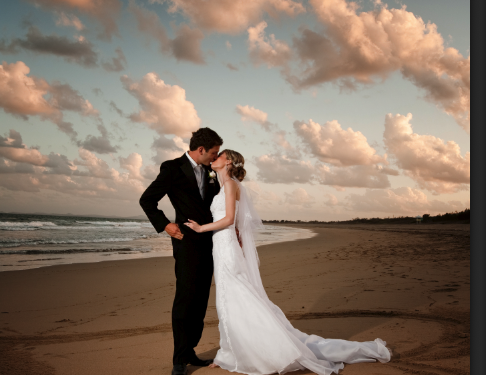
Here, we have a wedding shot. It looks pretty good after I added a couple layer effects (a vignette and a spotlight effect) to it, but I would really like to fill in that space in the upper-right corner with some more clouds. The problem is that they need to blend well or it will be obvious they have been added.
STEP TWO:
Get the Lasso tool (L) from the Toolbox and draw a very loose selection around one of the clouds in the image, like you see here, where I used the Zoom tool (Z) to zoom in and then selected the cloud above their heads.
STEP THREE:
Now, click on the Refine Edge button up in the Options Bar. In the View Mode section at the top of the Refine Edge dialog, set the View pop-up menu to On Black, then click on the Refine Radius tool to the left of the Edge Detection section (as shown here).
STEP FOUR:
Make the brush size fairly large, but not larger than the cloud itself (use the Right Bracket key to make it larger), then click-and-drag around the edges of the cloud. The Refine Radius tool will do its magic and you will see a softer transition.
STEP FIVE:
Set the Output To pop-up menu (near the bottom of the dialog) to New Layer, and then click OK to put the selected cloud on its own layer.
STEP SIX:
With the cloud element nicely extracted to a new layer, use the Move tool (V) to move the cloud over to the top right of the image, and scale it slightly using Free Transform by pressing Command-T (PC: Ctrl-T). Now you can see how versatile the Refine Edge feature can be with soft-edged subjects. In the final image, I pressed Command-J (PC: Ctrl-J) to copy our selected cloud to another new layer, and used it to fill in that open space at the top left of the image.
To learn more about selections and compositing, check out Corey’s book:Â http://kel.by/CoreyDD2
and his KelbyOne class, Design Series: Compositing Techniques: http://kel.by/CBcomposite.


