A popular style that has been around now for a couple of years in graphic design is grunge. A touch of grunge can easily be added to your artwork with a set of custom brushes. Once you create your set of brushes, you can save them and call them up at any time to achieve the grunge style. In this tutorial, we’ll use both Photoshop and Illustrator to create the brushes, and then you’ll learn how to apply the brushes in Photoshop.
1 EXPERIMENT ON PAPER
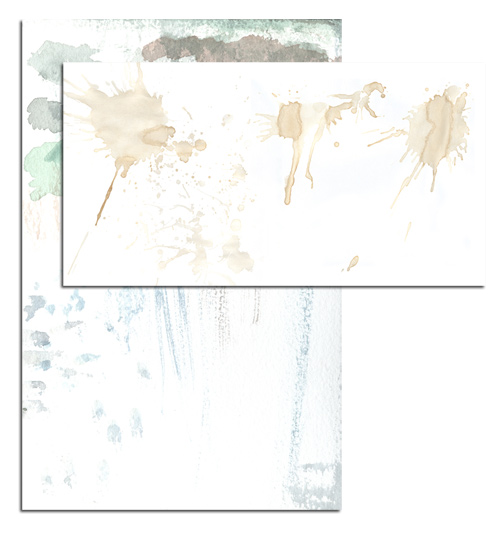
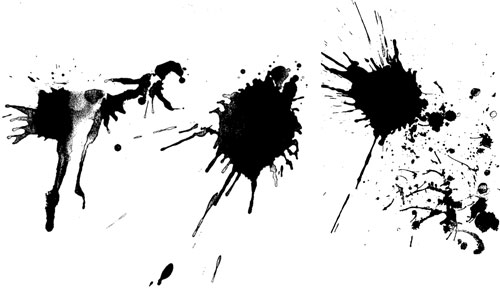
One way to create your own set of grunge brushes is by first experimenting on paper. Creating a grunge style means you can go wild—the dirtier the better. In the first example, I used watercolors on a piece of rough-textured watercolor paper. If watercolor painting is out of the question, try coffee. All you need is paper, coffee, and a straw. Suck a tiny bit of coffee into the straw and blow it onto the paper. It’s a simple and fun technique, and it’s really effective for achieving the perfect grunge splatters. You could also start from a digital image—just look for concrete or rusty structures.
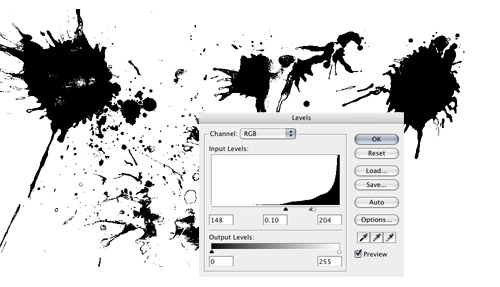
2 DIGITIZE AND APPLY LEVELS
Next, scan your watercolor or coffee artwork at a high resolution. Open your scanned artwork in Photoshop, and desaturate it (Image>Adjustments>Desaturate). Click the Create New Adjustment Layer icon in the Layers panel and select Levels. The values will be different for each image and will depend on the result you want to achieve, but in most situations you’ll have to drag the outer white and black sliders toward the middle to create a black-and-white image. Make sure you don’t exaggerate it too much, though, and that there are some gray areas left.
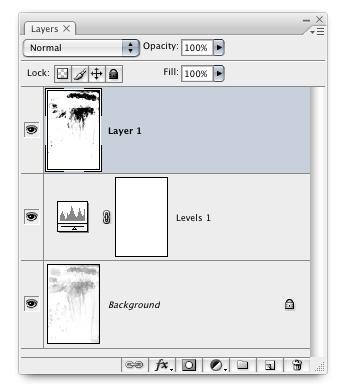
3 CREATE COPIES OF ART AND ADJUSTMENT LAYERS
Command-click (PC: Ctrl-click) both the artwork and Levels adjustment layer in the Layers panel to select them and press Opt-Shift-Command-E (PC: Alt-Shift-Ctrl-E) to merge and copy these layers to a new layer. Now we have the final grunge artwork in a separate layer, and we still have our original artwork and adjustment layer as a backup.
4 SELECT, COPY, AND PASTE SPLATTERS
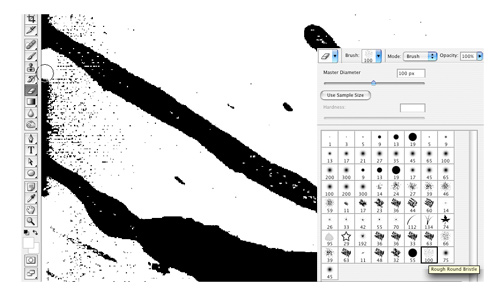
Select the Polygonal Lasso tool and make a selection around one of the splatters you would like to use as a brush. Copy and paste this selection into a new document. Depending on your selection, you might need to do some touching up. Select the Eraser tool (E) from the Toolbox and use both the Rough Round Bristle brush and a Soft Round brush from the default set of brushes in the Brushes panel to clean up the borders of your splatter document so you don’t see any straight edges. Adjust the size of the brushes if needed.
5 USE ILLUSTRATOR
Now you could go ahead and convert each splatter into a Photoshop brush, but we’re not going to do that just yet; we’re first going to convert the splatters into vector images in Illustrator. This will make them resolution independent. That’s a big advantage because you’ll be able to create your brushes in Photoshop as big or as small as you need. This keeps things very flexible, so it’s worth the extra step. Now save each Photoshop document somewhere on your hard drive.
6 LIVE TRACE SPLATTERS IN ILLUSTRATOR
Create a new document in Illustrator and place (File>Place) the first splatter you saved. With the image selected, choose Tracing Options from the pop-up menu next to the Live Trace button in the Control panel. Check the Preview option, choose Black and White from the Mode pop-up menu, and make sure Fills is checked. Play around with the settings. I’ve reduced the Path Fitting and Minimum Area settings to create more details. Check the Ignore White option so any gaps will be transparent. (Note: There is no Ignore White option in CS2, so you need to select the white areas with the Magic Wand tool [(Y] after you trace and delete them.) Hit the Trace button when you achieve the desired result, then click the Expand button in the Control panel.

7 PASTE VECTOR OBJECT INTO PHOTOSHOP
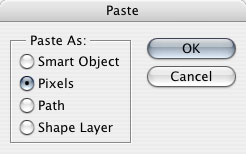
Select the traced splatter in Illustrator and copy it. Now go to Photoshop and create a new document. If the brush is for print, you’ll need to create a high-resolution document (File>New) at 300 dpi. I’m copying the big coffee stains into a document of 2600×2245 pixels. Now paste the Illustrator object into your Photoshop document. Select pixels in the Paste As options. In the end it’ll be converted into a brush, so we don’t need to keep it vector-based (just make sure you save your original Illustrator source files). Resize the splatter to fit the document and press Enter.
8 PREPARE BRUSHES PANEL FOR NEW SET
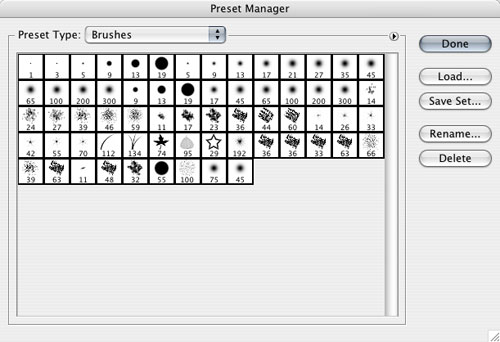
If you want to save your own set of brushes, it’s a good idea to make sure that you start with an empty Brushes panel. To clear your Brushes panel, go to Edit>Preset Manager. Select the first brush, then hold down the Shift key and select the last brush. Now that all brushes are selected, click the Delete button and then click the Done button. Your Brushes panel is now empty and ready to add new ones in. This way, when you export the new brushes to a set, you save only your custom brushes.
9 DEFINE BRUSH PRESET IN PHOTOSHOP
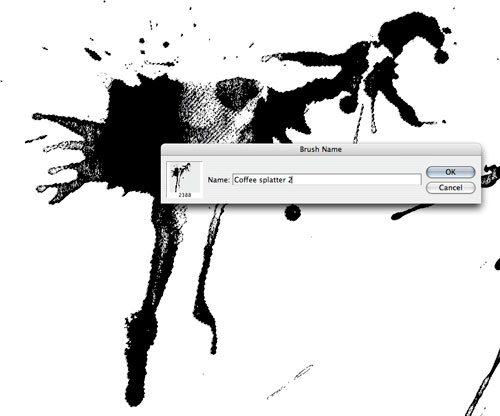
Hold down the Command (PC: Ctrl) key and click on the top layer’s thumbnail in the Layers panel to create a selection around the splatter. Go to the Edit menu and choose Define Brush Preset. Enter the name of your brush and click OK. Now you’ve created a Photoshop brush. Repeat the same steps for all other brushes you want to create. (Note: If you’ve created a corner brush, it’s easy to create brushes for the other three corners. Just flip the brush horizontally [Edit>Transform>Flip Horizontally] and then define the brush. Now flip the brush vertically and define it again. Flip it horizontally one last time and save it again.)
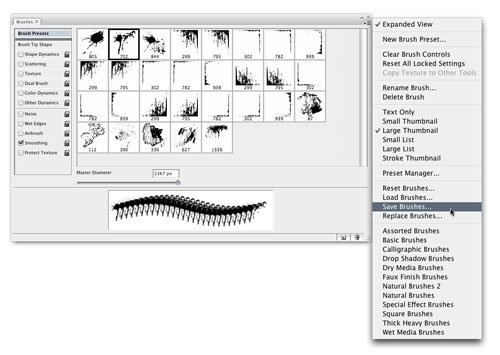
10 ORGANIZE BRUSHES PANEL AND EXPORT
If you’re going to create a whole set of brushes, it’s best to keep things nicely organized in the Brushes panel. In the Preset Manager, you can move brushes around just by clicking-and-dragging. You can also rename your brushes by double-clicking on them in either the Preset Manager or in the Brushes panel.
After all your brushes are nicely ordered and named in the Brushes panel, the only thing left for you to do is go to the panel’s flyout menu and choose Save Brushes. Enter a name and click the OK button.
11 ACCESS GRUNGE BRUSHES ANYTIME
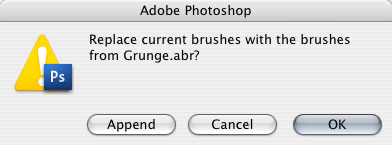
Now if you reset your Brushes panel to the default brushes and you want to use your set of grunge brushes, you can easily load them. Go to the panel’s flyout menu and choose Load Brushes. Browse to the file you’ve just saved and select it. If you saved the file in the default location, Photoshop will add the set to the bottom of the Brushes panel’s flyout menu next time you launch the application. Just select the name of your set in the menu and Photoshop will ask you whether you want to append or replace the currently loaded brushes.
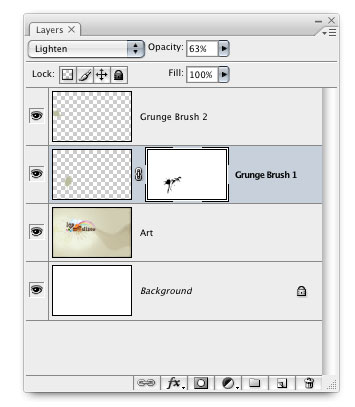
12 TIPS FOR USING YOUR GRUNGE BRUSHES
The hard work is done and the real fun can begin. While you’re clicking away with the brushes, here are tips that can come in handy:
• Use separate layers for each grunge effect to keep things flexible.
• Play with the layer blend mode, opacity, and color of the brush. Needless to say, the possibilities are endless.
• If the spot or splatter is too heavy or too big, you can use a mask on the layer and hide parts of the grunge effect using another grunge brush.