The interface of Acrobat 8 has a new look and feel that presents a less-cluttered work area. The interface components also change depending upon the type of PDF file you’re viewing, such as PDF forms, PDF packages, or a standard PDF file, and on whether you’re viewing your PDF through Acrobat or through your Internet browser. You can also customize how the interface looks. Becoming familiar with the new workspace and interface in Acrobat 8 will allow you to better take advantage of its new streamlined design and its many new features and capabilities.
STEP 1 The Getting Started Window
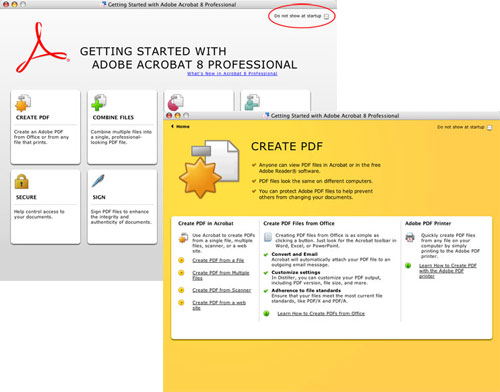
Acrobat 8 provides an interactive training wizard called Getting Started. This wizard launches automatically when you launch Acrobat. It contains eight task buttons, including the Create PDF shown here. Just click on a task button and the wizard will lead you through a multibranching tutorial session. You can close this window to enter the Acrobat 8 interface. You can also prevent this wizard from appearing by clicking the Do Not Show at Startup checkbox in the upper-right corner. You can also access this wizard at any time by selecting Help>Getting Started.
STEP 2 Open a PDF Directly in Acrobat 8
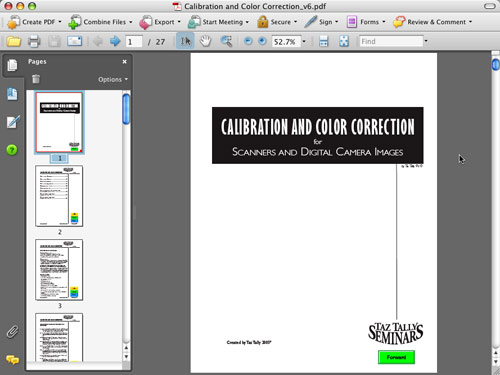
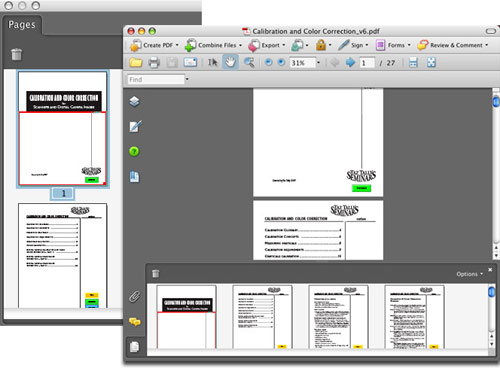
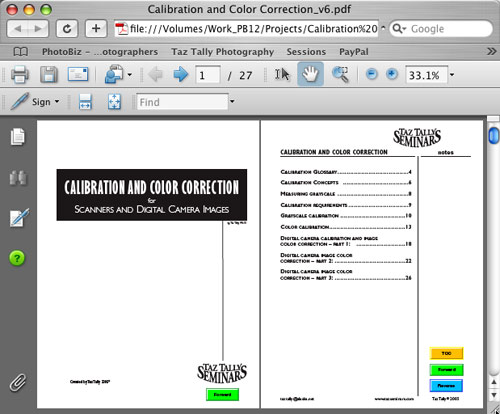
Select File>Open and select a multipage PDF document. Your document page will appear on the right side. Along the left side of your window in the navigation pane, you’ll see a series of icons that represent various options, including (by default) from top to bottom: Pages, Bookmarks, Signatures, How To, Attachments, and Comments. These icons replace the tabs from previous versions of Acrobat. The presence of the How To icon replaces the Help palette that used to appear when you selected it from the Help menu. Click on the top icon to see the Pages panel shown here.
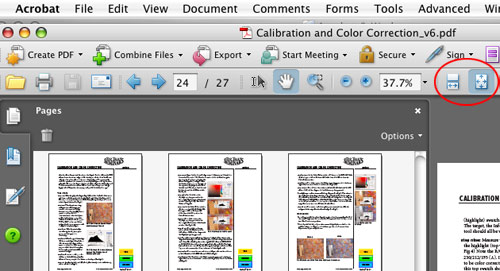
STEP 3 Enlarge the Pages Panel and Navigate
Move your cursor just past the right side of the Pages panel until your cursor becomes a double-line icon. Now click-and-drag with this icon to the right to expand the dimensions of the Pages panel. The number of page thumbnails visible in the Pages panel will increase, and the dimension of the document pane will automatically contract. You can use your Up and Down Arrows keys to navigate through either the Pages panel or document pane, and you can use Tab and Shift-Tab to navigate through a document page.

STEP 4 Accessing Menu Options and Tools
Controls for your PDF documents are now accessed either through the Acrobat menu bar located at the top of the Acrobat work area, or through Acrobat toolbars located below the menu bar and above the currently active Acrobat window. Navigation controls are located by default in the second row of toolbars. Gone are the duplicate navigation tools that were present at the bottom of the window. Click on the page display icons located to the right of the Select & Zoom toolbar to control whether your PDF pages will display individually or continuously.
STEP 5 Control What’s Visible
To close the navigation pane, click on either the currently open panel icon (here the Pages panel) or on the X at the top-right of the open panel, or type F4 (View>Navigation Panels>Hide Navigation Pane). To hide the Acrobat menu bar, select View>Menu Bar (type Shift-Command-M [PC: Shift-Ctrl-M] to bring it back). To control which toolbars are visible, select View>Toolbars and choose a toolbar from the list. To hide all currently visible toolbars, select View>Toolbars>Hide Toolbars (or faster, press F8). To control which navigation panel icons are visible, select View>Navigation Panels and then select the navigation panel of your choice.

STEP 6 Use Reading and Scrolling Mode
Acrobat 8 offers a very spiffy reading mode. To activate the reading mode, select View>Reading Mode (Command-Control-H [PC: Ctrl-Option-H]). This will hide all the currently visible toolbars and panels to create an uncluttered, reader-friendly window. You can then scroll through the document manually or Select View>Automatically Scroll (Command-Shift-H [PC: Ctrl-Shift-H]) to have Acrobat scroll through the document for you. Automatic scroll mode works without being in the read mode as well. Use the Up and Down Arrow keys to control scroll speed and direction.

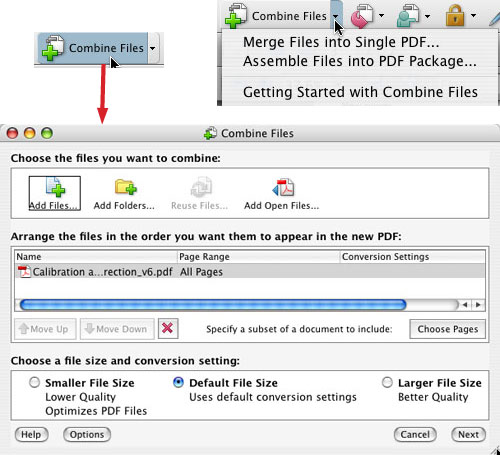
Step 7 Multiple Options in the Toolbars
Toolbar options can be accessed in several ways. Some toolbar items, such as Combine Files, contain two parts: a button and a pop-up menu. Click once on the button to activate a separate dialog containing choices and controls for that item. To access more specific controls or to access the Getting Started dialog for that toolbar item, simply click once on the pop-up menu (the down-facing arrow). This same menu can also be activated by clicking-and-holding on the toolbar button.
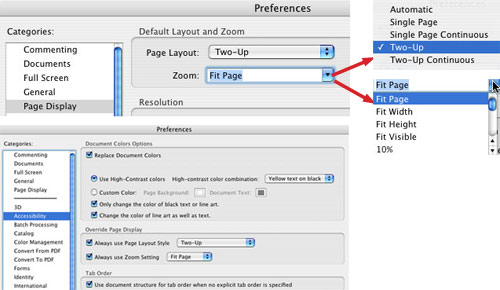
Step 8 Customize Your Default Page Display
You can customize the default page display, zoom level, and color of your PDF documents. To set your page display mode, select Acrobat (PC: Edit)>Preferences and select the Page Display category on the left. Click on the Page Layout pop-up menu and select the view mode you prefer. If you often view documents with facing page, you can choose one of the Two-Up modes. To control the default zoom view, click on the Zoom pop-up menu and select one of the views. If you initially like to see the entire document page, select Fit Page. You can control the colors used for your background and text from the Accessibility category on the left.
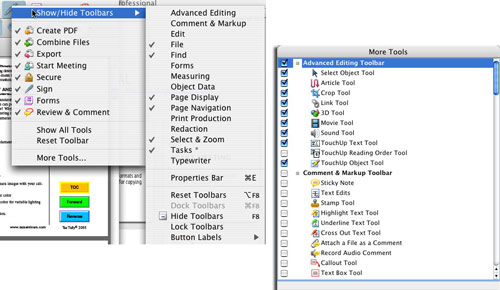
Step 9 Choose Your Most-Used Tools
You can quickly adjust which toolbars are displayed and which specific tools are active within each toolbar. Control-click (PC: Right-click) on any tool in a toolbar (here the Sign tool) to activate a tool access pop-up menu. Now select Show/Hide Toolbars at the top of the list and choose the toolbar you would like to access. If you would like to configure the tool content of two or more toolbars, select More Tools from the bottom of the contextual menu. Now check all the tools and toolbars you would like to have active.
Step 10 Control Placement of Navigation Panels
Navigation panels, like tools, can either float or be docked. To float a navigation panel, simply drag its icon over the document pane and release the mouse button. To re-dock a floating panel, drag the floating panel by its name tab onto the navigation pane. Navigation panels can also be oriented either horizontally or vertically. To change a vertically oriented panel to a horizontal orientation, simply drag the panel icon down to the bottom of the navigation pane area. Similarly, drag horizontally oriented panels to the top of the navigation pane to orient them vertically.
Step 11 Split the Screen for Multiple Views
Your document pane can be split into two or four panes. Select Window>Split (or click just above the active area on the vertical scroll bar) to create a dual pane view of any document page. A different page can be shown in each pane, and each pane can be scrolled and zoomed separately. Click-and-drag the horizontal splitter bar to control the dimensions of the windows. To return to a single pane, either click on the area between the two panes or select Window>Remove Split. Select Window>Spreadsheet Split to create four resizable document panes.

Step 12 Open PDFs in Your Web Browser
PDF documents can be opened in a variety of applications, including your Web browser. Once you install Acrobat 8, launch your browser and select File>Open. Locate and select the PDF you want to access. You’ll be able to open a PDF document, either across the Internet or from your internal or network drive, and have a similar navigation interface to what you have when you open the PDF directly in the Acrobat 8 application. The location of the PDF will be indicated in the URL address window of your browser. Acrobat 8 navigation tools will appear in a toolbar beneath your browser menus.
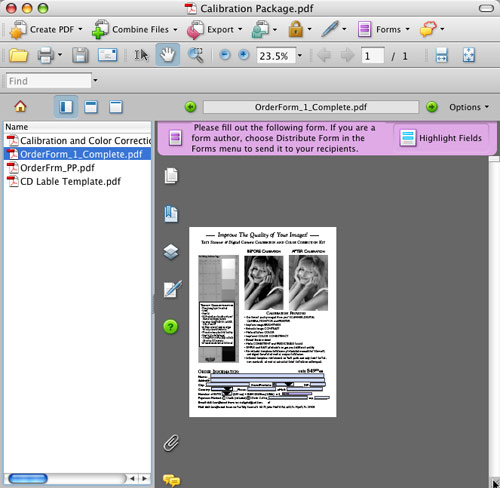
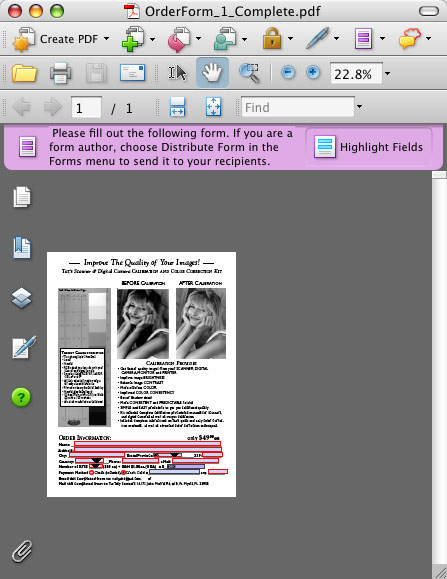
Step 13 Read the Document Message Bar
Certain types of PDFs, such as PDF forms (shown here), PDF documents with security restrictions, and PDFs that are intended for review, will provide a message bar that contains information and/or instructions pertaining to that document. The document message bar has a colored background and is located directly above the navigation and document panes. An icon for this message bar also appears at the top of the navigation pane. This message bar can be displayed and hidden by clicking on its icon. Click the Highlight Fields button to indicate the interactive areas of the PDF.
Step 14 Viewing Packages
In Acrobat 8 you have the ability to combine a group of related PDF documents into a PDF Package. In PDF Packages, each PDF document retains its own separate identity and structure, while it’s bundled together with other PDF documents. When you open a PDF Package, each document is listed in a panel to the left of the navigation pane. You can control how this list is displayed by clicking on one of the three list options icons, or you can view information about the whole package by clicking on the Cover Sheet icon on the far left.