Creating Vector Grunge Artwork in Adobe Illustrator
Something interesting has happened lately. Recently, I performed a search on iStockphoto.com and found that many of the most popular downloaded files weren’t just photos—they were illustrations that had this vector grunge look to them. It’s a mix of vector artwork and a photo that totally changes the look and feel of the image. In this tutorial, we’ll show you how you can create that type of look in Illustrator.
STEP 1 Create New Document; Drag Out a Spiral
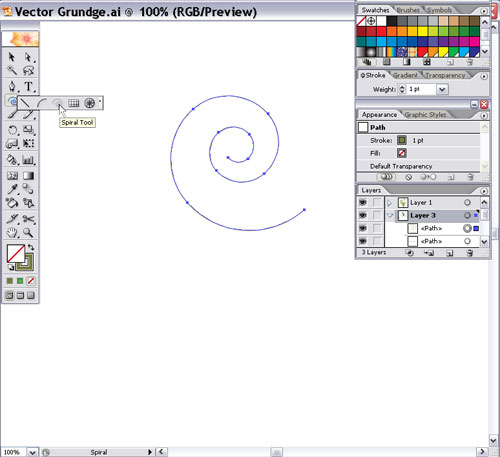
Open Illustrator and choose File>New to create a new RGB document. Select the Spiral tool (it’s in the same slot as the Line Segment tool in the Toolbox). Click-and-drag on the Artboard to create a spiral. As you drag, press the Down Arrow key to reduce the number of spiraling rotations inside the shape. Set the spiral’s Fill color to None and the Stroke to R:117, G:122, and B:64.

STEP 2 Apply Flat Brush to Stroke
Choose Window>Brushes to open the Brushes palette. At the top of the palette, click on the 6 pt Flat brush to apply it to the spiral. This should make the stroke appear to be thicker in some places and thinner in others.

STEP 3 Make a Triangle
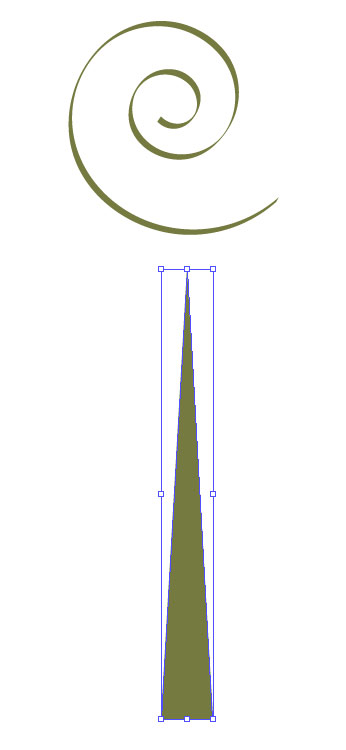
We just created the spiral that will be added to the top of the tentacle shape we’ll create next. To create the tentacle shape, select the Polygon tool and click once on the Artboard to create a polygon. In the Polygon dialog that appears, enter 300 pt for the Radius and change the number of Sides to 3 to make a triangle. Click OK to create the shape. Set the Fill color to R:117, G:122, and B:64.

STEP 4 Change the Horizontal Scale
Choose Object>Transform>Scale, then select Non-Uniform and change the Horizontal setting to 10%. Click OK to make the triangle thinner.

STEP 5 Apply a Twist to the Triangle
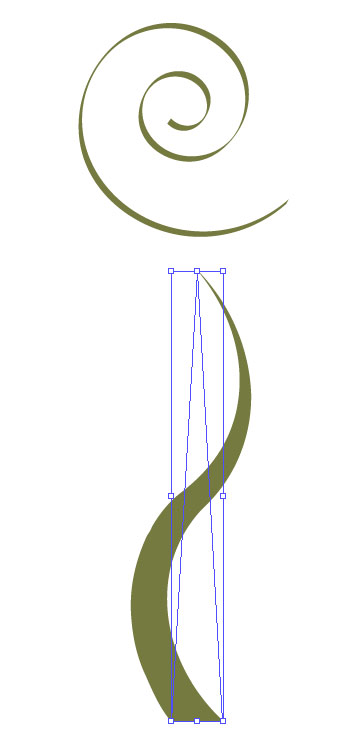
Now go under the Effect menu and choose Distort & Transform>Twist. Enter 50° and click OK to twist the triangle shape so it looks more like a curved tentacle.

STEP 6 Join the Shapes
Choose the Free Transform tool (E). Rotate both the tentacle and the spiral object until they appear to be one shape. It’s best to place the tentacle shape first and then rotate the spiral shape so it appears to continue from the top of the tentacle. Don’t forget that you can resize the shapes as needed to make them fit together better. Finally, if the tentacle shape doesn’t appear to intersect perfectly with the spiral, it’s okay. By the time you place these objects with all of the surrounding artwork you won’t notice it.

STEP 7 Add More Shapes
Using the Selection tool (V), select both shapes. Press Command-G (PC: Ctrl-G) to group the two shapes together so you can move them around as one object. Repeat the previous steps to create a few of these shapes with various sizes. If you really want to speed things up, just copy-and-paste parts of the original shape to other tentacles. Resize them, put them at different angles, and rotate them to make it appear more random. Finally, be sure to use different colors. We used a combination of R:147, G:154, and B:80 for some and R:191, G:207, and B:48 for others.

STEP 8 Create New Layer; Switch Layer Order
Great, now it’s time to work on the background. Click the Create New Layer icon at the bottom of the Layers palette to create a blank layer (Layer 2). Drag this layer below the original layer (Layer 1) holding the shapes we’ve created so far. Finally, click in the empty space to the right of Layer 1’s Eye icon to lock the layer so you don’t inadvertently change any of those shapes.

STEP 9 Load Watercolor Brushes
Next we’re going to create a grungy look for the background. With Layer 2 selected, set your Fill color to None and your Stroke color to a light green (we used R:159, G:201, and B:111). Then in the Brushes palette, click the small right-facing arrow at the top right to display the palette’s flyout menu and choose Open Brush Library>Artistic_Watercolor to load that brush set.

STEP 10 Paint Random Brush Strokes on Background
When the Artistic_Watercolor brush palette appears, select the very last brush in the list (Watercolor Stroke 6). Press B to select the Brush tool. Choose Window>Stroke to open the Stroke palette and set the Weight to 5 pt. Then click-and-drag on the background across the image to create a brush stroke. Continue doing this until you fill the background with a nice, random texture. Tip: Experiment with the stroke weight and the brush choice for some different effects.


STEP 11 Load Ink Brushes
Now go back to the Brushes palette and click the flyout menu again. This time choose Open Brush Library>Artistic_Ink from the list to load that brush set. Then select the Ink Splats brush (fifth from left) from the palette that appears.

STEP 12 Add Ink Splats to Background
Leave your Fill color set to None and set your Stroke color to white. Drag a few quick strokes across your image to further add to the grunge effect.

STEP 13 Use Other Brushes to Add to Randomness
Experiment with a few different colors as well as splatter brushes to get some nice, grungy, random effects. We used R:179, G:198, and B:151 for some and R:121, G:137, and B:93 for others. We also switched to the Ink Spatter 1 and Ink Splash brushes to change things up.

STEP 14 Save .ai File; Place in Photoshop
The last step is to put this drawing on top of a photo. You can import a photo directly into Illustrator or work in Photoshop. I’m a Photoshop junkie at heart, so I saved this image as an .ai file by choosing File>Save. Next, open Photoshop and with your photo open, choose File>Place. Find the .ai file you just saved and place it into your Photoshop document. Then, use the Move tool (V) to move it into place. We also changed the blend mode of the vector grunge layer to Multiply to make it interact with the background more.


