
Acrobat provides many ways for navigating a PDF document. For instance, you can construct a PDF with automatic style sheet-based links within your PDF. But often this isn’t done. Here’s a simple and straightforward method for adding useful Table of Contents (ToC) navigation to your PDF documents.
1 OPEN A PDF FILE
Open a multipage PDF file that contains a ToC and sequential page numbering. It’s helpful but not an absolute requirement that your document ToC lists page numbers, or even has page numbers. In fact, if your document or ToC lacks page numbers, the links you’ll create become even more important because no page number guides are required. We’re going to use a 25-page color-correction manual for this tutorial. Manuals are particularly good candidates for ToC links because readers are often looking for a specific set of instructions rather than having to read the entire manual.

2 LOCATE THE TABLE OF CONTENTS
Navigate to the ToC page (in our example page 2) and zoom in on the table of contents copy. Zooming in will make the placement of your navigation buttons easier and more accurate. Depending upon the dimensions of your document page, the number of ToC entries, and the point size of the ToC text, you may want to zoom in to the top half—or even tighter—on this area of the page.

3 DETERMINE NAVIGATION LINK LOCATION
Our approach here is to place internal hyperlink buttons on the ToC page that will link to individual document pages. Evaluate the layout of the ToC document page to determine where you’d like to place the active link buttons. You can create a link button directly on top of the copy, over part of the copy (such as over the page number), or completely off to one side. Here we’ll place the links to the right of the ToC copy in the column labeled “Notes,” which we can change to “Links” using Adobe Acrobat’s text editing tools.

4 PLACE ADVANCED EDITING TOOLS
Choose Tools>Advanced Editing>Show Advanced Editing Toolbar to display the advanced editing tools. Although you can certainly choose individual tools, such as the Button tool, you’ll find it far easier and faster to have all the advanced editing tools handy in their readily accessible toolbar. You can leave your advanced editing toolbar as a floating panel that you can move around, or you can dock it to one side of your page by clicking-and-dragging the toolbar to the edge of the document.

5 SELECT YOUR HYPERLINK TOOL
Mouse over to the Advanced Editing toolbar and click the Button tool, which we’ll use to create a hyperlink button. (Note: Other tools, such as the Link tool [also in the Advanced Editing toolbar], can be used to create internal hyperlinks but I chose the Button tool for this tutorial because of its wider range of formatting and action options. Once you’ve completed this tutorial, however, I encourage you to try the Link tool, as well. It’s similar to the Button tool, so setup will be fairly intuitive.)

6 CREATE FIRST HYPERLINK BUTTON
With your Button tool selected, drag a rectangle around the area where you want to create your first button link. A blue selection rectangle and coordinate lines become automatically available to help you place your button. Don’t worry too much about the button’s precise size and location because you can easily edit it at any time by activating the Select Object tool (it’s automatically activated after you use the Button tool) and dragging any of the rectangle control points to change its dimensions, or by dragging the middle of the button to alter its location.

7 NAME YOUR BUTTON; OPEN PROPERTIES
Once you release the mouse from drawing your initial button, a Field Name dialog appears. Type in a name for your button: “Navigate to Page 4.” (You can change this name via the Properties dialog.) Click Show All Properties located in the lower-right corner of the Field Name dialog. (Tip: You can also access the Show Properties dialog by Right-clicking on the link button with the Select Object tool and selecting Properties from the menu.)

8 ASSIGN APPEARANCE PROPERTIES
Click the Appearance tab to assign text and border properties. We chose the Helvetica Bold font, which allows for easy readability. Next, click on the Text Color swatch and select a color from the flyout menu—we used white. For the Border and Fill Color, we chose black. And finally, assign a Line Thickness (Thin) and a Line Style (Solid). Tip: Pick a point size large enough to read but also leave a nice border around the copy. You may want to adjust the dimensions of your button rectangle and type to suit each other also.

9 BUTTON OPTIONS
Under the Options tab, click the Layout drop-down menu and choose Label Over Icon to control the relative arrangement of the icon and label elements. In the Label field, type your label copy (“Press to go to pg 4”). Click the Choose Icon button to locate and place a graphic (we created our button in Photoshop). Click OK. Tip: Select an icon graphic that can be nonproportionally scaled without appearing distorted, such as the beveled-edge button shown here. This provides flexibility in your button’s dimensions and saves lots of icon editing time.

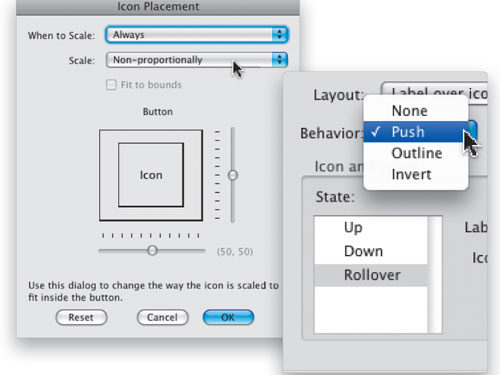
10 FINE-TUNE APPEARANCE OPTIONS
To control the scaling of your icon, click the Advanced button. In the Icon Placement dialog, choose Always from the When to Scale drop-down menu, Non-proportionally for Scale, and click OK. This allows the graphic to fit easily into the button dimensions, even when its dimensions are changed. Finally, to fine-tune your button behavior, in the Button Properties dialog, choose Push for Behavior and Rollover for State.

11 START BUTTON ACTION SETUP
Click the Actions tab to activate the hyperlink control settings. Choose Mouse Down from the Select Trigger menu and choose Go to a Page View from the Select Action menu. Notice the variety of choices in the Select Action menu so you can initiate many actions with a button like this. Here, we’re using our button to create an internal hyperlink to a specific page in the document.

12 FINISH BUTTON ACTION SETUP
Now, click the Add button and navigate to the page (page 4) where you want this hyperlink to acquire. Then choose View>Zoom>Fit Page to bring up full-page view. Once you’ve navigated to page 4, click the Set Link button in the Create Go to View dialog. Note: Be sure to navigate to the page and view that you want before clicking the Set Link button. Now go back to the ToC page, double-click on your button to open the Button Properties dialog, and the Actions panel will be highlighted. Review and confirm the button action you’ve created.

13 SET THE GENERAL TAB
If you want to rename your button or provide a tool tip, click on the General tab. What’s a tool tip? It’s the message that appears when someone rolls their cursor over the top of the button and pauses for a moment. You can also assign Common Properties, such as Form Field and Orientation. Here, we’ve added the Tooltip: “Press this button to navigate to Page 4.” Click Close. Now, choose the Hand tool and click on your button to try out your new hyperlink!

14 CREATING ADDITIONAL BUTTONS
To create additional buttons for each ToC link, you don’t have to start from scratch. You can duplicate this first button and adjust the name, label copy, and go to page link for each additional ToC link. Here’s how: Choose the Select Object tool and press the Option (PC: Alt) key while you drag your current button to create a duplicate copy. And, if you hold down the Shift key while you drag your original button, your new button will remain directly under the original. Double-click the new button to open the Button Properties dialog, and make your changes. Voilà, ToC-based links!

ALL IMAGES BY TAZ TALLY UNLESS OTHERWISE NOTED
