
Create a Splash Animation with Adobe After Effects
Designing small, quick intro identities needn’t be a laborious process. In fact, armed with some clever techniques and careful planning, you can create very unique IDs in a very short space of time. We’re going to create a small, simple splash animation for a fictitious film production company, using expressions to drive the main animation. However, the finishing touches come from clever use of the 3D camera depth of field setting and a little magic from my old friend—the wiggle expression!
The specs for this project are an NTSC square pixel composition (720×540), 29.97 frames per second, 6 seconds long, with a background color of black, and named “Focus Titles.”
STEP 1 Create Gear Elements
As always, we need to start somewhere—and here, we start by creating some “gear” elements in Illustrator to use in After Effects. Using concentric circles with alternating fills and then adjusting a rectangle and rotating copies of that rectangle at 30° increments around a radius, gear shapes can be created quickly and easily. Be sure each gear design has the same number of teeth—in this case, we’ve used an even 12 per gear. Make sure that each gear is on its own named layer, then save a native Illustrator file (Gears.ai in this example) ready to import to After Effects.


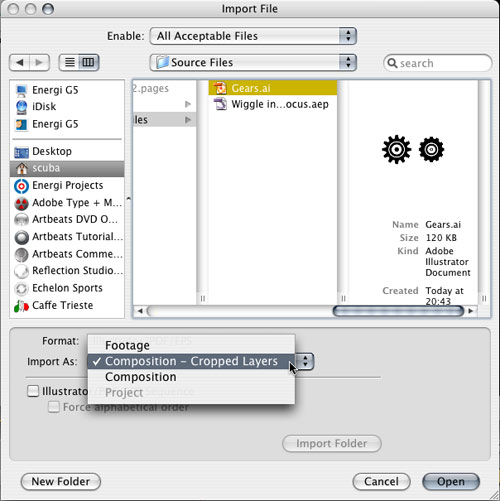
STEP 2 Import Elements; Change Background Color
Now in After Effects, double-click inside the Project panel to bring up the Import File dialog and locate the Gears.ai file. Select it, then from the Import As pop-up menu in the lower part of the dialog, choose Composition – Cropped Layers. Click Open and a new Gears comp will appear in the Project panel. Double-click its icon to open it. Press Shift-Command-B (PC: Shift-Ctrl-B) to access the Background Color option, and change it to white for now.
STEP 3 Adjust Comp Size; Animate First Gear
Press Command-K (PC: Ctrl-K) to access the Comp Settings, and change the size to NTSC D1 Square Pixels to match the comp you began with (Focus Titles in this example). To ensure high-quality rendering later on, click the Continuous Rasterization switches for both gear layers in the Timeline. Then, select the Gear 1 layer and hit R to reveal its Rotation property. At 0 seconds on the Timeline, click the Stopwatch for Rotation to add a keyframe, then at 1 second along, change the value to 1 x +0.0° to ensure 1 complete rotation in 1 second.

STEP 4 Adjust Second Gear
Now select the Gear 2 layer, hit S, and adjust the Scale value to suit your design requirements (if necessary). Then, drag the gear in the Comp window so one of the teeth of Gear 1 “bites” into one of the spaces of Gear 2. Hit R to access its Rotation property. We now need to animate its rotation to go in the opposite direction to the first gear. If we use keyframes for this and end up with perhaps 100 gears, that’s a lot of adjusting if the timing needs to be changed. Instead, let’s use a very simple expression.

STEP 5 Add Rotation Expression
Making sure Gear 1’s Rotation property is still visible in the Timeline, hold down Option (PC: Alt) and click on the Stopwatch for Gear 2’s Rotation property, and an expression field will appear in the Timeline. Select the Pick Whip tool in the Expressions Tools panel, and drag it to point at Gear 1’s Rotation property. This will copy the movement from Gear 1 to Gear 2, no matter how many adjustments we make! However, if you press the Spacebar to preview a few frames, you’ll notice they both go the same direction.
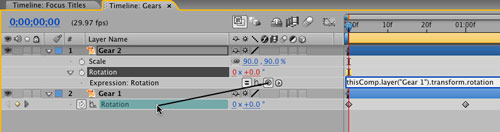
STEP 6 Edit Expression
In order to make the second gear go in the opposite direction to the one driving it, we simply add a calculation to the expression. Click back on the expression field to activate it, then click at the end of the script (after .rotation), type *-1, and press Enter when done. If you play the Timeline now, you can see that for every degree of clockwise rotation Gear 1 makes, Gear 2 rotates one degree in a counterclockwise direction. Perfect!

STEP 7 Rinse & Repeat
Select Gear 1 in the Timeline, and press Command-D (PC: Ctrl-D) to duplicate it. Gear 3 will now appear. Drag it to the top of the Timeline. Hit R to show Rotation, then click the Stopwatch to turn off the duplicated keyframes. Run through Steps 4, 5, and 6 again on Gear 3 to position and scale it as you desire, pointing Gear 3’s Rotation expression to Gear 2’s Rotation value, remembering to add *-1 to ensure it rotates in the opposite direction. Using this technique, you can build an entire chain of rotating items, all driven by those two keyframes on the first gear!

STEP 8 Nest 3D Composition; Adjust Fill Color
Close the Gears composition down and return to the original 720×540 comp (Focus Titles in this example). Drag the Gears comp from the Project panel to the Timeline to nest it in the original comp, and click the 3D Layer switch for that layer. In order to see the gears on the black background, go to Effect>Generate>Fill, and in the resulting Effect Controls panel, click the color swatch and select a beige color instead.

STEP 9 Add 3D Camera; Adjust Position; Rotate Layer
Making sure you’re at 0 seconds on the Timeline, go to Layer>New>Camera. In the dialog, choose 20mm from the Preset menu and click OK. Select the Gears layer, hit R to reveal its 3D Rotation properties, and on X Rotation, change the value to –90°. Select the Camera layer, hit P to access its Position property, and set the X, Y, and Z values to 150, 120, and –400, respectively. This nicely positions the camera above the flat gears layer, looking down on them.
 ]
]
STEP 10 Add Text Title; Adjust 3D Y Axis
At 0 seconds, go to Layer>New>Text to create a text layer in the center of the comp. Enter the company title you wish to use, then use the Character palette to adjust the font, size, and tracking to suit the design. When done, go back to the main Selection tool, then click the 3D Layer switch for the text layer. In the Comp window, drag the green arrow to pull the text up above the gears, to about 215 pixels on the y-axis (you can use the layer’s Position values to check this if you wish).

STEP 11 Activate Depth of Field; Adjust F-Stop
Double-click the camera layer to access the Camera Settings dialog, and turn on Enable Depth of Field. Click OK. Notice any changes? Probably not—the default settings for depth of field are very weak. Double-click the camera again, and set the F-Stop to 1.0. Using such a tight F-Stop setting really introduces depth of field. Click OK, and you’ll notice that almost everything went out of focus—perfect! The reason for this is that the Focus Distance for the camera is 1000 pixels away from its position, yet it’s only about 400 away from our gears and logo, so we’re looking too far ahead.

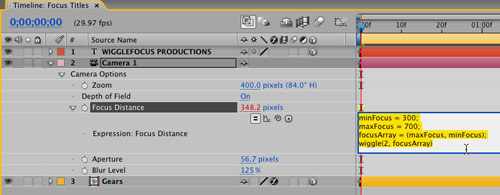
STEP 12 Adjust Focus Distance; Increase Blur Level
With the camera selected, press AA (A key twice, fast) to reveal the Camera Options in the Timeline. Adjust the Focus Distance to 375 pixels, and most of the front area of the logo now sits in a focused plane. Just for good measure, let’s also set the Blur Level to 125% to add a bit more. Now the focus is good in the foreground, blurred in the background—but it’d be cool to add some random focusing to this instead of keeping it static.

STEP 13 Add Wiggle Expression
We can use an expression to randomize the Focus Distance, but we need to limit the variation and keep the numbers within a reasonable range. For this, we’ll create an array and use it in a wiggle expression. Hold down Option (PC: Alt) and click the Focus Distance Stopwatch to create an expression, then in the expression field, type the following, remembering to hit Enter when done:
minFocus = 300;
maxFocus = 700;
focusArray = (maxFocus, minFocus);
wiggle(2, focusArray)
STEP 14 Finalize Animation
The above expression tells After Effects to vary the Focus Distance with a minimum of 300 and maximum of 700, combined into an array, twice per second. If you want to increase or decrease the speed of the focal changes, simply adjust the number 2. Feel free to go back into the Gears comp and drag the second Rotation keyframe for Gear 1 further down the Timeline to slow their rotation down. Add whatever finishing touches you would like to complete your animation—and use these techniques in the future to assist you in fast and cool identity design. Enjoy!

