
In Part 2, I talked about creating spread layouts and tweaking them to look the way you want them to, plus some tips on the best ways to view and navigate while building your books. Now, we're going to learn how to make the whole book-creation process much faster and easier by creating our own custom Auto Layout panel presets.

Using the Auto Layout Preset
Lightroom comes with a few built-in presets for automatically laying out your book, and you can find those in the Auto Layout panel. Just click to the right of the word "Preset" and a pop-up menu appears. Here, you can see the built-in presets in the list, plus a few custom ones I created. To create your own Auto Layout presets, choose Edit Auto Layout Preset at the bottom of the menu (as shown here).

This brings up the Auto Layout dialog you see here. By default, it starts by applying one of the presets and it shows the Left and Right Pages layouts, but remember this is just a starting place and all of this is completely customizable (which is why we came to this Auto Layout Preset Editor dialog in the first place). You can pretty much ignore the left and right layouts that are there because we're going to create our own.

Let's say we want to create a fine art-style layout with text on every left page (where we can tell our story), and then a single square photo on the right page. We'll start in the Left Pages section. To choose a different layout, click on the pop-up menu and choose Fixed Layout to access more options. In the pop-up menu that appears below, you can choose how many photos you want to appear on all your left pages. In our case, we want just text to appear on all our left pages, so choose Text Pages from the menu (as shown here).

When you choose Text Pages, it loads that left side window with the Text Pages templates. There are only four, so there's not a whole lot of great choices here—click on the one that's a full page of text. (Note: We'll have the option of how we want to actually format this text later by going to the Type panel, where we'll probably set the text to centered, which looks good as long as you keep your description short and sweet.) Once you've chosen the text template for the left side, go to the Right Pages, choose 1 Photo from the pop-up menu, and the one-photo templates will appear in the window below. Scroll down to the square template (sixth row down on the left).

Formatting Text
At this point, if we went ahead and saved this as a custom preset (don't actually do that though) and applied this Auto Layout to our book, here's what the pages would look like throughout our book with text on the left and one square photo on the right (of course, there would be a different photo on each page). By default, the text would be up in the top-left corner and formatted differently as you see here, but as I mentioned in the previous step, you can format the text to look the way you want it to. In the Type panel, I changed the font; centered the text both horizontally and vertically by clicking the Align Center and Vertical Align Center icons at the bottom of the panel; then added some Tracking and Leading (space between the two lines of type) to add a little elegance. Then I typed my own text, which is pretty much what you'd do to all your text pages. (Note: If you don't see all the options in the Type panel as shown here, click on the little wedge to the right of the Character color swatch.)

Tip: If you went with a text-only, left-page layout like this, once you've formatted the text, you can save time by copying-and-pasting that nicely formatted text onto the next page. It will retain the font you chose, the center justification, font size, tracking, leading, and pretty much everything else except (for reasons I cannot begin to imagine) it doesn't retain the vertical spacing (it puts your text up at the top again), so you'll have to click the Vertical Align Center icon at the bottom right of the Type panel. Even with that, it's a huge timesaver over manually formatting each page of type.

Random from Favorites
Back to the Auto Layout Editor dialog. While we're here, there are a few other options I want to point out. If you don't choose a Fixed Layout (a specific template), you can have Lightroom choose a random layout for each page by choosing Random from Favorites from the pop-up menu. Of course, this only works if you've added some of your favorite templates to your Favorites list. If you don't have any saved favorites yet, go to the Page panel, and click on the down-facing arrow on the right side of the panel to reveal the page templates. Click on a category in the list at the top of the pop-up menu and then scroll to a page template that you like. Right-click directly on that page's thumbnail, and a contextual menu appears with Add Layout to Favorites (as shown here). Click on that and now you have a favorite for the Random from Favorites in the Auto Layout panel. If you only have one favorite, it's not going to be real random now, is it? So, save a few of your favorites, and now you'll know that when it does choose a random layout, at least it will be one you really like. By the way, even if you choose Random from Favorites, you still get to choose how many photos you want on each page by one of the checkboxes that appear, so it does narrow things down a bit when you make that choice.


If you want both the Left and Right Pages to have the exact same layout, just set up either side (left or right), and choose Same as [Left or Right] Side from the pop-up menu at the top of the other page.

Make and Save a Custom Preset
Let's start from scratch, build on it, and save it. From the Left Pages pop-up menu, choose Fixed Layout, then select 3 Photos from the next pop-up menu. When those templates appear, choose the one with two vertical photos on the left and one larger photo on the right. Then, for the Right Pages, choose one large square photo layer (as shown here). Now go up to the very top center of the dialog, click on the pop-up menu, and choose Save Current Settings as New Preset.

This brings up a dialog where you can name your preset. I recommend naming your preset with a short, descriptive name so weeks or months down the road, it's easy to figure out what you'll get when you choose this Auto Layout. I named mine "3 Left, 1 Sq Right." Short and descriptive. When you've named your layout, click Create, then click Done to close the Auto Layout Preset Editor dialog.

Apply the New Auto Layout
Go to the Auto Layout panel. First, click on the Clear Layout button to remove any presets that already had been applied (this gives you a book with all empty pages). Now, from the Preset pop-up menu, choose the custom preset you just created (3 Left, 1 Sq Right).

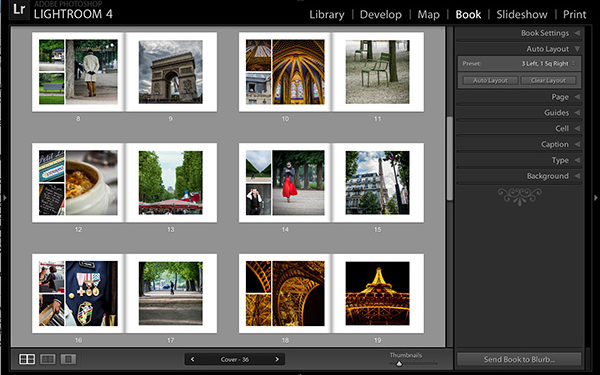
Now click the Auto Layout button and in a split second, your book is created with the photos from your collection already in place, with three photos on the left pages and one square on the right. It automatically makes the proper number of pages to match how many images from your collection. To adjust the horizontal or vertical position of any photo, click directly on the photo, and drag it left or right, up or down until it appears in the cell the way you want it.
You can also click-and-drag images between cells, so if the most important photo on the three-photo page didn't appear as the large photo, you can drag it from the small vertical cell on the left to the large cell on the right. You can also click-and-drag an image from the left page to the right page (and vice versa) and, of course, you can drag from the Filmstrip up onto any cell on any page. So there you have it: the power of creating your own custom Auto Layout presets.

In Part 4, I'll cover how to work with captions and more about working with type, including how to create type for your cover. See you back here. Cheers.
This article originally appeared in Lightroom Magazine published by KelbyOne.com.
