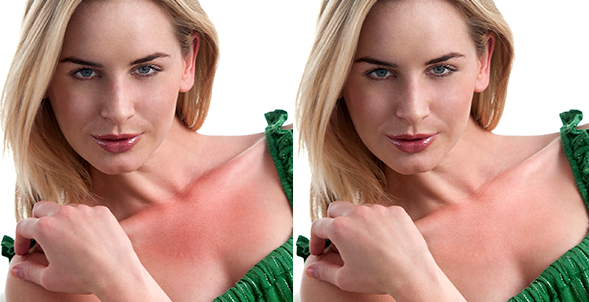
You're definitely going to run into situations where your subject has a patch of skin, maybe on their arm, or back, or leg, that is either brighter or darker than the surrounding skin. So, we should do a quick retouch to balance those areas before we start any kind of skin softening or smoothing. You don't want to spend a lot of time on this, but if you can get the skin tones in these areas closer in just 60 or so seconds, it makes things easier down the road. Luckily, it's a very quick and easy technique.
Step One:
Here's the image we want to retouch, and if you look between our subject's collarbone and her chest, you'll see a large area of skin that's darker than her surrounding skin. Ideally, we'd like to balance these areas of skin before we do any skin softening or enhancing.
Step Two:
Get the Lasso tool (L) and trace right around that darker area (as shown here). Try to keep your selection pretty darn close to that area, but don't spend a lot of time making it exactly perfect, because you're going to add a huge feather to the edges that will make up for not having a perfect selection, but you should at least try to get close. Now, go under the Select menu, under Modify, and choose Feather. When the dialog appears, enter 10 pixels if you selected a smallish area, or 20 pixels if it's a larger area, like the one we have here.
Step Three:
Now, click on the Create New Adjustment Layer icon at the bottom of the Layers panel and choose Curves from the pop-up menu. Notice that your selection is already masked out on the Curves adjustment layer mask.
Step Four:
Now, don't worry, even if you've never used Curves before, you'll be able to do this. You're going to change the tone of these patches of skin (whether they're too dark, like the ones shown here, or too bright, which is often the case) by adjusting the midtones. So, start by clicking once right on the center of the diagonal line in the Curves graph (shown circled here in red) in the Adjustments panel to add a point to the midtones area of the curve. So far, pretty easy, right? You just click once right in the middle of the line.
Step Five:
All you're going to do now is drag that middle point diagonally up and to the left to brighten that whole darker area. Just drag a tiny little bit, keeping an eye on your selected area as you drag, and with just a little bit of dragging, you'll be able to make that darker area of skin match the surrounding area (this is much easier than you'd think, so make sure you try it for yourself). Also, if the area had been brighter, instead of darker like it is here, you'd drag that center point diagonally down toward the bottom-right corner. Either way, this is usually a very small movement, and to know exactly how much to move, keep an eye on the area of skin you're adjusting. Also, it sometimes helps to move the curve a lot—making it much brighter—and then pull it back down again to match (this is kind of like turning the focus ring on your lens so it goes way out of focus, and then turning it back the other way to snap it into sharp focus. By putting it way out of focus, it makes seeing when it's in sharp focus that much easier. Same thing here).
Step Six:
Now that we've balanced that large area, if you wanted to take it a step further, I see two other remaining parts of that same general area that could use a little more balancing. So, first, in the Layers panel, click on the Background layer. One area is on the right side of her collarbone, so go ahead and trace it with the Lasso tool (as shown here), and then apply a 10-pixel feather. The reason we're only using 10 pixels this time is because the size of the selected area is so much smaller.
Step Seven:
Add another Curves adjustment layer, click on the center of the Curve to add a point to the midtone area, and once again, drag up just a tiny bit until that darker area better matches the surrounding skin (as shown here). You can see, once again, it's just a tiny move of that Curve.
Step Eight:
The last thing I might adjust is those remaining dark areas within that first large area we brightened. Click back on the Back-ground layer, and trace around them with the Lasso tool (select the first area, then press-and-hold the Shift key, and select the second area), add a 15-pixel feather (for medium-sized areas), and add a Curves adjustment layer. Add a point to the center of the curve, and move it just a little bit up, once again, to brighten those areas. Just a reminder: This process should be pretty quick, and you won't do it to every photo, just to ones where a darker or lighter area of skin really jumps out at you. A before and after is shown below.
This is an excerpt from Scott Kelby’s book, Professional Portrait Retouching Techniques for Photographers Using Photoshop.


