

Here are ten great tips to get you started in Lightroom 1.0
T Is for Toolbar
Pressing the letter T on your keyboard hides the toolbar that appears at the bottom of the Preview area, and pressing T again makes it visible. However, if you’d like to hide it temporarily (which is handy for taking a quick, uncluttered look at your photo), then press-and-hold T and the toolbar only hides as long as you have the letter T held down.
Rate Photos Quickly
When applying star ratings to photos in the Library module, if you hold down the Shift key while applying your rating, it will automatically move you to the next photo. So, if you press Shift-4, rather than just 4, it assigns a 4-star rating to the current photo and then immediately brings up the next photo.
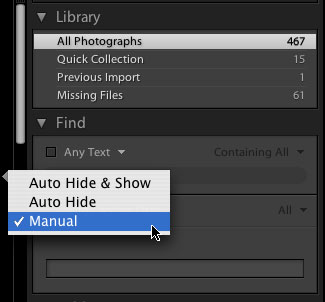
Control Your Panels
Pressing the Tab key hides all the side panels in Lightroom, so your photo(s) are displayed larger onscreen. If you move your cursor over a side triangle where a Panels area used to be, it temporarily pops back out. When you move away from a panel, it automatically hides. But it doesn’t have to be that way. You can configure each Panels area individually, as well as the filmstrip along the bottom and the module picker up top. If you want to turn this “auto-popping” off, you can switch to Manual mode, so when you want a Panels area open or closed, you click the triangle next to it. You can also choose Auto Hide, where you manually open that Panels area, but when you move away from it, the panels automatically hide. To access these options, Control-click (PC: Right-click) on one of those triangles and choose from the pop-up list.
Advertisement
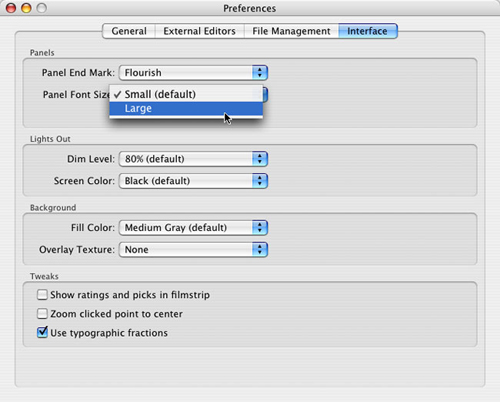
Bigger Text
If the text displayed in the panels seems a little too small for your tastes (and you’re getting tired of squinting), you can change the font size by going to Lightroom (PC: Edit)>Preferences and clicking the Interface tab. Go to Panel Font Size, choose Large, then restart Lightroom, and your panel font size will be significantly larger.
Slide to the Default
To reset any slider back to its default setting, you can double-click directly on the slider knob, but I think it’s easier to double-click directly on the slider’s name instead—it’s a bigger target and easier to hit than that little slider knob.
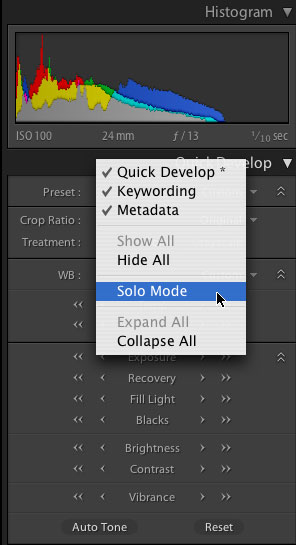
Going Solo
If you want to see only the panel you’re working on and hide the rest, then Control-click (PC: Right-click) on the panel’s titlebar, and choose Solo Mode from the pop-up menu that appears. Now when you open a panel, all the other panels in that Panels area will automatically hide. (You can tell when your panels are in Solo Mode because the disclosure triangles change from a solid fill to tiny gray dots.) You can also turn Solo Mode on and off by Option-clicking (PC: Alt-clicking) on a panel’s name. Note: You can turn this feature on/off for each Panels area.
Remove Clutter
If you don’t use a particular panel, then there’s no reason to have it cluttering up your Panels area, right? So, just Control-click (PC: Right-click) on any panel’s titlebar, and from the pop-up list that appears, choose any panel you want to hide.
Full-Screen Photos
Want to see the photo you’re working on as large as possible? Then press Shift-Command-F (PC: Shift-Ctrl-F). To return to the regular view, press that same shortcut again.
More Than a Badge
You know those tiny icons that appear in the bottom-right corner of your photo in the Library Grid view (Adobe calls those “Badges”)? They let you quickly see what has been applied to the photo (e.g., the Pencil badge tells you that a keyword has been applied to the photo, and the +/– badge tells you that the photo has been edited in Lightroom, etc.). Double-click on any one of those badges, and it will take you directly to the panel where that adjustment was added. For example, if you double-click on the Pencil badge, it opens the Keyword panel and highlights the keyword field. Pretty slick.
Selective Histogram
The Histogram panel gives you the histogram for the entire photo. But, if you want a histogram reading on, say, the face of your subject to make sure the flesh tones have detail, go to the Develop module, click the Crop Overlay button, and drag in the corners to where it’s around just the face. Now the histogram shows you the reading from just what appears inside the crop border. When you’re done, press the Clear button in the toolbar to remove the crop border.
