
Creating a Fireball in Adobe After Effects
Let’s face it: After Effects is amazing. If anyone on this planet would tell you that, it’s me. Anything you want to do, you can do-as long as you know the way to do it. Take one of the sessions I presented at NAB in Las Vegas, for instance: creating a flexible, realistic, 3D fireball for a title sequence, not something After Effects does automatically with a plug-in. People lined up afterward asking, “How did you do that again?” So, for this tutorial, I thought I’d show you how.
For this project, you’ll need the After Effects CS3 Professional Preview available at Adobe Labs. The specs are a square-pixel composition of 800×450 pixels (16:9 aspect ratio but intended for Flash video), 29.97 frames per second, 6 seconds long, with a background color of black, and named “Fireball.”
[Download a QuickTime preview of this project.]
STEP 1 Acquire Fire Video
A quality video clip of real flames looks better and is cheaper to purchase than shooting or creating and rendering in full 3D. I turned to Artbeats Stock Footage and in their Reel Fire 1 collection, the clip named RF108 fits the bill exactly: a single flame source shot on a crisp black background and (believe it or not) seamlessly looping. As you’ll see, a single purchase of this clip would pay for itself tenfold! Once you have your flame clip, double-click in the Project panel in After Effects and import the clip via the Import File dialog.

STEP 2 Adjust Fire Anchor Point; Make 3D Layer
Drag the flame clip from the Project panel into the Timeline at 0 seconds. Double-click the new flame layer in the Timeline to open the clip in a Layer window. Select the Anchor Point icon in the center of the window and, holding down the Shift key to constrain it vertically, drag it down to the bottom of the clip. Close the Layer window tab to return to the Comp window and you’ll see the bottom of the flame is now in the center. In the Timeline, click the 3D Layer switch for the flame layer.

CREDIT: ARTBEATS
STEP 3 Key Flame (Not Keyframe!)
Seeing as we’re going to use duplicates of this 3D “spike” of fire, we need to key the flames out of their black background. Select the flame layer, and go to Effect>Color Correction>Levels. In the Effect Controls Panel (ECP), drag the Histogram’s black slider slightly to the right to darken the background. Then drag the white slider slightly to the left to lighten the flames. Now, go to Effect>Channel>Shift Channels and in the Take Alpha From pop-up menu that appears in the ECP, choose Red to key the flame immediately using its strong red channel.

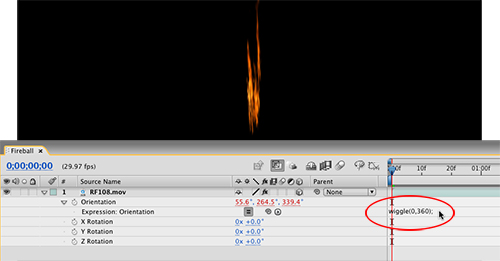
STEP 4 Apply Random Orientation
To create a “ball” of flame spikes, we need to have a series of duplicated 3D layers, all rotated to different angles. Quite a job—unless we use a cool Expression! Select the flame layer and hit R to reveal its 3D rotation properties. Option-click (PC: Alt-click) on the Stopwatch for Orientation (so we can affect all 3 axes at the same time) to add an Expression. In the Expression Field, type the following and press Enter to apply it: wiggle(0,360);
STEP 5 Duplicate Layers
The wiggle expression has told After Effects to randomly rotate the X, Y, and Z axes anywhere up to 360°, but with no movement. This purely sets a random static angle so if we now press Command-D (PC: Ctrl-D) to duplicate the flame layer, each duplicate is rotated to a completely different angle automatically! Continue to duplicate until you have enough flames—in this case, I have a total of 20 layers. Now, we need to scale them to a better size, but not flame by flame.

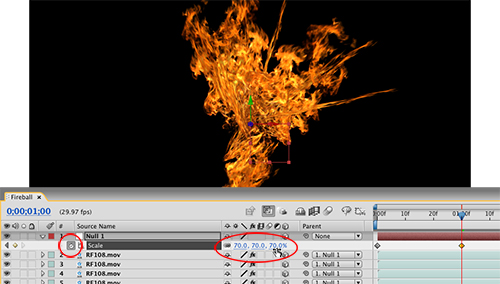
STEP 6 Add 3D Null; Parent Flames
At 0 seconds on the Timeline, go to Layer>New>Null Object. Null 1 appears at the top of the Timeline. Click the 3D Layer switch for it, then make sure the Parent column is visible in the Timeline—if it isn’t, Control-click (PC: Right-click) on the Source Name column and choose Columns>Parent. Select all the layers except for the Null, then click the Pick Whip icon (@) from any one of them, drag it to the Null 1 name, and let go. This parents all 20 flame layers to the 3D Null—we can now animate all the flames by animating one simple Null.

STEP 7 Keyframe Null Scale
Now to make the flames “burst” outwards, select the Null layer and press S to reveal its Scale property. Drag any of the 100% numbers in the Timeline down to 2%, and all of the flames will scale down. At 0 seconds, click the Scale Stopwatch to add a keyframe. Move the Current Time Indicator (CTI) to 1 second, then change the scale value to 70%. If you scrub the Timeline now, the flames will enlarge over that first second, giving us our “burst.”
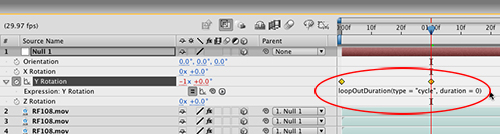
STEP 8 Rotate Null; Add Loop Expression
Back at 0 seconds, press R to show the Null’s Rotation property and click the Stopwatch for Y Rotation to add a keyframe of 0°. At 1 second, change the Y Rotation value to –1x +0.0°. If you preview the first second of animation now, you have more of a spherical set of flames—but they stop spinning at 1 second. So, Option-click (PC: Alt-click) the Y Rotation Stopwatch to add an Expression, and type the text as shown above to tell AE to loop the rotation.
Production Note: Please set the below copy on one line in the graphic box loopOutDuration(type = “cycle”, duration = 0)
STEP 9 Add “Explosive” Text; Add Anchor Point Animator
Let’s add a text title that can also explode with the flames, using the new 3D text option in After Effects CS3. At 0 seconds, go to Layer>New>Text to create a centrally positioned text layer. Add your type and style it using the Character and Paragraph panels. For our letters to rotate correctly in the next steps, twirl down the text layer in the Timeline, and from the Animate pop-up menu choose Anchor Point. Adjust the second value (vertical) to adjust the anchor point to be more central on the first line of text (in our example, 0.0, –14.0).

STEP 10 Add New Animator Properties; Adjust Wiggler
Deselect Animator 1 for the text layer by clicking off its name, then go back to the Animate menu and choose Position—Animator 2 will appear below Animator 1. From the Add pop-up menu next to Animator 2, choose Property>Rotation. Then go back to Add and select Property>Enable Per-Character 3D and also choose Selector>Wiggly. Now, twirl down Wiggly Selector 1 and set Wiggles/Second to 0 and Correlation to around 20%. This again turns on static randomness, but for our text.

STEP 11 Animate Text Explosion
At 0 seconds, click the Stopwatches for Animator 2’s Position, X Rotation, Y Rotation, and Z Rotation values to add keyframes (all values should be 0). At 6 seconds (the end of the Timeline), adjust the Position values (X, Y, and Z) to the far extremes of where you want the letters to explode (in our example, 700, 500, 2000). Next, change the X, Y, and Z Rotation values to spin the letters as much as you want across those 6 seconds (in our case, 30x, 20x, and 5x, respectively).

STEP 12 Add Motion Blur and Frame Blending
Select all of the layers and click the Motion Blur switch on one layer to activate Motion Blur for all of the layers. Click the Frame Blending switch twice on a video layer to turn on high-quality frame blending for all the video layers. If you turn on the Comp Motion Blur (Timeline), there might not be enough blur (depending on your last-used settings). So press Command-K (PC: Ctrl-K), and in the Composition Settings, click the Advanced tab and adjust both the Shutter Angle and the new Samples Per Frame values to increase the blur (respectively 720 and 24 for our example).

STEP 13 Nest Comp; Add Time Remap Keyframes
Now for the Matrix-effect! Close the Fireball comp and in the Project panel, drag it onto the Create a New Composition icon at the bottom to nest it in a new composition. Fireball 2 will now open with the original Fireball comp as a layer. Select that layer and go to Layer>Time>Enable Time Remapping. Go to 1 second along and click the Add Keyframe icon on the far left of the Timeline to add a keyframe at 1 second. Go to 2 seconds and add another Time Remap keyframe.

STEP 14 Adjust Timing
Now for the fun! Select the 1-second keyframe and drag it back to 20 frames—this plays the first second of the explosion faster. Now drag the 2-second keyframe out to 5 seconds—this forces 1 second of time to slow-mo over 4 seconds. Make sure that the comp’s Motion Blur and Frame Blending buttons are activated and render the final result. To make the flames spin faster or the letters explode further, go back to the original Fireball comp and adjust the keyframes. But with this time-remapping effect applied over the top, this technique really does create something cool. Enjoy!

