

The Art of Printing
Acrobat 9 Pro is not only useful for viewing, editing, and manipulating PDF documents, but it also offers a sophisticated, full-featured print capability. With Acrobat Pro you have the ability to print everything from simple composite RGB to your desktop inkjet to full color-separated, commercial print documents with printer marks.
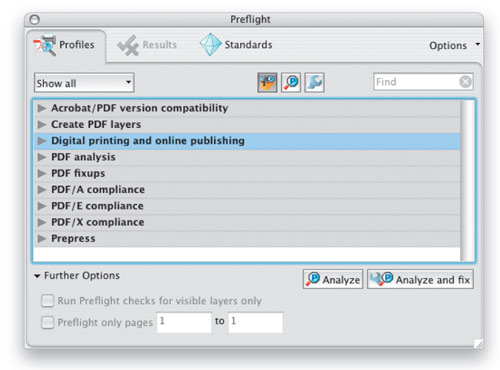
1 PREFLIGHT BEFORE PRINT
Prior to activating the print dialog in Acrobat, it’s well advised to perform a preflight on your PDF document to determine its print dimensions and quality of content. You’ll want to determine content characteristics, such as the color space and linear resolution of any placed images; the number of assigned print colors, including spot colors; any color profiles that have been assigned; the printability of items, such as vector paths; and the presence of any printer’s marks you may want. (For more details on preflighting, see “Customize Preflight Profiles in Adobe Acrobat” at www.layersmagazine.com/category/acrobat.)
2 MATCH DRIVERS AND PDF TO PRINT DEVICE
First, download and install the latest print driver for your print device. Based on your preflight results (see Step 1), make any adjustments to the content of your PDF so the linear resolution, color spaces, and assigned print colors match the device to which you’ll be printing. For most commercial print documents, you’ll want to have 250–300 ppi CMYK images, plus or minus spot colors. For inkjet printing, your images should be around 200 ppi and RGB color space—keep in mind that any spot colors will be printed as CMYK+ colors.
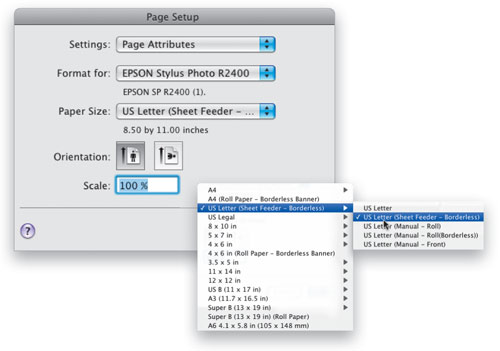
3 PICK PRINTER IN PAGE SETUP
The next step is to format your PDF for your specific print device. The best place to start is to choose File>Page Setup. First, choose your specific print device from the Format For drop-down menu (in this example, we’re going to be printing to an inkjet printer, so we’ve selected Epson Stylus Photo R2400). Then choose your paper dimension from the Paper Size drop-down menu. Note: If you want to print full bleeds on an inkjet printer, be sure to select a full bleed option, usually a submenu selection, from this menu. To finish, confirm your Orientation, leave the Scale at 100%, and click OK.
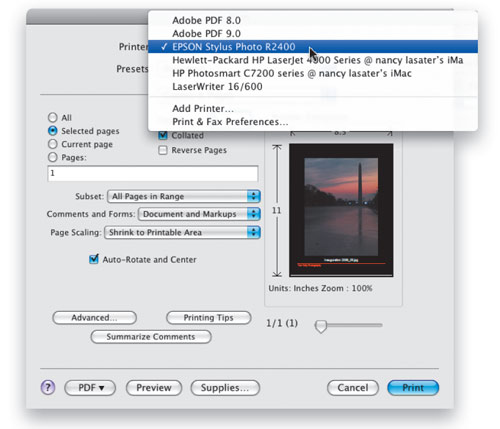
4 LAUNCH THE PDF PRINT DIALOG
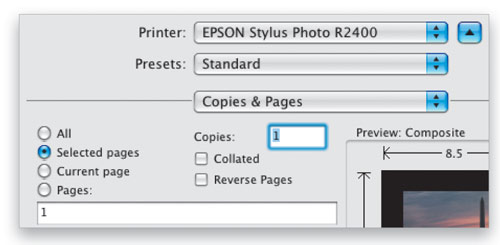
To enter the actual print dialog, choose File>Print. Once again, the first step is to select your specific printing device, this time from the Printer drop-down menu. The printer driver you select determines the available print options in the other portions of this dialog. You’ll likely see one or more Adobe PDF printer drivers. Choosing one of these drivers allows you to create an onscreen, color-separated version of your PDF without having to actually print the color separations.
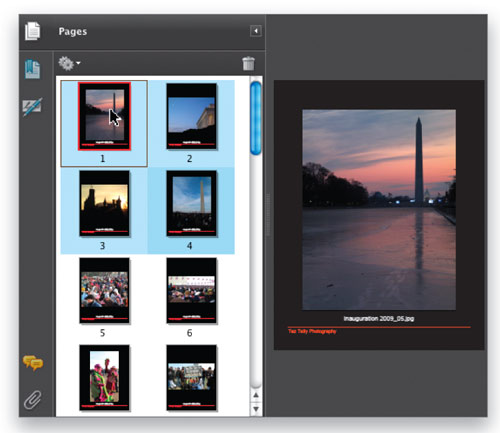
5 ASSIGN PAGES TO PRINT
From the unnamed menu located below Presets, choose Copies & Pages (this should be the default selection). Now work your way through the options at the top left to select which PDF document pages you’d like to print. The options you see here will depend on the printer driver you selected in Step 4. If you selected specific PDF pages in the Pages panel prior to activating this print dialog (see image in Step 2), click the Selected Pages option to restrict printing to those pages. This feature allows you to visually select your print pages.
6 SELECT OPTIONS FROM COMMENTS AND FORMS
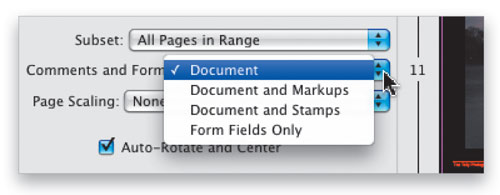
To control which components of your PDF document will print, click on the Comments and Forms drop-down menu. Notice you have the ability to print just the Document, the Document and Markups, Document and Stamps, or Form Fields Only. This is a little-known and often ignored print control capability that adds a great deal of flexibility and customization to your PDF printing. Here, we chose to print the Document only.
7 DETERMINE PAGE SCALING
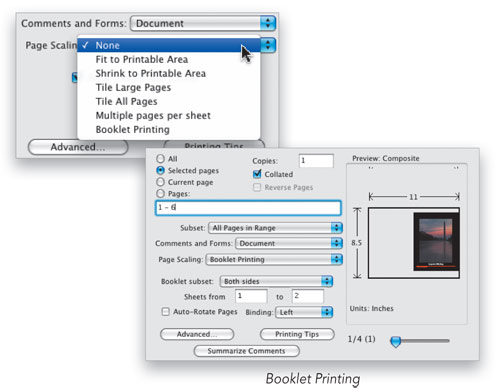
With Acrobat, you can apply on-the-fly scaling of your print image. Click on the Page Scaling drop-down menu. Here you see many print dimension options, including the ability to print multiple pages on one sheet or print large images across several sheets. There’s even a Booklet Printing option that allows you to print facing pages on single sheets (see image). The default setting is typically Fit to Printable Area. If you’ve already set the dimensions of your image exactly as you want them (as we’ve done here), then choose None from this menu list.
8 SELECT MEDIA TYPE
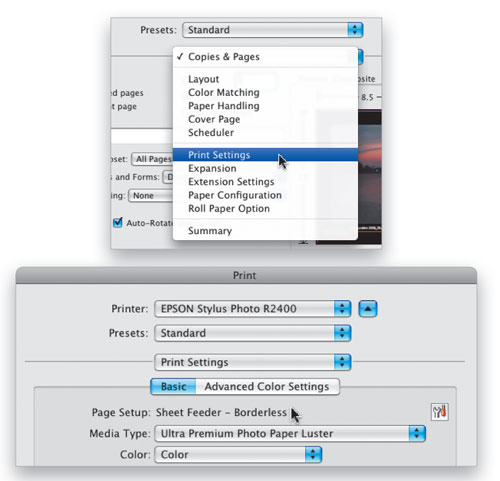
From the unnamed drop-down menu, choose Print Settings. (Note: Depending on your printer, some settings in the following steps may be located in sections with different names than the Epson driver we’re using here.) Check that you still have the proper printer driver selected, then review the Page Setup, which indicates the print dimension you assigned in Page Setup in Step 3. Make sure this matches the page setup you expect (here Sheet Feeder—Borderless). From the Media Type drop-down menu, select the media type on which you’ll be printing (here Ultra Premium Photo Paper Luster). Then from the Color menu, choose your preferred mode (here Color).
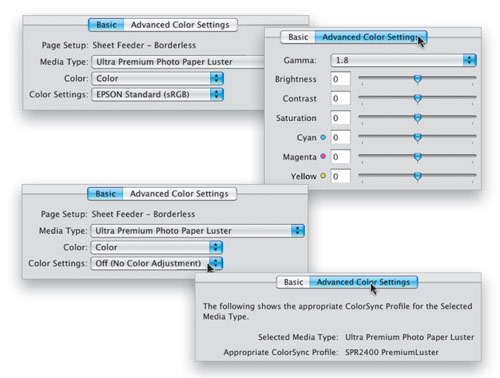
9 TURN OFF COLOR ADJUSTMENT
Steps 9 and 10 are critical for determining which color controls will be used in your printing. From the Color Settings drop-down menu, choose the default printer driver control color profile (here Epson Standard [sRGB]). Now click on the Advanced Color Settings tab, and note the printer driver-based controls. Return to the Color Settings drop-down menu and choose Off (No Color Adjustment). Once again, click on the Advanced Color Settings tab and note the paper-specific color profile that’s indicated. This setup will typically achieve the highest quality and most consistent print results.
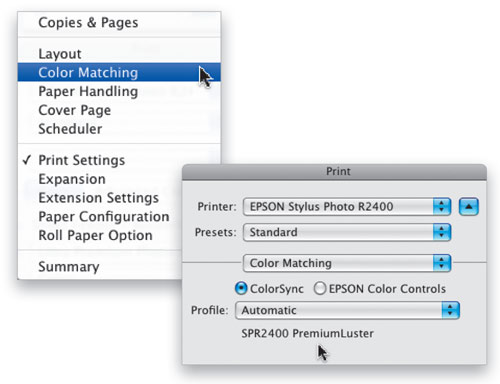
10 USE COLORSYNC FOR COLOR MATCHING
Return once again to the unnamed menu, currently with Print Settings selected, and choose Color Matching. Here, you see a choice between two color control modes: ColorSync and an option for your particular printer (Epson Color Controls in this example)—in the printer option, the printer driver controls the color matching. Click on the ColorSync button and you’ll see the paper-specific color profile. You can click on the Profile drop-down menu to select another profile if you wish, but we’ll stick with the same paper-specific Premium Luster profile we used in Step 9. This avoids any potential conflict with the Epson driver.
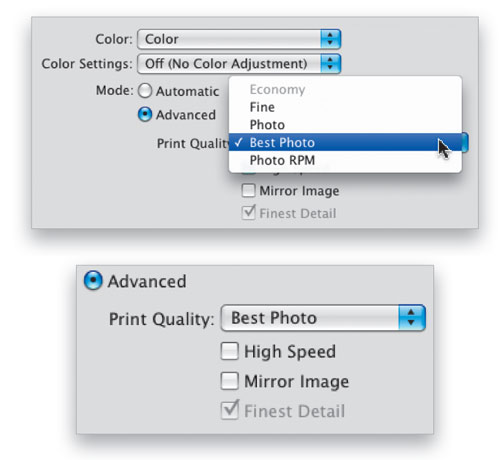
11 CHOOSE PRINT QUALITY
Now return to the Print Settings menu, click on the Advanced button in the Mode section, then click on the Print Quality drop-down menu. The choices you see will depend upon your printer and printer driver. You can experiment with the various print modes to understand their effect on image quality. Here, we’ll select either Best Photo or Photo RPM to achieve high-quality prints. Note: RPM is a higher resolution mode that’s useful for images containing high detail such as text. Also test the High Speed setting (turned off here), which allows bidirectional printing, but can sometimes lower image quality.
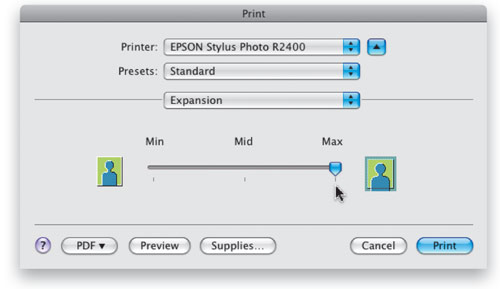
12 EXPERIMENT WITH EXPANSION SETTING
Return to the unnamed drop-down menu and choose Expansion. You want to pay attention to this setting if you’re printing full bleed—that is, to the edge of your print. Feel free to test the effect of the various Expansion settings. The Expansion setting is the printer version of dragging an image past the bleed marks that you set in a page layout document. You may simply want to use the Max setting to make sure your images always bleed off the edge of your print media.
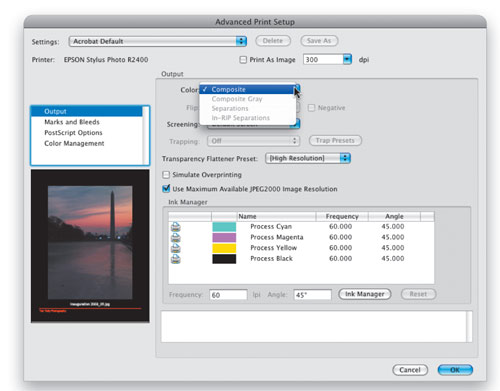
13 ADVANCED PRINT SETUP: SEPARATIONS
If you want to print color separations or control overall color-management settings, choose Copies & Pages from the unnamed menu and click on the Advanced button located in the lower-left quadrant of the print dialog. Click Output (in the list on the left). From the Color drop-down menu, select the type of output you’d like (here Composite). This is the menu from which you can choose to print separations either directly from Acrobat or send them to a RIP (Postscript Level 3 only). If you print separations, click on Marks and Bleeds and assign printer marks in that menu.
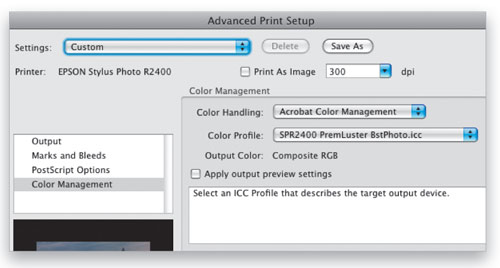
14 ADVANCED PRINT SETUP: COLOR MANAGEMENT
Click on Color Management in the list. From the Color Handling drop-down menu, choose whether you want Acrobat to manage the color (selected here); the printer to manage the color; or disable color management and allow embedded color profiles to be used. If you choose Acrobat Color Management, select the paper-specific Color Profile from the drop-down menu. You can even direct Acrobat to simulate printing on another device: Just check the Apply Output Preview Settings box and assign the device to be simulated using Advanced>Print Production>Output Preview. (See “Output Preview” in the preflight article referenced in Step 1.) All that’s left now is to press Print.
ALL IMAGES BY TAZ TALLY UNLESS OTHERWISE NOTED
