
A Retro Look with Illustrator
This tutorial on creating a retro look is a great example of how Illustrator handles transparency in your Photoshop images and text objects. We’ll also create some smashing text effects using the envelope distort feature and show you how you can edit your text even after it’s been distorted in groovy ways. Yeah, baby.
1 CREATE ROUNDED RECTANGLE
Choose File>New and in the New Document dialog, click the Document Profile pop-up menu, choose Basic RGB, and click OK. Select the Rounded Rectangle tool (nested under the Rectangle tool [M]). Click once on the artboard to bring up the Rounded Rectangle dialog and set the Width to 800 and the Height to 600. Also, set the Corner Radius to 40 pt and click OK. In the Control panel, set the Fill to None and the Stroke to black so we can see where the shape will be split in the next steps.

2 DRAW TWO WAVY PATHS
Select the Pen tool (P), click outside of the rectangle about a third of the way down on the left side, then click-and-drag points to draw a path that curves in a random pattern across the shape. You should end up with a wavy line similar to the one you see here. Add another wavy line across this shape below this one, creating three sections of the overall shape. (Tip: Press Return [PC: Enter] after your draw your first path so you can start your second path independent of the first.)

3 DIVIDE AND UNGROUP
Now we’ll use these lines to cut the rounded rectangle apart. Using the Selection tool (V), click-and-drag to select both lines and the background shape. Open the Pathfinder panel (Window>Pathfinder), and click the Divide icon, the first icon in the Pathfinders section. This will use the paths to slice the rectangle apart. The shapes are still grouped together even though we’ve cut them, so go to Object>Ungroup.

4 SET TYPE AND SCALE TO FIT
Select the Type tool (T) and click on the artboard inside the top shape to set a text object. The font we’re using here is called Oliver. You can download it from www.dafont.com. Since we’re going with a retro theme, the first word will be “SMASHING.” We’ll use “GROOVY” for the middle shape and “YEAH BABY” for the last shape. Select the text and scale each text object so that it’s approximately the same size as the shape it resides in.

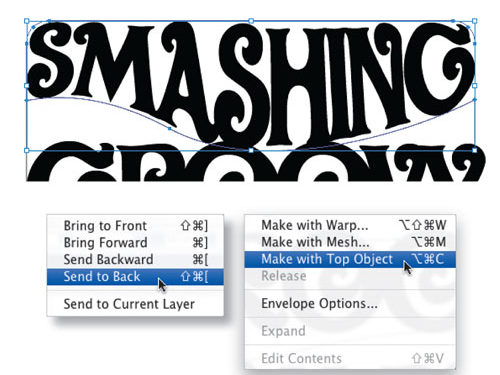
5 ENVELOPE DISTORT TEXT TO FIT SHAPE
Select the word “SMASHING” in the top shape, and go to Object>Arrange>Send to Back. Now drag to select both the text and the top shape, and go to Object>Envelope Distort>Make with Top Object. This will cause the text conform to the shape. Isn’t that cool?

6 ENTER ISOLATION MODE; REPEAT ENVELOPE DISTORT
Now here’s a very important point: We’ve distorted the text within the shape but we can still edit the text by going into Isolation mode. Simply double-click on the object and it will bring you into edit mode for that element, which allows you to resize, rotate, or change the text anyway you want. To return to the main layout, just click the small arrow twice in the upper-left corner of the artboard. Now repeat Step Five for the two remaining text shapes. Remember, the text must be behind the shape in order to apply the distortion.

7 IMPORT PSD WITH TRANSPARENCY
Now we’ll place a photo with transparency. In this example of the disco girl, we double-clicked the Background layer in Photoshop to convert it into a regular layer, selected the dancer, chose Select>Inverse, pressed Delete (PC: Backspace) to create a transparent background, and selected File>Save As. With the image ready, go to File>Place. Once the Place dialog opens, locate the file of your extracted subject, and click OK. Position this image in front of the text and resize as necessary. Notice the transparency is maintained, even on the sleeve of her shirt.

8 SAMPLE COLOR FOR THE TEXT
To color the text, we’re going to refer to the disco girl we just imported, specifically her shirt. Double-click the top text object to enter Isolation mode and switch to the Eyedropper tool (I). Then click in an area of her shirt where you want to sample a color. For SMASHING we used a dark pink color. Once you click and sample the color, it applies it to the selected object. When you’ve found the color you want, be sure to exit Isolation mode. Do this to the remaining text layers with a different color for each one. We used blue for GROOVY and yellow for YEAH BABY.

9 ADD 3-POINT STROKE TO TEXT
Let’s enhance these text objects a bit more by adding a small stroke. With the Selection tool, Shift-click all three text objects to select them, then click on the Stroke icon near the bottom of the Toolbox. Choose the black swatch from the Swatches panel (Window>Swatches), and in the Control panel, set the Stroke Weight to 3 pt.

10 PLACE BACKGROUND IMAGE; SEND TO BACK
Now it’s time to place a background to finish the whole thing off. We’re using a cool disco background from www.istockphoto.com but you can use any image you like. Just position the image in front of the overall layout, resize as necessary, and go to Object>Arrange>Send to Back.

11 SET TEXT TO HARD LIGHT
With the background in place, reselect the three text objects, open the Transparency panel (Window>Transparency), and change the blend mode from Normal to Hard Light. You should now be able to see the background through all three text objects.

12 CREATE DROP SHADOW FOR DANCER
Let’s add a quick little shadow under the disco girl. Grab the Ellipse tool (L) and draw a narrow oval shape at the bottom of her pants. Set the Fill to Black in the Control panel. Go to Effect>Blur (under the Photoshop Effects section)>Gaussian Blur. Set the Radius to 5 pixels and click OK. Open the Transparency panel again and drop the Opacity to 70%. Finally, select the girl and go to Object>Arrange>Bring to Front so the shadow appears behind her. Groovy, baby!

FINAL IMAGE

