
Using the Histogram to Learn What the Sliders Do in Photoshop Camera Raw
If you're like me and you don't use the histogram on your camera (well, I do use my camera's highlight clipping warning, but technically that's separate from the actual histogram), knowing how the sliders in the Basic panel of Camera Raw affect your histogram can be really helpful.
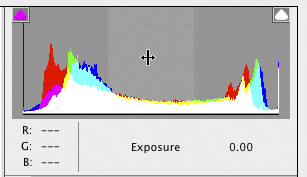
If you hover your cursor over the histogram in Camera Raw, it will display the name of the slider that covers that part of the histogram, as well as highlight the area that slider affects. When you do this, you'll notice that your cursor changes into a two-headed arrow. If you click-and-drag right on the histogram, it will actually let you drag the histogram to adjust it, and it will move the corresponding sliders. This is pretty amazing technology.
THE EXPOSURE SLIDER
If you look at this histogram from Camera Raw below, you can see the Exposure slider controls the biggest part of the histogram: the midtones and the lower part of the highlights (and perhaps the upper part of the shadows). This slider is well named because it really does control the overall exposure of your image, so if the image is too light or too dark, start here first.

THE HIGHLIGHTS SLIDER
If you look at the histogram below, you'll see that the Highlights slider controls the (wait for it—wait for it—) highlights. (I love those rare times when a Photoshop slider actually does what its name implies.) But it doesn't control the very brightest highlights. Take a look at the histogram and you'll see it stops before the very brightest tones, so it controls the meat of the highlights but not the extreme brightest highlights.

Drag the Highlights slider to the left to bring back any clipped highlights, or bring detail back to things such as puffy white clouds. Drag it to the right to create those blown-out highlight looks. If you shoot into the sun to create lens flare effects for portraits, dragging the Highlights slider to the right will help blow the lens flares out even more and enhance the effect.
THE SHADOWS SLIDER
One look at the histogram here and you can see that the Shadows slider is a very close cousin to the Highlights slider in the fact that it controls a lot of the shadow areas, but not the very darkest shadows. This is an incredibly handy slider since it has the power to bring out hidden detail in the shadow areas. I use it pretty liberally.

Dragging the Shadows slider to the right opens up anything in shadows, so it's perfect for situations when your subject is backlit (including landscapes). Dragging this slider to the left darkens the shadow area, but honestly, I'm more likely to use the Blacks slider to darken the shadow areas (the results look much better), so I rarely drag this slider to the left.
THE WHITES SLIDER
The Whites slider controls the very brightest part of your image, as seen in the histogram here—even brighter than what the Highlights slider controls. I use this for fine-tuning the whites in an image and setting the white point (kind of like you do with Levels in Photoshop).

Dragging the Whites slider to the right brightens the whites in your photo, so I use this when I really want the image to look more contrasty (very handy when you're making black-and-white conversions). You can drag it to the left to help when the Highlights slider alone can't pull back clipped highlights, but most of the time you won't have to resort to that.
THE BLACKS SLIDER
The Blacks slider controls the very darkest shadow areas of your image (as seen in the histogram here), with the benefit of being able to open up the shadows (make them lighter).

Dragging the Blacks slider to the left makes the blacks richer and darker and saturates the color more, so I always grab this slider when I open an image that looks washed out. Dragging it to the left usually fixes that problem in a jiffy. If I want to open up the shadow areas, I'll drag the Shadows slider to the right (rather than the Blacks), but if that doesn’t do the trick, then you can try the Blacks slider. You'll probably find that the effect is more subtle than the Shadows slider, even when dragging it to +100, and therefore somewhat less useful. But if you're in a pinch to brighten your shadows, at least you now have another place to go.
SO THAT'S HOW THEY CORRELATE
I hope that helps you get a better understanding of how each slider affects the histogram, and knowing that, I hope it helps lead you to better-looking edits all the way around.
This article is courtesy of Photoshop User magazine, the official publication of KelbyOne, which provides quality online education for creative people. For more information, visit KelbyOne.com.
