
Photographic Workflow from Lightroom to Photoshop
Most of us learn how to use Lightroom and Photoshop because we run into a problem and search for a solution. As a result, we tend to have various individual skills without an overall perspective on how to put the skills together in a good workflow. In this tutorial, we’ll highlight a few of the main workflow steps so that we can have an effective and efficient Lightroom and Photoshop workflow.
Begin in Lightroom
1 RAW IS GOOD, DNG IS BETTER
The advantages of shooting RAW (e.g., more flexibility and more information) are well known and most photographers capture RAW images (versus JPEG). But there’s an often-overlooked step, and that’s converting the RAW files to DNG (or Digital Negative). The DNG format extends the flexibility and stability of your images even further. DNG is a publicly available archival format that’s an appealing solution for those who want even more assurance of being able to open and process RAW files far into the future. For more info, visit www.adobe.com/products/dng. OPTION #1: [Insert 1.tiff]—Note from Chris Orwig: I don’t have a graphic for this first step but I was hoping you could create one from my idea.

2 IMPORT, PART 1: CONVERT & BACK UP
Before you start viewing or working on your images, it’s critical to save them appropriately. Specifically, you always want to copy the files to at least two locations and here’s where Lightroom can help. With Lightroom open, connect your card reader and insert the media card, and the Import Photos dialog will open. If desired, in the File Handling section, be sure to select Copy Photos As Digital Negative (DNG) and turn on the Backup to: option. Click the Choose button and select another external hard drive where you’d like to save the files.

3 IMPORT, PART 2: APPLY INFORMATION
In the Information to Apply section, click the Metadata pop-up menu, and choose New. In the New Metadata Preset dialog, enter important metadata such as copyright, and click Create. To apply the preset, select it from the Metadata menu. Next, manually add keywords to all the images. Begin with the general keywords that describe the entire import (more specific keywords can be added later). Finally, choose the size of the Initial Previews. Typically, it’s best to choose Standard (medium JPEG) or 1:1 (full size) so Lightroom will generate large enough previews now so you won’t have to wait for them later. Click Import.

4 RATE & RANK
With your images imported, it’s time to separate the wheat from the chaff. You can begin by adding star or flag ratings to the images. This can be done in the Library and Develop modules but for the quickest results, it’s best to work in the Library module’s Loupe view (E), as there will be less preview render time. Next, use one of the following methods to add ratings: Press 0–5 to add or remove star ratings; 6–9 to add or remove color label ratings; P to Flag As Pick; U to Remove Flag; and X to Reject.

5 FILTERS & COLLECTIONS
Photographers use filters with collections to pick their keepers. In the Library module, press Command-L (PC: Ctrl-L) to Enable Filters and select a criteria, such as Library>Filter by Rating of 2 stars only, which will now only show you the 2-star images. Next, open the Collections panel, click the New Collection icon (+), and choose Create Collection Set. Name your collection and click Create. Next, select all the filtered 2-star images, click on the New Collection icon, choose Create Collection, name it, select the set you just created, and click Create. Click on your original set of images and repeat this process for 4- and 5-star ratings.

6 ADD METADATA
It’s typically best to add keyword metadata to your images that matter most. Choose the collection you’d like to work on, select one or more images, open the Keywording panel, and add a keyword by typing it in the Click Here to Add Keywords field. You can also click on one of the Keyword Suggestions to add it to the Keyword Tags field. For even more advanced keywording, use a Keyword Set with frequently used, predefined keywords. To quickly apply one of these keywords, press the Option (PC: Alt) key and a number between 1 and 9.

7 ADJUST WHITE BALANCE
As you process your images, it’s best to begin with white balance. Press the W key to go to the Develop module and select the White Balance Selector tool simultaneously. Next, position the tool over an area of the image that should be neutral. Typically, something white, gray, or black works best. As you do this, look at the Navigator panel on the left and you’ll see the white balance preview. Once you’ve found a desirable neutral area, click on it. If the white balance isn’t prefect, drag the Temp and Tint sliders in the Basic panel to make any needed adjustments.

8 MAKE TONE ADJUSTMENTS
Using the Basic controls to modify tone is as easy as dragging a slider, but let’s take things a bit further. It’s important to process the image so it can be reproduced accurately, so you need to make sure it has good shadow and highlight detail. Press the J key to turn on the clipping indicator. Now when you make a “bad” adjustment (as in the image shown here), the clipping indicator will light up, showing you the problem areas. To correct these problems, modify the sliders until the clipping indicator is reduced or gone completely.

9 CHANGE PRESENCE FOR MORE PRESENCE
The Clarity, Vibrance, and Saturation sliders are grouped in the Presence section of the Basic panel. While this name is a bit vague, the actual sliders are anything but that, providing measurable contrast and color enhancements. The Clarity slider adds local contrast, which adds dimension or depth to an image. Zoom to 100%, then increase the Clarity amount to add subtle contrast. The Vibrance slider affects less-saturated colors and protects skin tones. Increase the Vibrance to add color variety and snap. The Saturation slider adjusts colors equally. Increase the amount to saturate, or decrease the amount to remove color.

10 REDUCE NOISE
Practically every digital image needs noise reduction and sharpening. In the Develop module, open the Detail panel. To begin, zoom to 100% to see the details of the image. Next, use the Luminance and Color sliders to remove the noise. The Luminance slider controls noise caused by brightness; the Color slider removes noise that results from color artifacts by reducing color variance. Increase the amounts of both sliders until the image looks good. Keep in mind that when you use the noise-reduction controls, you’ll soften the photo. As a result, you need to dial in an appropriate amount of sharpening.

11 SHARPEN THE IMAGE
Digital photographs need a certain amount of sharpening to correct any softness that results from capture. In the Detail panel, there are four sharpening sliders: Amount, Radius, Detail, and Masking. The Amount slider controls the overall intensity; Radius controls how far out from an edge the sharpening extends; Detail controls the sharpening of small details; and the Masking slider controls where the sharpening is applied. Begin by increasing the Amount and keep the Radius below 2. For photographs of people, use a very low Detail amount; for photographs of landscapes or architecture, use a higher amount.

12 COMPARING PHOTOS
In traditional film photography, the image emerges in the develop tray. Images also emerge in Lightroom: You slowly build up to the desired result. Thus, it’s helpful to compare the final state of the image to the original. The quickest way to compare a starting version to a final version is to press the Backslash (\) key to toggle between the two. For even more comparison views, choose View>Before/After and make a selection from the list. You may also use one of the following shortcuts: press Y for a Left/Right before-and-after view, Option-Y (PC: Alt-Y) for Top/Bottom, or Shift-Y to Split Screen.

From Lightroom to Photoshop
13 CORRECT PERSPECTIVE
In Lightroom you can only push an image so far. For example, if you need to make a perspective correction, you have to go to Photoshop. After finishing your work in Lightroom, select the image and press Command-E (PC: Ctrl-E) to edit the image in Photoshop. If the Edit Photo dialog appears, choose Edit Original. Once in Photoshop, press Command-J (PC: Ctrl-J) to copy the Background layer. Next, choose Edit>Free Transform. While holding down the Command (PC: Ctrl) key, click-and-drag the corner points to fix the distortion or perspective, then press Return (PC: Enter) to commit the transformation.

14 COLOR & TONE
While Lightroom has some great controls, when it comes to specialized and unique color and tone, it’s not as strong as Photoshop. With this image, we’re interested in creating muted colors and a high-contrast look. Click the Create New Adjustment Layer icon at the bottom of the Layers panel and choose Hue/Saturation. Lower the Saturation to –100, then change the layer blend mode to Soft Light. The Soft Light blend mode is a great way to add contrast and color, but by applying this mode to a desaturated layer, we can add contrast while removing color. If the effect is too strong, lower to layer Opacity.

15 ADD LIGHT
Photographers use light to direct the eye and to create visual interest. In Photoshop, one technique involves using a filter called Lighting Effects. (Note: This filter works with 8-bit images only.) Select the Background copy layer you created in Step 13, choose Layer>Duplicate Layer, then go to Filter>Render>Lighting Effects. In the Lighting Effects dialog, choose Omni from the Light Type menu. Reposition the light source on the image as needed, then use the controls to dial in the overall light Intensity. Click OK to apply the effect. Finally, lower the Opacity of the duplicate layer until you like the results.

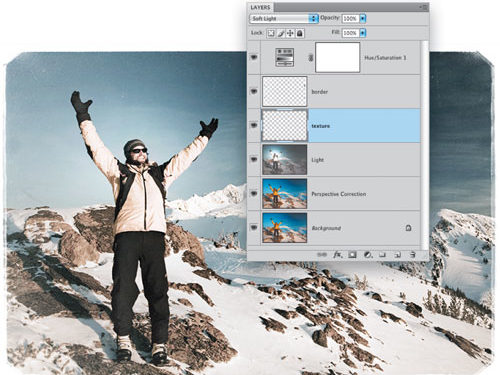
16 ADD TEXTURE & A BORDER
To add a texture, open an image of a texture and drag-and-drop it onto your image (or create a new layer and draw the texture). Next, try using one of the layer blend modes like Soft Light or Overlay to blend the texture into the image. To add a border, click the Create a New Layer icon at the bottom of the Layers panel, select a brush with an interesting edge from the Brushes panel (Window>Brushes), and paint with white. To draw a straight line, click where you’d like the line to begin, reposition the brush, and then Shift-click. This way you can create a more uniform edge.

Back to Lightroom
17 PRINT WITH TEMPLATES
Close and Save your Photoshop file to head back to Lightroom. Printing in Lightroom is fast and effective because you can use a predetermined template or create your own. Select one or more photos in the Filmstrip. In the Print module, open the Preview and Template Browser panels. Next, position the cursor over one of the Lightroom templates to view it, and click to select it. (Note: You can customize the layout by using the panels on the right.) If you customized the layout and want to save it, click the Create New Preset icon (+) in the Template Browser panel header, name it, and click Create.

18 PRINT TO JPEG
One often-overlooked feature in Lightroom is the ability to prepare your images for printing by a lab. To send your images to a lab, you’ll need to convert the files to JPEGs. In the Print Job panel, choose Print to: JPEG File. Turn off Draft Mode Printing, change the Print Resolution, and select Print Sharpening (typically Standard works best). Turn on Custom File Dimensions and select a size. Under Color Management, set the Profile to sRGB and Rendering Intent to Relative. When you’re ready, click the Print to File button, choose a directory to save the files to, and send them to the lab of your choice.

ALL IMAGES BY CHRIS ORWIG UNLESS OTHERWISE NOTED
