
Improve Your Workflow Productivity with the Image Processor
Of the many new productivity features in Photoshop CS2, perhaps the one that will save you the most time is the Image Processor. If you often work with digital images that you want to multipurpose, the Image Processor should be one of the tools that you regularly use. It allows you to adjust image dimensions, file formats, apply actions on the fly to multiple images, and even create more than one version simultaneously—oh yeah, this is a hot tool for improving your workflow productivity!
The setup
You can access the Image Processor directly in Photoshop by using File>Scripts>Image Processor, but the most efficient way is to access your images and the Image Processor through Adobe Bridge.
After you’ve downloaded your digital camera images to a folder on your hard drive, access those images through Bridge. Now, use the Bridge Batch Rename function (Tools>Batch Rename) to apply logical names to images you want to process with the Im-age Processor.
Note: Try to get in the habit of using Adobe Bridge as your primary digital asset man-agement tool. I now search for and access all of my images and documents through Adobe Bridge and rarely, if ever, use the File>Open command or use the operating system to name, duplicate, or move images.
The next thing you need to do is determine how you’d like to process the images with which you’ll be working. For this project, I’ll be processing images that I’m considering using in the “Diamond Creek and Beach Hike” chapter in my book on 50 Hikes of the Ke-nai Peninsula, Alaska. I want to send out some images for my editor to consider, and I want to save all of them in my Alaska images database. Images that I’ll send out for review need to be reduced in image dimension and saved as high-quality JPEGs. I’d also like to save all of the images as full-dimension TIFFs for use as final print images in the future.
Using the Image Processor
Here’s how the Image Processor works:
STEP ONE:
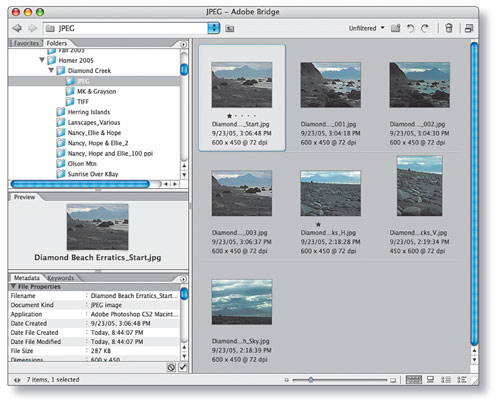
Select the images in Bridge that you want to process using Shift-click for se-quential images, or Command-click (PC: Control-click) for nonsequential images. In our example, we’ve selected seven images for processing, one of which I’ll ultimately use in my chapter, and all of which I will place in my Alaska images database.
STEP TWO:
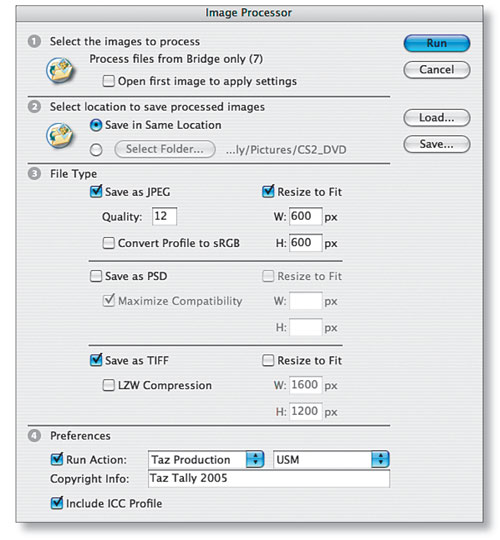
Go under the Tools menu and choose Photoshop>Image Processor to open the Image Processor dialog. In area 1 (Select the Images to Process), note that the seven images we selected in Bridge are already pre-selected—Process Files from Bridge Only (7).
The Open First Image to Apply Settings option is mainly used for processing RAW images taken under similar lighting conditions. If you have this option checked, the Camera Raw dialog will open for the first image after you click the Run button (but don’t click the Run button just yet). After you determine your settings for that first image in the Camera Raw dialog, click the Open button and the Image Processor will automatically apply those settings to the other RAW images.
STEP THREE:
In area 2, Select Location to Save Processed Images, check the Save in Same Location button (as shown) or Select Folder and locate the folder where you want the images saved. Note: Image Processor will automatically create new folders to house your processed image.
STEP FOUR:
In area 3, File Type, check the file formats in which you want to save your images. If you check more than one format, Image Processor will process and create more than one image. For this example, we’ve checked JPEG for the version to send for review and TIFF for the final print versions.
In this area, you’ll also configure the properties for the format versions you’ve selected, for example:
JPEG:
We’ve selected a Quality of 12 to maximize the image quality and checked Resize to Fit so that the dimensions of these images will be reduced. We placed both the Width and Height values at 600 pixels so that regardless of whether the images are landscape or portrait in orientation, the maximum long dimension will be 600 pixels. We didn’t check the Convert Profile to sRGB because our color profiles are set to Adobe RGB and we want them to remain that way. If we were creating these images for the Web, we might check this sRGB box.
TIFF:
We didn’t check the Resize to Fit because we want these images to remain at their full initial resolution (3264×2448). We also didn’t check LZW Compression. (I don’t like to use compressed images when I print as it can slow down or even prevent printing.)
STEP FIVE:
Now we’ll set our Preferences (area 4). First check the Run Action box and then select the action you’d like to be applied to each image. For our images, we’ll use an Unsharp Mask (USM) action. If you don’t already have a sharpening action created, cancel out of the Image Processor and create one in Photoshop (using either the Unsharp Mask or Smart Sharpen filter).
Next, type in any Copyright Info you want to be stored in the metadata of your image. And finally, check Include ICC Profile to include the color profile assigned in your Photo-shop Color Settings dialog (in our example, Adobe RGB 1998).
STEP SIX:
If you’d like to use these Image Processor settings again, click the Save button located in the upper-right corner. Once you save these settings, they can be loaded with the Load button at any time. Now click the Run button to run the Image Processor.
The Image Processor (running though Photoshop) will open all of the selected images (seven in our example), make copies of them, and apply all the settings you’ve assigned. The processed copies will be placed in folders labeled “JPEG” and “TIFF,” and your origi-nal images remain untouched.
Now is that a timesaver or what? I’ll bet you’re now thinking of all sorts of efficient ways to use Image Processor.
