
Highlight Clipping in Adobe Photoshop Camera Raw (and Why You Should Care)
I come from a traditional film background where we were concerned with nailing the exposure for the shadows and would let the highlights kind of take care of themselves. Today, with digital sensors, it’s exactly the opposite. Our main concern is retaining highlight details, making sure that the brightest parts of our images have detail.
If we don’t keep a close eye on the highlights, they can blow out or clip, where those areas have no detail. How does highlight clipping even happen? It happens in one of two ways. First, it happens in camera when you take the shot. If you’re using Auto, Program, Shutter, or Aperture Priority mode, your camera does its best to give you what it thinks is a proper exposure—and today cameras do a pretty amazing job of it—but it struggles when there’s a lot of bright white areas in your photos, such as snow, beach scenes, a sky with white puffy clouds, a bride’s gown, etc. These bright areas tend to beat the computer in your camera and they clip. The easiest way to fix this in camera is to use the Exposure Compensation control, which lets you override what your camera thinks is the proper exposure. That way, you can force it to shoot -1/3 to -1 stop or more below what it thinks is right so you can retain those blown-out highlights. If you didn’t do that or didn’t realize it was possible, you can usually fix this in Camera Raw or Lightroom.
Another cause of clipping is when you’re editing the photo in Camera Raw. You could have increased the Exposure amount (or Whites or Highlights sliders) enough to create clipping that wasn’t in the photo. Hey, it happens. If you know what you’re doing, it might be okay. More on that later.
Note: Some things are going to clip no matter what, such as a photo where the sun is clearly visible. It’s going to clip highlights like mad, and that’s okay because as far as we know there’s no real detail on the surface of the sun. So, the critical question to ask yourself when you see a clipping warning (either in your camera or in Camera Raw) is, “Is this clipped area an area of important detail,” such as skin, a bride’s gown, etc.? If it’s just a reflection on a chrome bumper, then you can let it go. Being able to let unimportant detail go will help to keep you out of therapy.
HOW DO YOU KNOW IF YOUR IMAGE IS CLIPPING THE HIGHLIGHTS?
On your camera, turn on the highlight warning and after you take the shot, look at the image on the LCD. Any areas in your photos that are clipping will flash on and off at you like a slow strobe light. When you see that blinking, that’s your cue to use Exposure Compensation to bring the highlight exposure back in line.
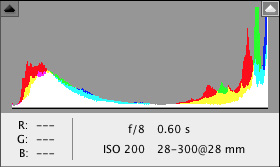
There’s a highlight clipping warning in Camera Raw to let you instantly know what’s clipping. It’s actually on all the time, but it has two modes. The “always on” mode appears in the top-right corner of the histogram in the form of a triangle. It should be a black triangle, which indicates you don’t have any clipping problems. If it’s any other color, however, you have problems. For example, a red, green, blue, cyan, etc. triangle means you’re clipping, but only in that color channel. If the triangle is red, you’re only losing highlight detail in the Red channel, so there will be some other detail there. While it’s not ideal to have any clipping, it’s not the worst thing in the world. A solid white triangle is the worst thing in the world. This means you have full-on, blown-out, no-detail clipped highlights.

The other mode (that you turn on) displays highlight areas that are clipping in solid red on your photo so you can clearly see what’s clipping. It stays on the photo as you repair the problem so you can see how your fix affects the rest of the photo as the red clipping warning disappears. To turn this on, click on the triangle in the top-right corner of the histogram, or press the letter O on your keyboard to toggle it on and off.

There’s also a shadow clipping warning to alert you if your shadow areas are so dark that those areas will be solid black (no pixels, no detail, nuthin’). So why isn’t there a shadow warning in most cameras like there is a highlight warning? It goes back to what I said in the beginning—we’re more interested in retaining highlight detail. I think there’s another reason, as well—some things should actually be solid black. I’ve heard photographers brag about retaining shadow detail and I always think their images look flat. That’s because I believe some things in your photo should actually go solid black. That’s my personal opinion, and it’s why I don’t sweat the shadow clipping warning in Camera Raw. If I have some black clipping, I’m okay with it.
THE HIGHLIGHTS SLIDER TO THE RESCUE
Thankfully, once you’ve determined that you have highlight clipping (and that the clipping appears in an area where there’s important detail), the fix is easy. Just drag the Highlights slider to the left until the highlight clipping warning goes away (the red warning areas disappear or the triangle turns black).
Warning: Don’t get so focused on fixing the clipped highlights that you ignore the effects of dragging the Highlights slider too far. Depending on the image, it can either have a very minor effect on the overall look of the image, or it can affect it quite a bit. Nothing to panic over, but keep an eye out for how the overall image looks as you’re recovering your highlights. A quick way to test this is to find the spot that looks good to you, and note that number (let’s say it’s -42). Now, drag the slider to 0 then back to -42 a few times and you’ll quickly see how it’s affecting the rest of the image. Before you do that, make sure the Exposure slider is set where you want it.

WHAT IF THAT DOESN’T DO THE TRICK?
That’s possible, especially if your clipping happened in camera. If the clipping is really bad, you can drag the Highlights slider all the way to -100, and if that isn’t enough, you can try dragging the Exposure slider to the left, just not too far.
If you’ve dragged the Exposure slider down a bit and the image is still clipping, you have two more options. First, drag the Whites slider to the left to see if that does the trick.

The second option is to use the Adjustment Brush (K). Click the round minus icon to the left of the Highlights slider to set it to -25 and to reset all the other Adjustment Brush sliders to 0. (Lightroom Users: Double-click on the word “Effect” at the top of the Adjustment Brush panel to reset all the sliders, then drag the Highlights slider to -25.) Now paint over only the areas that are clipping and see if that does the trick. All this makes you really wish you’d paid attention to this in camera, right? I know. But it happens to everybody, so this is the price we pay. If the -25 settings doesn’t do it, try -50.

WHAT IF ALL OF THOSE DON’T WORK?
Then your photo will have clipped highlights. It’s not the end of the world. Many people have experienced clipping highlights and gone on to live otherwise happy and productive lives. Well, some of them. Plus, once this happens to you, you’ll make sure the highlight clipping warning is turned on in your camera from here on out, and that’s a good thing.
Not all clipping is bad; in fact, if you’re going for the popular lens flare washed-out look, then clipping actually adds to the effect (and so does dragging the Highlights slider to the right to increase the brightest highlights and make the washed-out effect even more obvious).
Tip: The Highlights slider is great for bringing back detail in clouds and taming bright skies, so give it a try when you have a landscape or travel image, even if it’s not clipping.
IT COMES DOWN TO THIS…
In the end, clipping warnings are here to help you make decisions about your exposure. They’re not a rule handed down by the International Highlight Committee, so you can choose to ignore them or use them. But now you know what they are, what causes them, how to fix them in camera, and ultimately how to deal with them in Camera Raw and Lightroom. Cheers.
This article is courtesy of Photoshop User magazine, the official publication of KelbyOne, which provides quality online education for creative people. For more information, visit KelbyOne.com.
