Acrobat 8 offers easy-to-use tools and utilities for creating forms, including a new assistant that leads you through the process using a series of step-by-step dialogs. Fields that Acrobat can easily recognize are key to creating forms quickly, so you can save lots of time if you pay close attention to how you create the form in InDesign prior to exporting it as PDF document.
1 [Design a Form in InDesign]
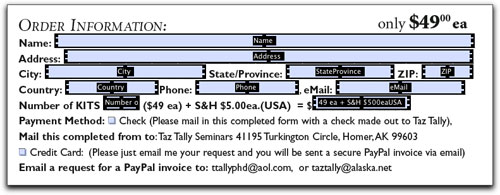
Design your form in InDesign or another page-layout application. (You can create a form in a word-processing application, but you’ll likely find it easier to position and edit your form components in a page-layout application such as InDesign.) Use underlined areas to designate your form’s text-entry fields, and checkboxes to designate choices to be checked. Acrobat easily recognizes underlined areas and checkbox icons so it can automatically create text-entry fields and checkable icons. Be sure to leave adequate room horizontally and vertically to accommodate the length and size of the text you want used in your form.

TAZ TALLY
2 [Create Your PDF Form Template Document]
Export your page-layout document to Acrobat (File>Export), choosing Adobe PDF in the Format field, to create your Acrobat PDF document where you’ll add your interactive form fields. In the Export Adobe PDF dialog, choose [Smallest File Size] as the Adobe PDF Preset to make your form easy to send across the Internet. This preset is also a good choice if your forms have no graphics. Check Optimize for Fast Web View for multi-page forms and click Export.
Tip: Keep any graphics in your form simple so you can compress them without fear of losing too much quality.

3 [Open your PDF: Start the Form Creation Process]
Make a copy of your PDF and open the copy in Acrobat. Choose Forms>Create New Form from the Tasks Toolbar at the top of the document to begin the form-creation process. In the dialog that appears, select Start With a PDF Document. (Forms can also be created using PDF forms templates, spreadsheets, and even scanned documents.) Click Continue and a “Creating and Distributing Forms” message appears. Click Continue to proceed with the forms-creation process.
Note: You can manually create all of your form fields, but the New Form Assistant can speed up the process considerably.

4 [First Step of the New Form Assistant]
The next dialog to appear is Step 1 of a four-step process that will identify and place form fields in your document. Click the Use the Current Document button to choose the currently open PDF file. (The other choice, Import a File from File System, allows you to Browse to find and select another PDF file to use for your form.) Click the Next button to move to the next step in the form-creation process.
Note: Prior to starting this New Form Assistant, you can choose Forms>Run Form Field Recognition to test Acrobat’s form field-recognition process.

5 [Activate Auto Field Detection]
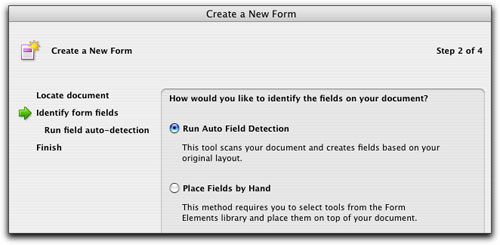
In the Step 2 dialog, choose Run Auto Field Detection, which allows Acrobat to automatically recognize the form fields you’ve created. (As an alternative, you can select Place Fields By Hand if you want to…yep…manually create the fields.) With some practice, you’ll learn to create form fields in your page-layout program that lend themselves to easy sequential auto-form field creation in Acrobat. Organizing your form fields sequentially from upper left to lower right in your page-layout document is key here. Click Next to proceed.
6 [Finish Auto Detection and Form Field Creation]
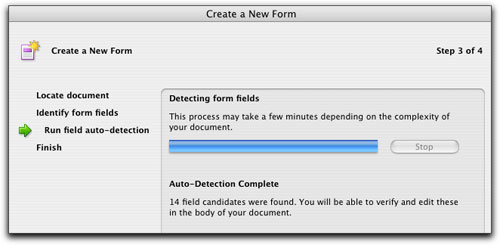
Step 3 of the New Form Assistant requires only that you wait until the process is complete. When the Auto-Detection finishes, the dialog will indicate how many “field candidates” it detected and created (14 in our example).
Click Next to move to the final dialog, which simply congratulates you on finishing the process and tells you that you’re ready to begin editing your form. Click Done to exit the New Form Assistant.
7 [View and Evaluate Your Auto-Created Form Fields]
Zoom in on the area of your document containing the first (top) form fields. Notice the type of form fields that have been created and how they’re labeled. In our form, the first eight fields are text-entry fields (as they should be) that have been labeled using the names placed in the page-layout design; i.e., Name, Address, City, etc., down through the eMail field. As you can see, this form is set up to make good use of the auto-detection and form field-creation capabilities of Acrobat 8.
8 [Configure your Auto Form Fill]
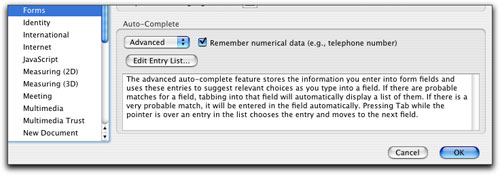
Let’s stop for a minute to configure the auto-fill features: Choose Acrobat (PC: Edit)>Preferences then click on Forms in the list on the left-hand side of the dialog. In the Auto-Complete section at the bottom of the Forms dialog, select either Basic or Advanced to determine the specifics of how the auto-fill will function. Basic will offer likely alternatives while Advanced will auto-select the most likely field entry choice. Check Remember numerical data if you want Acrobat to remember numeric as well as alpha data. To edit the content of the auto-fill data list click the Edit Entry List button.
9 [Configure your Forms Preferences]
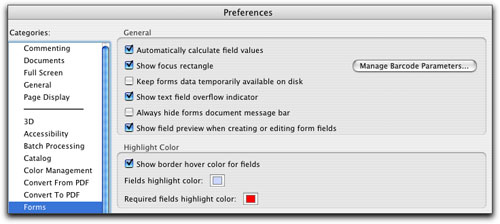
While you have the Forms Preferences dialog open, this is a good time to go ahead and configure the general settings that control how the form fields appear. At the very least, you’ll want to configure the Highlight Color area to assign a color to highlight the fields (here light blue). Click OK to close the dialog. As you begin to control more advanced features, such as required and calculation fields, you’ll return later to this dialog to fine-tune your Forms preferences.
10 [Check Field Data Entry Sequence]
Click on either the Select or Hand tool from Acrobat’s Toolbar. This will change the look of the form fields: They’ll no longer be outlined and labeled.
To begin the form field sequence check, simply click on the first (Name) field. After a brief pause, a blinking cursor will appear on the left side of this field. Now type in a name, then tab through, sequentially filling in the various text fields. At the end of the sequence, check one of the payment checkboxes.

11 [Add a Submit Button]
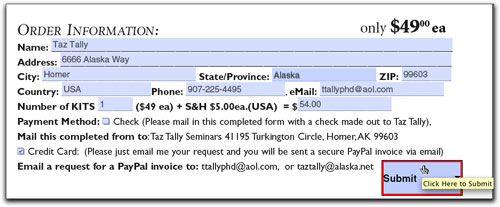
To finish the setup of your basic form, add a button that will be used to submit the completed forms data. If the Forms tool panel isn’t already open, choose Tools>Forms>Show Forms Tools, then click on the Combo Box tool. Now drag your mouse across a rectangular area at the bottom of the form to set the dimensions and location of the Submit button. A red outlined Combo Box will appear (shown bottom right) as well as the Combo Box Properties dialog.


12 [Configure the Submit Button]
To set up your Combo Box Properties dialog, click on the Actions tab, choose Mouse Down from the Select Trigger menu, choose Submit a Form from the Select Action menu, then click the Add button to open the Submit Form Selections dialog. Type in the URL of the website where you want the forms data sent, then select the data format in which you’d like the forms data submitted—for this example, choose PDF The Complete Document—and click OK. Notice that Mouse Down>Submit a form is added to the Actions area. (Don’t close the Combo Box Properties dialog yet.)


13 [Add a Name and Mouse Rollover Tool Tip]
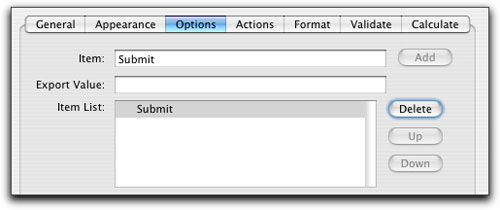
Now, we’ll name our submit box and add a mouse rollover tip. Click on the Options tab and in the Item field, type “Submit.” Click the Add button, which adds the word “Submit” to the Item List. Click on the General tab and in the Name field, type “Submit,” then type “Click Here to Submit” for the Tooltip. Click the Required checkbox, which places a red border around your button, and click Close. Select the Hand tool and roll your mouse over the Submit button to view your handiwork.