
Creating Transitions for Rough Cuts with Adobe Production Studio
By Richard Harrington & Marcus Geduld
When video editing, it’s common for an editor to encounter a cut that just doesn’t work. A wise man (and my second boss—Mr. John Pascuzzi) says, “If you can’t solve it…dissolve it.” That advice has served me well from directing live television to cutting broadcast commercials. While a dissolve is a clean and professional transition, it’s hardly flashy enough to write a tutorial about. So we thought we’d bring out a few of our favorite transitions that help us through the rough cuts.
[If you’d like to download the practice project and media used in this tutorial to practice these techniques, visit either www.PhotoshopForVideo.com/resources/resources.html or www.layersmagazine.com/magazine-downloads.]
FILM FLASH TRANSITION
STEP 1 Identify your Edit
To create a transition, you’ll need two adjacent shots. Open up an existing Premiere sequence or create a new project with at least two shots in the Timeline. A film flash transition will create overexposed areas that flare out. It’s similar to a white flash, but a little more organic as it’s often achieved when excess light leaks into a film camera.

STEP 2 Create the Transition Area
Using the Razor tool, make a small cut into the footage on each side of the edit. If you want a 1-second transition and are working with 29.97 fps source material, then you should move the Current-Time Indicator (CTI) 15 frames to either side. An easy way to do this is to click on the counter in the Program window and add or subtract 15 frames. The end result will be two short clips that are adjacent.

STEP 3 Use the Solid Composite Effect
The Solid Composite effect is a quick way to apply a solid color to the filtered image. It also allows you to specify a blend mode when adding the color. This can be used to create the flash. Apply the filter to the first and second clip in the transition. Set the following three properties to prepare the effect (be sure to adjust both instances of the effect): Source Opacity: 100%; Color: White; and Blending Mode: Add.

STEP 4 Keyframe the Transition
To create the flash transition, you’ll need to keyframe the Opacity value. Keyframes are easy to add in Premiere and they’re essential to create animation. For the first clip, keyframe from 0% Opacity to 100% Opacity. For the second clip, reverse the effect: keyframe from 100% to 0%.

STEP 5 Render and Review the Effect
The effect will need to be rendered to watch it. Press Enter to render the Work Area. The effect should flare and create a white glow. As long as you keyframed the filter properly, the image will transition cleanly.
If you like the effect and would like to save it, you can Right-click on the effect’s name in the Effects Control area. Choose Save Preset and give the effect a logical name such as Flash In for the first and Flash Out for the second.

GRADIENT WIPE TRANSITION
STEP 1 Create a Gradient Pattern
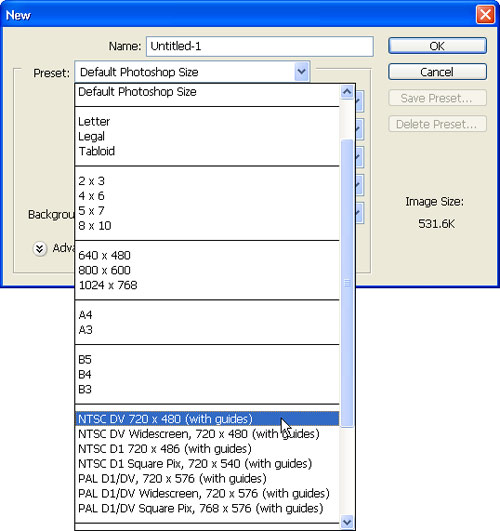
The Gradient Wipe uses a grayscale image to create a customized transition. The incoming image is added to the darkest areas of the gradient first, then the rest of the image is added first to the gray, then to the white areas of the gradient. In Adobe Photoshop, create a new document using the NTSC document preset, set the Color Mode to Grayscale, and click OK.
STEP 2 Add the Gradient
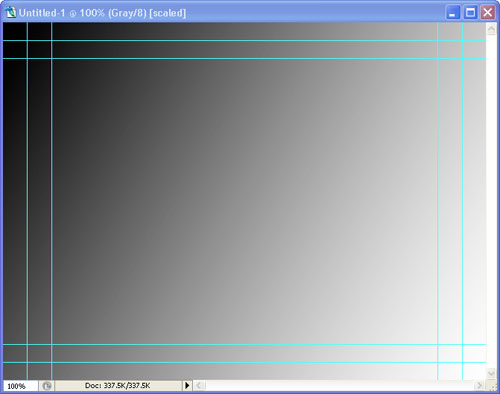
Still in Photoshop, select the Gradient tool from the Toolbox (or press G). Using the Linear Gradient (first icon of five up in the Options Bar), click-and-drag from the top-left corner to the lower-right of your document to create a gentle linear gradient that can be used for the wipe. Choose File>Save and save the gradient to an easy-to-access location like the project folder.
STEP 3 Locate the Gradient Wipe
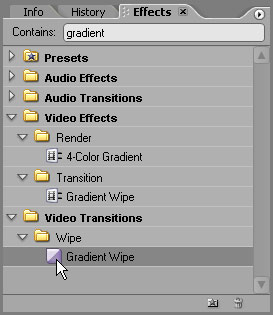
Move the CTI to the edit point where you’d like to add the gradient wipe to. In the Effects dialog, enter “gradient” in the Contains field. This way you can locate the Gradient Wipe effect quickly. There are two Gradient Wipe effects, so be sure to click on the one under Video Transitions.
STEP 4 Apply the Gradient Wipe
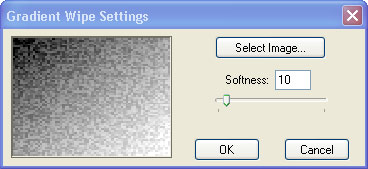
Drag the Gradient Wipe transition onto the cut point and position the effect over the center of the edit. When you release the effect, the Gradient Wipe Settings dialog opens. Click on Select Image to load in a custom gradient, navigate to the gradient we created in Step 2, and click Open. Adjust the softness slider and click OK.
STEP 5 Render and Review
Just as with the first transition, this effect will need to be rendered to watch it, so press Enter to render the Work Area. The effect will create a nice diagonal transition with a soft edge.
If you’d like to adjust the effect or substitute a different gradient, just double-click the Transitions icon in the Timeline. Then in the Effect Controls window, you can modify the properties (click Custom) to reopen the effect window. (You’ll find ten more gradient wipe patterns for free at www.PhotoshopForVideo.com//resources/resources.html [click on Layers Magazine—Gradient Wipes]. These patterns are also available at www.layersmagazine.com/downloads.html.)
BLUR WIPE TRANSITION
STEP 1 Create the Transition Area
Because we’re going to use a filter to drive our next transition, it’s necessary to manually overlap both shots. An easy way to do this is to make a small overlapping region using the Razor and Ripple Edit tools. Place the CTI one frame before your transition point, then with the Razor tool, click to add a segment edit in the track.

Step 2 Create the Transition Layer Stack
The clips now need to be overlapped. Lift the short segment you created in Step 1 up to a higher video track. Then with the Ripple Edit tool, drag the handle to extend the shot. You’ll want to add enough frames so your transition is 20–90 frames long (depending on the speed you’d like). Be sure that you also drag the handle of the underlying shot back toward the left to close the gap.

Step 3 Apply a Blur Filter
Premiere Pro currently ships with seven blur filters. Each will work for this transition effect, but will produce very different results. For this transition, use the Gaussian Blur filter and apply it to the overlapping segment. You must keyframe the filter’s value to achieve a transition. Add a keyframe at the start of the segment with a value of 0, and then add a second keyframe with a value at 250 at the end. This will animate the blur’s amount over time.

Step 4 Add an Opacity Fade
So the effect doesn’t have an abrupt pop at its end, you’ll also want to keyframe the Opacity value. You can access these controls from the same dialog as the Gaussian Blur. Add your first Opacity keyframe set to 100%, midway through the blur, then add a second set to 0% at the end of the segment (at the same point as your second blur keyframe). Press Enter to render and review your new transition.

