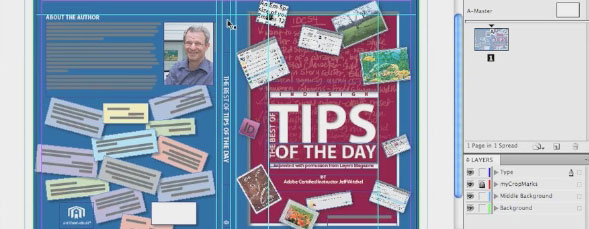
There is a new feature in InDesign CS5 that allows users to include multiple page sizes in the same document. Jeff Witchel experimented with this new feature and found that it could be very useful when laying out a book jacket design. Watch this video and see how he did it.

Share & Enjoy


Similar Articles


  1. [...] Book Cover Design in InDesign CS5 November 16th, 2010 [...]

  2. [...] This post was mentioned on Twitter by Kenton Smith, Drew Malone, Stephanie Moore , In House Designers, Anshul Pandey and others. Anshul Pandey said: Book Cover Design in InDesign CS5 http://bit.ly/cDm72I #design [...]

  3. [...] more on Layers Magazine [Translate] Categorized under: Tutorials. Tagged with: Book, Cover, Design, [...]

  4. Denis (Reply) on Tuesday November 16, 2010

    Excellent. I’m in the middle of a book project. Thanks for that.

  5. free online virtual worlds (Reply) on Tuesday November 16, 2010

    Very useful tutorial. Good resource!

  6. [...] Book Cover Design in InDesign CS5 | Layers Magazine [...]

  7. Rob Carr (Reply) on Tuesday November 16, 2010

    Ok, dumb question: to make a trifold, do you make 3 panels 3.7 wide by 8.5 high (room for bleed, margins) and then shrink the last panel down a bit? How much is a bit?

    I have to try this with our printer to see how to print it out.

    • Jeff Witchel (Reply) on Tuesday November 16, 2010

      Hi Rob,

      Yes!

      If your printed page is 11″ X 8.5″ and the first two panels are 3.7″, that leaves 3.6″ for that last panel. So set up three 3.7 pages and then make “folded in” panel 3.6″. Ideally the difference should be .125″.

      The best way to get the correct sizes for each panel is to call your printer. They may even offer Templates with the correct panel sizes.

      Hope this helps!

      Jeff

  8. [...] Book Cover Design in InDesign CS5 | Layers Magazine [...]

  9. Anna (Reply) on Tuesday November 16, 2010

    Thanks a lot. I just switched to CS5 and it things as above just look less time-consuming really!

  10. Peter (Reply) on Tuesday November 16, 2010

    Hi Jeff…
    great tutorial… just battling to hear the commentary: could you crank up the soundtrack?
    Thanks
    Peter

  11. [...] Erstellen von Buchumschlägen kann mit unterschiedlichen Seitengrößen in InDesign CS5 erheblich einfacher werden. [...]

  12. Eugene Tyson (Reply) on Tuesday November 16, 2010

    Yes it’s really simpler than ever to make a cover with a spine. The best thing about it is that when you include crop marks it gives the position of the spine as marks. Previously you had to manually insert fold marks where the spine was to indicate to the printers.

    If you haven’t got CS5 don’t fret – just create a document and add the width of the spine to the overall size. In Margins and Columns insert 2 columns and insert the size of the spine for the gutter. That will give you a visual indication where the spine is in the layout.

  13. Brenton (Reply) on Tuesday November 16, 2010

    Really helpful, great tutorial cheers Jeff

  14. jackson (Reply) on Tuesday November 16, 2010

    Great tutorial!

    I have a stupid question, when i publish it, how do i make all of the pages stay connected, when i export it into a pdf it still has the 3 pages/sections separate (on on top of the other)

    Im new to Indesign.

    Thank u again!

  15. Erin (Reply) on Tuesday November 16, 2010

    THANK YOU! This just saved me a ton of time- and was one of the easiest videos to follow that I’ve seen in a while.
    Much appreciated.

  16. leonking (Reply) on Tuesday November 16, 2010

    Hi jeff! It has long been thought how to do it and here is found. Thank You! And greetings from Ukraine.


Planet Photoshop Photoshop World Kelby Training Lightroom Killer Tips NAPP Scott Kelby