A black-and-white photograph is all about the subtle matrix of tonal values that give shape and form to the image. Knowing how to precisely apply modifications to light and shadow is key to fine-tuning a black-and-white photo. In this tutorial, we’ll take a look at some ways to shape and enhance the tonality of a black-and-white image with some quick and simple techniques.
[If you’d like to download the images used in this tutorial to practice these techniques, click here. All files are for practice purposes only.]
Punch Up the Blacks, Method 1
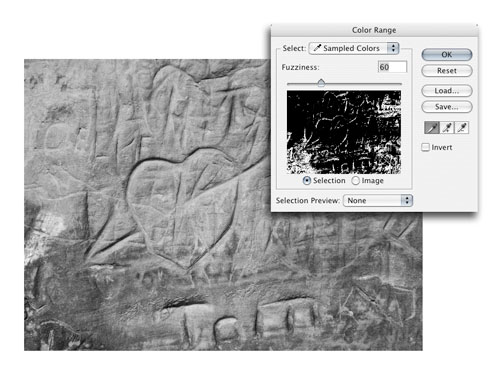
1 SELECT SHADOWS WITH COLOR RANGE
First, we’ll take a look at some ways to quickly isolate and darken the shadows to emphasize texture and create depth. Start with an image that has already been converted to black and white, or you can use the one featured here. Choose Select>Color Range. In the Color Range dialog, use the default menu setting of Sampled Colors and click in the image on a representative dark tone. Use the Fuzziness slider to fine-tune the selection (represented by the white areas in the preview) and click OK. My Fuzziness setting for this image was 60.
2 USE CURVES TO DARKEN SHADOWS
With the Color Range selection active, choose Layer>New Adjustment Layer>Curves. Drag down on the curve as needed to darken the shadow tones and increase the textural depth of the image. Click OK. This technique will be more successful on images with a clear definition between the deep shadows and the middle values, such as the carved heart photograph in this example.

Punch Up the Blacks, Method 2
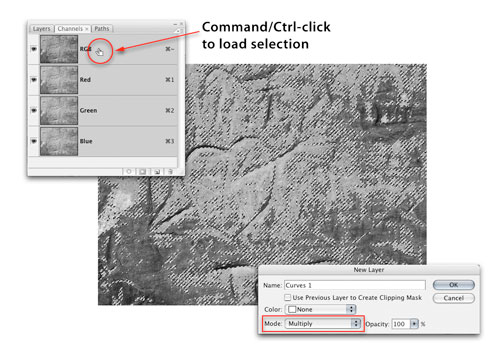
1 SELECT RGB CHANNEL; INVERSE AND APPLY CURVES
Now let’s try a different version of that technique. Throw away the curves layer you just made. This method uses the inverted tonal map of the image to create a layer mask. Bring up the Channels panel and Command-click (PC: Ctrl-click) on the RGB composite channel (or the Gray channel) to load a selection of the luminosity of the image. Lighter values will be more selected, darker values less selected. Choose Select>Inverse. From the main menu, choose Layer>New Adjustment Layer>Curves. In the New Layer dialog, set the Mode to Multiply and click OK.
2 LOWER LAYER OPACITY
Click OK in the Curves dialog without making any changes to the curve. The image will be noticeably darker, with the darkest tones being affected most of all. This darkening is being accomplished by the Multiply blend mode. Adjust the Opacity in the Layers panel as needed to fine-tune the effect (75% in this example). In the next step we’ll explore further ways to fine-tune this layer mask.

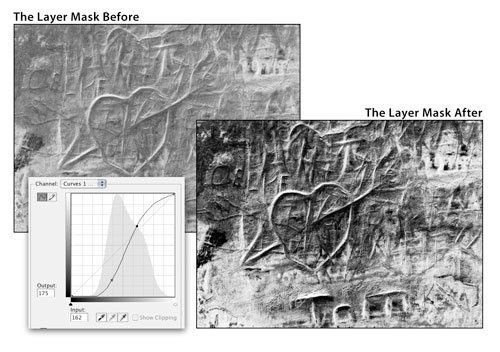
3 ADJUST LAYER MASK WITH CURVES
A layer mask is made up of grayscale tones. Lighter tones show the adjustment more than darker tones. If needed, these tones can be adjusted with standard tonal correction tools. With the Curves adjustment layer active, choose Image>Adjustments>Curves. In this example, I don’t want the lighter tones in the photo to be darkened quite as much, so I used a fairly steep S-curve to increase the contrast in the mask. This minimizes the darkening effect on the lighter areas in the photo. Click OK to apply the curve.
Soft Light Highlight Sculpting
1 CREATE NEW LAYER SET TO SOFT LIGHT
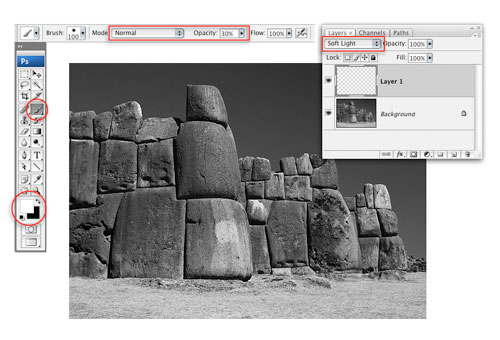
For this technique, we’ll paint on an empty layer with white and black and use a blending mode to add subtle highlights and shadows. You can use one of your own images or the one of the Inca fortress shown here. Add a new layer to the image (Layer>New>Layer and click OK). At the top of the Layers panel, set the blend mode to Soft Light. Choose the Brush tool (B) in the Toolbox; press D then X to set the Foreground color to white; and in the Options Bar, make sure the Mode is set to Normal and the Opacity to 30%.
2 PAINT HIGHLIGHTS AND SHADOWS
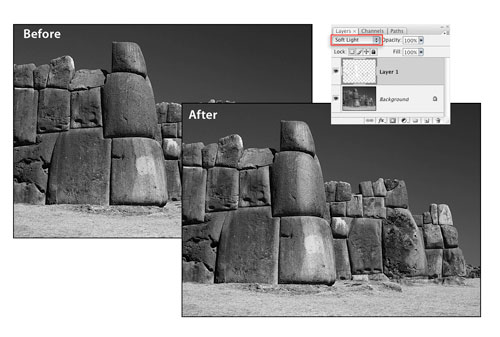
Using a brush size that’s appropriate for the areas you’re modifying, paint where you want to increase the sense of a highlight. In this image, I added vertical white strokes to the rounded corner of the central tower, and also on other areas of the wall where there was an obvious highlight that I wanted to enhance. Press X to switch to black and paint in areas where you want to deepen the shadows. You’ll probably need to lower the brush Opacity to 20% for working on the shadows.
3 APPLY GAUSSIAN BLUR
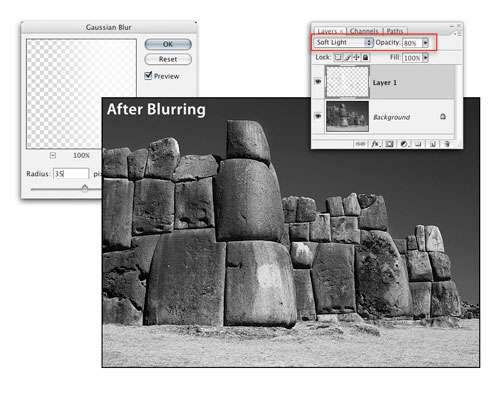
The initial effect of adding enhanced highlights in this way is likely to be too obvious, so to soften the effect and blend it better with the actual highlights and shadows in the image, apply a blur to the layer. Choose Filter>Blur>Gaussian Blur and blur to taste. I ended up using a blur Radius of 35 pixels. Click OK and apply final fine-tuning to this effect by adjusting the layer Opacity as needed.
Quick and Easy Split Toning
1 COLORIZE WITH HUE/SATURATION
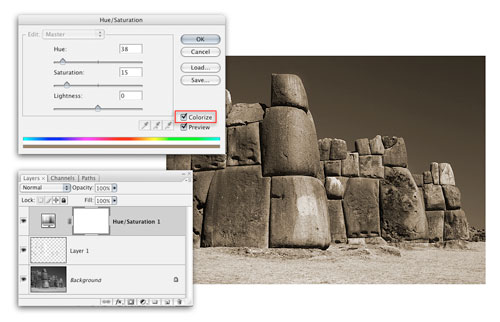
Both Camera Raw and Lightroom provide an elegant way to apply a split tone to an image. There are a number of ways you can do this in Photoshop, too. Here’s one way that adds a sepia tone to the highlights and midtones, while preserving the original neutral black-and-white tonality in the darker values. Click the Create New Adjustment Layer icon at the bottom of the Layers panel and add a Hue/Saturation adjustment layer. Click the Colorize checkbox, set the Hue to 38 and the Saturation to 15, and click OK.
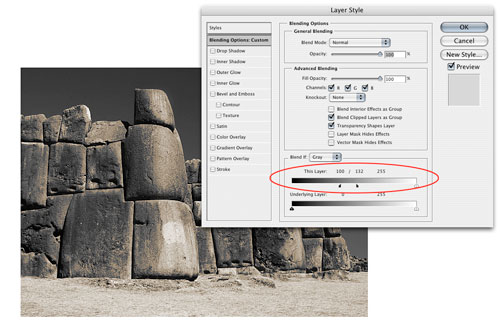
2 ADJUST BLENDING OPTIONS
Now we’ll modify the layer to apply the sepia to specific tonal regions. Double-click on the Hue/Saturation layer just to the right of the layer name to bring up the Layer Style Blending Options dialog. Move the shadow slider for This Layer to 100. Option-click (PC: Alt-click) on the right side of that slider to split it in two. Move the right half to approximately 130. Any tone below 100 isn’t being affected by the sepia; between 100 and 130, the sepia will gradually begin to show; and any tone above 130 is being fully affected by the sepia tone. Click OK to close the dialog.