
Vector Effects in Adobe Illustrator
In this tutorial we’re going to explore the graphics created for the Olympic Winter Games recently held in Vancouver, British Columbia. Throughout the winter games, they had a continuing graphic theme of very stylized vector art. Here, we’ll achieve a similar effect using only Adobe Illustrator and a PSD file of a snowboarder. Follow along below to learn more about vector graphics.
[If you’d like to download the image used in this tutorial to practice these techniques, visit www.layersmagazine.com and navigate to the Magazine section. All files are for personal use only.]
1 PLACE IMAGE ON ARTBOARD
Let’s begin by creating a new document in Illustrator by going to File>New. Select Basic RGB for the New Document Profile, and click OK in the New Document dialog. Choose View>Hide Artboards to make the artboard invisible. Then, go to File>Place. Locate the snowboarder PSD file (or a file of your choice), select it, and make sure that the Link checkbox is unchecked at the bottom left of the Place dialog. Click the Place button to place the file on the artboard.

2 LIVE TRACE THE SNOWBOARDER
Select the snowboarder image with the Selection tool (V), and in Control panel locate the Live Trace and Mask buttons. In between the buttons is the Tracing Presets and Options icon with a small downward pointing arrow. Click the icon and go to the bottom of the drop-down menu to select Tracing Options. In the Adjustments section, set the Mode to Color and the Max Colors to 10. (This setting may vary if you’re using a different photo.) The Preview checkbox is unchecked by default, so simply enable the checkbox to see the results. Once you have the settings in place, click Trace.

3 EXPAND; DELETE BACKGROUND
With the image still selected, click the Expand button in the Control panel. This will turn the newly traced photo into individual vector shapes. Well almost, you still need to choose Object>Ungroup. You may have to do this a couple times to be sure all is ungrouped (two times should do the trick). Starting outside of the image area, click-and-drag to select various sections of the large background elements and then press Delete (PC: Backspace) to delete them. It’s okay to leave some vector fragments here and there, but we want to get the image down to just the snowboarder. Be sure to delete the areas between his legs.

4 CREATE A TWO-COLOR EFFECT
The Live Trace left some residual color from the original photo. We want to make this appear more like it’s only using two colors. Click on the light green area of the snowboarder’s sleeve with the Selection tool. Then, go to Select>Same>Fill Color. This will select all other shapes with the same color. Open the Swatches panel (Window>Swatches) and choose a light gray color to apply to the selected shapes. Repeat this process to other areas of the image using varying shades of blue to get the overall two-color look. When done, select everything (Select>All) and go to Object>Group.

5 SET A RADIAL GRADIENT
Select the Rectangle tool (M), click on the artboard, and set the dimensions to 1000×800 pt in the resulting Rectangle dialog. Click OK. Open the Swatches panel and click on the black-and-white Radial Gradient swatch. Select the Gradient tool (G) and the gradient annotator will appear on the image. Double-click the color stop near the center to open a set of color swatches. Choose cyan (R:41, G:171, and B:226). Double-click the outer color stop and change its color to white. Click the large black circle next to the center point and reposition the gradient to the left side of the rectangle as you see here.

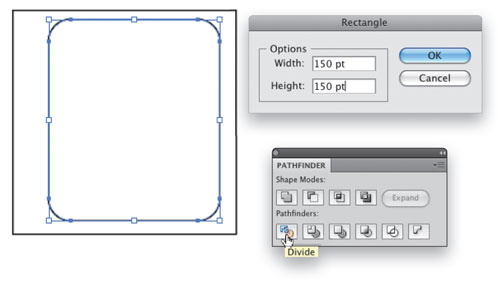
6 CREATE A BACKGROUND ELEMENT
Set your Fill to white and Stroke to black. Choose the Rectangle tool and click in the artboard. Set the dimensions to 150×150 pt, and click OK. Select the Rounded Rectangle tool (nested with the Rectangle tool) and click on the artboard. Set the Width to 115 pt, the Height to 135 pt, and the Corner Radius to 15 pt. Click OK. Using the Selection tool, position this object inside the 150×150 pt square—offset it a little to the right. Select both shapes and go to Window>Pathfinder. Click the Divide icon and go to Object>Ungroup. Click outside the artboard to deselect, then select the inner shape and press Delete (PC: Backspace).

7 DEFINE A SYMBOL; SPRAY BACKGROUND
Select the remaining shape and set the Stroke to none. Go to Window>Symbols and drag this new shape into the Symbols panel to define it as a symbol. In the Symbol Options dialog, set the Type to Graphic. Click OK. Now select the Symbol Sprayer tool (Shift-S). Make sure the newly defined shape is selected in the Symbols panel and start painting the symbol over the blue gradient area. Hold the mouse button down and move the cursor around until you get a good cluster of the shapes.

8 RANDOMIZE YOUR SHAPES
Select the Symbol Sizer tool, which is nested with the Symbol Sprayer tool. The Symbol Sizer tool will enlarge shapes when you first click-and-drag around; however, if you click and then immediately hold down the Option key (PC: Alt), the shapes will shrink in size. Do this to randomize the size of the shapes. Then, open the Transparency panel (Window>Transparency) and change the Opacity to 50%.

9 DRAW A SWOOSH WITH THE PEN TOOL
Select both the box containing the gradient and the symbol shapes and lock them in place (Object>Lock>Selection). Select the Pen tool (P). Starting along the left flat edge of the graphic, click to start a new path. Move to the right edge of the gradient, and click-and-drag to curve the path as you see here. Click another point a little further over to the right but don’t drag. Continue the path back to the edge where you started. Then click the original point to close out the shape (if you don’t get a straight path, just Option-click [PC: Alt-click] the previous point).

10 PASTE IN FRONT; INSERT A PATTERN
With the shape drawn go ahead and apply a color fill. We chose a nice shade of blue in the Swatches panel. Then, go to Edit>Copy, and then Edit>Paste In Front. This places the copy directly on top of the original shape. Open the Swatches panel and click on the top-right icon to open the flyout menu. Go to Open Swatch Library>Patterns>Decorative>Decorative_Primitive. Select Borneo. Open the Transparency panel to change the blend mode to Overlay, and set the Opacity to 50%. Feel free to experiment with other patterns and blend modes.

11 ADD ADDITIONAL SWOOSHES
Repeat Step 9 to Step 11 to create a couple more swooshes. Vary the curve of the swooshes and the color with shades of blue and green. Also choose different patterns to vary the look of each as well as, trying different blend modes and opacities. This is a great time to experiment with all the cool presets and get familiar with what Illustrator has to offer. Use the Layers panel to move the swooshes behind or in front of other swooshes.

12 STROKE LEFT EDGE OF GRAPHIC
Target the snowboarder in the Layers panel and choose Object>Arrange>Bring to Front. Deselect, and set the Fill to none and the Stroke to match the overall blue color of the design. We used the Eyedropper tool (I) and sampled the color from the snowboarder suit (to sample a color for the Stroke, click the Stroke icon near the bottom of the Toolbox and Shift-click with the Eyedropper). Set the Stroke size to 1 pt. Select the Pen tool and click to start the stroke slightly above the top-left edge of the graphic. Hold the Shift key and click just below the bottom edge of the document to finish the stroke.

13 POSITION YOUR IMAGES
Select the snowboarder and position this image over the swooshes in the layout. Drag a corner of the bounding box to scale if necessary to better fit the composition (hold the Shift key to scale proportionally). Here, we also added another snowboarder using the same Live Trace settings, and then scaled the second snowboarder down and positioned him above the original snowboarder. As a final touch, we changed the Opacity of the second snowboarder to 60% in the Transparency panel.

14 ADD GRUNGY TEXT
Lastly, grab the Text tool (T) and click next to the 1-point, blue stroke to set a text object. The font we’re using here is called 28 Days Later. You can download it from www.dafont.com. Type “SNOWBOARD” and click on the Rotate tool in the Toolbox. Rotate the text to line up with the blue stroke and there you have it! Hopefully this exercise will have you experimenting with different combinations of these techniques to come up with your original art. Be creative and have fun!

