There’s a Picture in There Somewhere

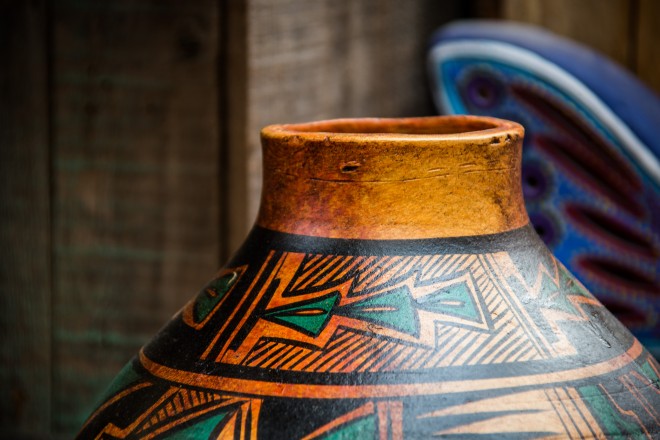
BEHIND THE SCENES: This was taken inside Jackalope, one of the awesome gift shops in Santa Fe, New Mexico. I took my students there a few years ago during a workshop at the Santa Fe Photographic Workshops campus. It made such an impression, I went back again this year. Lots to shoot indoors and out, and the place is very camera friendly.
CAMERA SETTINGS: I used my go-to travel setup here—one camera body and my go-to travel lens, the Tamron 28–300mm f/3.5–6.3). For the final image, I’m zoomed in reasonably tight at 200mm and, at that zoom amount, my f-stop could only go as low as f/5.6. (Remember: this is a variable aperture lens, so when I shoot wide, at 28mm, my f-stop can go as low as f/3.5 but as I zoom in tighter, that number is forced to go up. In this case, at 200mm it increased to f/5.6. If I zoomed in even tighter, it would be at f/6.3.) Because we were indoors, I had to bump up the ISO to 400 to get my shutter speed to 1/60 of a second (that’s about the minimum most folks can hand-hold a shot and still have it nice and sharp. Any slower and your image would be a little blurry). So, to sum up, I’m at f/5.6, at 1/60 of a second shutter speed, at 400 ISO. The behind-the-scenes shot above was shot at 28mm (wide angle), so I could get my f-stop down to f/3.5, and that increased my shutter speed to 1/640 of a second—plenty of speed to get a sharp shot. So, while it’s nice and sharp, it’s just a “meh” shot, which is why I needed to zoom in to make something out of it.
THOUGHT PROCESS: We’ve all been in these situations before where you see all this cool stuff in one place, but it’s so busy or crowded (like at an indoor market or busy city square) that it’s hard to think there’s even a shot there. In situations like this, it helps to remember that we don’t have to show everything we see in front of us—we can pick and choose what winds up in the frame. We can literally use our camera to cut this giant, busy, messy scene into small visual chunks that fit in our frame. That way, we can keep the distractions to a minimum.
In this case, I really liked the colors on this one particular vase on a shelf alongside other gifts for sale in the shop. By zooming in tight, we only reveal what’s in our frame—which, in this case, was just this one vase—as if it were all alone. If I had moved even an inch to the right, you would have seen the price tag of the butterfly carving behind it. So, while I’m composing the shot, I’m moving a few inches in either direction to see which one gives the least distracting image, and this was my favorite of the ones I took. Besides the color, what drew me to shooting it in the first place was the soft, diffused light from the skylights above (pretty rare in gift shops, I’d have to say). Now that I’ve mentioned how you can visually chop a scene like this into little pieces inside your frame, go back and look at that image on the facing page, and you’ll see how many good shooting opportunities are actually there.
POST-PROCESSING: I increased the Contrast amount in Lightroom’s Develop module (or Camera Raw), and then I darkened the outside edges by dragging the Post Crop Vignetting Amount slider to the left in the Effects panel. That’s pretty much it.
By Scott Kelby
Excerpt from The Digital Photography Book, part 5
Learn how to do more from The Digital Photography Book, part 5, here: http://kel.by/K1SMBook5


