
The Digital Camera: See Your World Differently
Envision the End Result and See Your World Differently

I’ve been interested in photography for almost 40 years. Even after all that time I still find the image capturing process quite magical and very rewarding. I see a scene, press some buttons, and presto—I’ve captured a split second in time, a personal moment that can be relived again and again.
Today, photography is more magical than ever, thanks to digital image capture and digital imaging programs such as Adobe Photoshop. For me, photography is a 50/50 deal: 50% image capture and 50% digital darkroom work. I say “for me” because a wedding or news photographer may not agree. He or she may simply (and honestly) picture the scene as it appears naturally.
Personally, I thoroughly enjoy enhancing my pictures in Photoshop. Knowing some of the capabilities of Photoshop, I take pictures with Photoshop enhancements in mind.
The shot
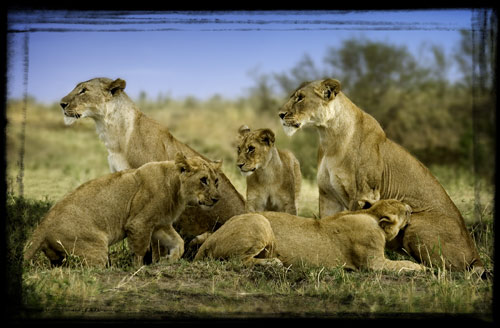
This shot of two lionesses with their cubs (which was photographed in the Masai Mara Game Reserve in Kenya, Africa, in September 2006 on an overcast day) is one such example. This is the straight-out-of-the-camera RAW file. I love the way the “moms” are on the lookout for predators and the way three of the cubs are positioned. But here are the things that I don’t like about the picture: (1) The way the face of the cub on the far left is half hidden; (2) the flat lighting; (3) the dull color; (4) the way the twigs are “sticking out” of the back of the lioness on the right; (5) not enough light in some of the cubs’ eyes; (6) too much dead space on the top and bottom of the frame; (7) the overall flatness of the image; and (8) not enough separation between the background and the main subjects (too much depth of field). Other than that, I think it’s a great shot!

Again, I took the shot with Photoshop enhancements in mind, enhancements that are outlined below. Let’s check ’em out! (By the way, you’ll see that I do a lot of layer flattening here. Some of it is necessary and some of it was done to make the process easier to follow. Usually, it’s best to use and save adjustment layers whenever possible so you’ll have the option to go back later and make changes.)
Crop and adjust contrast
Start by using the Crop tool (C) to trim off some of the top, bottom, and sides of the picture to draw more attention to the subjects. Don’t underestimate the power of this tool. Use it creatively and your picture will have more impact.

After cropping, use the Clone Stamp tool (S) to remove the branches sticking out of the back of the lioness on the right, as well as the cub on the left. Just Option-click (PC: Alt-click) to sample an area of brush around the branches and then paint over them with the Clone Stamp.
Next, use the Elliptical Marquee tool to select the eyes of the lionesses and cubs in the scene (hold the Shift key to add each eye to the selection). Then, increase the contrast of the eyes by going to Image>Adjustments>Brightness/Contrast. This technique simulates the effect of daylight fill-in flash, which can add light to a subject’s eyes. Press Command-D (PC: Control-D) to deselect.
The picture looks flat because it’s filled with mostly midtones, illustrated by the histogram shown in the Levels dialog (Image>Adjustments>Levels). Likewise, the image lacks contrast (shadows and highlights). To fix this problem, move the shadow slider (on the left) to inside the “mountain range” and then move the highlight slider (on the right) to the edge of the “mountain range.” That’s a basic quick fix for most images.

However, after the Levels adjustment, the picture looks too light. So go to Curves (Image>Adjustments>Curves) and slightly pull down the Curve line toward the bottom right-hand corner of the Curve dialog. This evenly darkens the picture. Pulling the Curve up toward the top left, by the way, would have the opposite effect.

Now it’s time to fix the washed-out sky. Start by duplicating the Background layer (click on the layer in the Layers palette and press Command-J [PC: Control-J]). In this example, I used the Photoshop plug-in Nik Color Efex Pro 2.0 (www.niksoftware.com). Using the Graduated Blue filter, I adjusted the sliders to add color to the sky. However, the beautiful blue filter now covers the heads of the lionesses. Use the Eraser tool (E) and a soft-edged brush to erase those areas of the picture on the top copied layer. This allows you to see through to the bottom, unfiltered layer. (I know, I know! Using a layer mask is the preferred way to hide and reveal effects, such as this one. I could have used one here; however, I’m trying to keep things simple to help beginners get the basic concept. The good news is that I’ll cover using a layer mask in just a bit.)

The image is starting to take shape. But as I always tell my workshop students, you’re really never done with a picture in Photoshop. You can always do more work—and have more fun!
Decrease depth of field
To add a sense of separation between the main subjects and the rest of the image, let’s blur the background and foreground—only. Flatten the image (Layer>Flatten Image) and then create a duplicate the Background layer again. Apply the Gaussian Blur filter (Filter>Blur>Gaussian Blur) to the entire copied layer. [Insert g.tif] Then, use a layer mask to paint away the blur over the main subjects in the center of the frame. If you’re new to using layer masks, here’s the basic concept: After creating a duplicate layer and adding the blur, click on the Add Layer Mask icon (third icon from the left at the bottom of the Layers palette). Next, with black selected as your Foreground color, select the Brush tool (B) and “paint away” the effect.
If you make a mistake and paint away too much of an area, hit the X key on your keyboard to change the Foreground color to white, and paint over the area again. Your mistake will be history, so to speak. To get back to work, hit the X key again to set your Foreground color back to black.
Now it looks as though the picture was taken with a longer lens and a wider aperture, perhaps a 500mm lens with a 1.4x teleconverter. (I actually took the photograph with my Canon 100–400mm IS lens set at 400mm at f/8 on my Canon EOS-1Ds Mark II.)

Sharpen then darken the edges
All files need sharpening. But why sharpen an entire image when only the main subjects need sharpening? And why create an entirely new layer mask to control the sharpening when the blurred layer already has a mask that we can use to our advantage? To sharpen the moms and cubs, click on the Background layer and duplicate it again, and then use the Unsharp Mask filter (Filter>Sharpen>Unsharp Mask). The layer mask on the blurred layer above will hide the sharpening in the background and foreground but will reveal it on the main lionesses and the cubs. The point here: Think about sharpening only the important parts of an image, rather than the entire image.

At this point, I thought about how Ansel Adams and the Renaissance painters darkened the edges of their photographs/paintings to draw more attention to the scene. To create that effect, flatten the image again, switch to the Rectangular Marquee tool (M), and select an area inside the picture that’s about a 1/2″ from the edges of the frame. Then use Feather (Select>Feather) with a Radius of 250 (if you have a low-res image, use a lower Feather Radius). The key is to have a smooth transition from the darkened area to the center of the frame. Once you’ve made your selection, go to Select>Inverse. Then, go to Image>Adjustments>Curves and pull down the curve from the center point toward the bottom right-hand corner until you’re pleased with the degree of darkening. Finally, go to Select>Deselect (sure, keyboard shortcuts are faster—learn ’em and you’ll save tons of time).
Here’s the result of all those enhancements—the result I actually envisioned when I took the picture.

The effect in the main image at the beginning of this column is one that I didn’t originally envision, but one that I think looks cool. I added the digital frame by using a Camera Frame in PhotoFrame Pro 3, a Photoshop plug-in from onOne Software (www.ononesoftware.com). I like digital frames because they “dress up” a picture.
So the next time you’re looking through your camera’s viewfinder, try to envision the end result. With Photoshop enhancements in mind, it just may change the way you shoot—and see the world.
