The Art of the On-Location Portrait

For the past 20 years, I’ve had the good fortune to lead photography workshops to the far corners of the world, mostly to photograph interesting, diverse, and remote cultures. Talk about travel being a great education!
This past November, eight students and I traveled with VSP Workshops to Namibia, where we had the unique opportunity to photograph the Himba, an ethnic group living in the northern part of the country. One of our goals, in addition to taking candid and lifestyle shots, was to take a series of on-location portraits. In this column, I’ll share with you some of the photographs from that shoot, along with some of the specific goals we set for ourselves.
Make pictures, don’t just take pictures
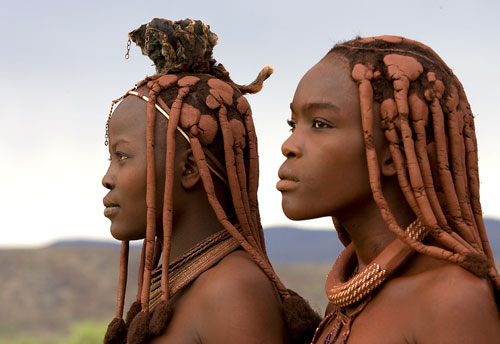
Anyone can take pictures, but not everyone can make pictures. Making pictures is creative, fun, and easy. Rather than simply pointing your camera at a subject and pressing the shutter release button, take the time to carefully position your subject or subjects in a scene, as I did when I photographed these two Himba women posed against a clear sky.

Work with a subject on his or her pose and expression. Create a balanced photograph. Watch the background. Choose the best f-stop for the appropriate depth-of-field, and the best shutter speed to either stop or blur action. Work—and play—at making pictures and you’ll feel a sense of accomplishment when you see the results of your effort.
Fall in love
For me, the key to getting a good on-location portrait is to fall in love—photographically—with the subject. That’s exactly what I did when I saw this young woman. Out of the 50 or so people who lived in this particular village, she caught my eye immediately. It was photographic love at first site.

So, the first tip is to find a subject that you absolutely must photograph, someone who moves you to say, “I’ll do anything to get that person’s picture for myself and to share with others.”
The camera looks both ways
One of my favorite photography adages is that the camera looks both ways—in picturing the subject, you’re also picturing a part of yourself. When you keep in mind that the energy, emotion, and feeling that you project will be reflected in your subject’s face, especially the eyes, and you’ll get a high percentage of pictures that you like. I’m sure you can tell how I was feeling when I took this photograph.

Take three
When taking headshots, take a head-on photograph, a profile, and a three-quarter’s view (as illustrated by the opening photo and the two previous photos). Photographing a subject from different angles gives you an assortment from which to choose your favorite.
Capture a natural moment
To capture a natural moment, you need to establish a sense of trust with your subject. That takes time—time you need to spend talking to subject, learning about her life, sharing information about your life, and why you’re there taking pictures.
Perhaps the most important part of establishing a sense of trust is to find a guide who has previously visited the location and who has already gained the trust of the people, as our group did with the Himbas.
Frame it
When you put a print in a frame, you basically dress up and enhance the picture so the frame complements the photograph. On site, you can frame a subject with a doorway, window frame, tree branches, or a fence. The frame must complement the subject. Framing a subject can also add depth to the scene, helping to create a 3D effect in a 2D image.
See and control the light
Seeing the light—the contrast, shadows, and highlights—in a scene is the first step in getting the best possible in-camera picture. The second step is knowing how to capture and control the light, either by using a flash, reflector, diffuser, or by moving the subject into the shade.
This little Himba girl’s face was partially shaded by her hair. To fill in the shadows, I used a flash for daylight fill-in flash photography. The picture doesn’t look like a flash picture (my goal with all my flash pictures) because I dialed down the output of the flash, which balanced the light from the flash to the ambient light.

For the trio of tight headshots of the beautiful young woman pictured earlier in the column, I had a student hold a gold reflector so the sunlight (which was over and behind the woman’s hut) was bounced back onto the subject. That’s why the pictures of the subject positioned in the dark shade look so bright and colorful. Without the reflector, the pictures would have looked dull and flat. So don’t leave home without a reflector, diffuser, or a flash. And keep an eye on the light.
Go interactive
When you share your pictures with your subjects, you make photo sessions more fun and interactive. After all, who doesn’t like seeing their pictures? That’s especially true for the Himba, who live in a relatively remote part of Namibia. Share your pictures, and you’ll see how easy it is to make new friends.

