
Feature: Photographing Great Interiors
Photographing interiors can be tricky and varies depending on the layout of what you’re shooting. This makes it so that no single setup will work every time. After shooting many interiors, I’ve developed a few methods that help make each shot go smoother and come out looking great.
The first and most important part of any setup is to nail your camera settings and find a great angle. The best thing about most rooms is that they’re designed to look great from the entrance, so often this will be the best angle to shoot from. With interior photography, your wide-angle lens is truly your best friend. For most shots, I’m around 12–18mm to be able to capture a full room.
To really show the room, you need to capture its built-in and natural lighting. Turn on all the lights in the room and set up your camera. You’ll typically use a shutter speed of about 1/50 to capture natural light perfectly at ISO 100–200.
It’s important not to choose too slow of a shutter speed or the natural lights will change the light balance and mix too much with your flash. By choosing the right shutter speed, it’s possible to avoid having to use gels altogether because your flashes will be the main source of light. This also lets the lighting in the room look warmer and bring a more comfortable feeling to the shot: an especially important detail when shooting real estate since people want a house where they feel at home.
From here, it’s time to adjust aperture. This will vary depending on what flash type you’re using, how far it stops down, and how large the room is overall. When I’m shooting with Nikon strobes, I typically have a more open aperture since they don’t provide as much power as my AlienBees Flash Units. The key here is to make sure that the flashes don’t completely drown out the glow of the light bulbs, and that they adequately light the whole room.
Room By Room
Following is a shot-by-shot explanation of lighting setups for each example, along with any tricks that I used to make each one come out great.
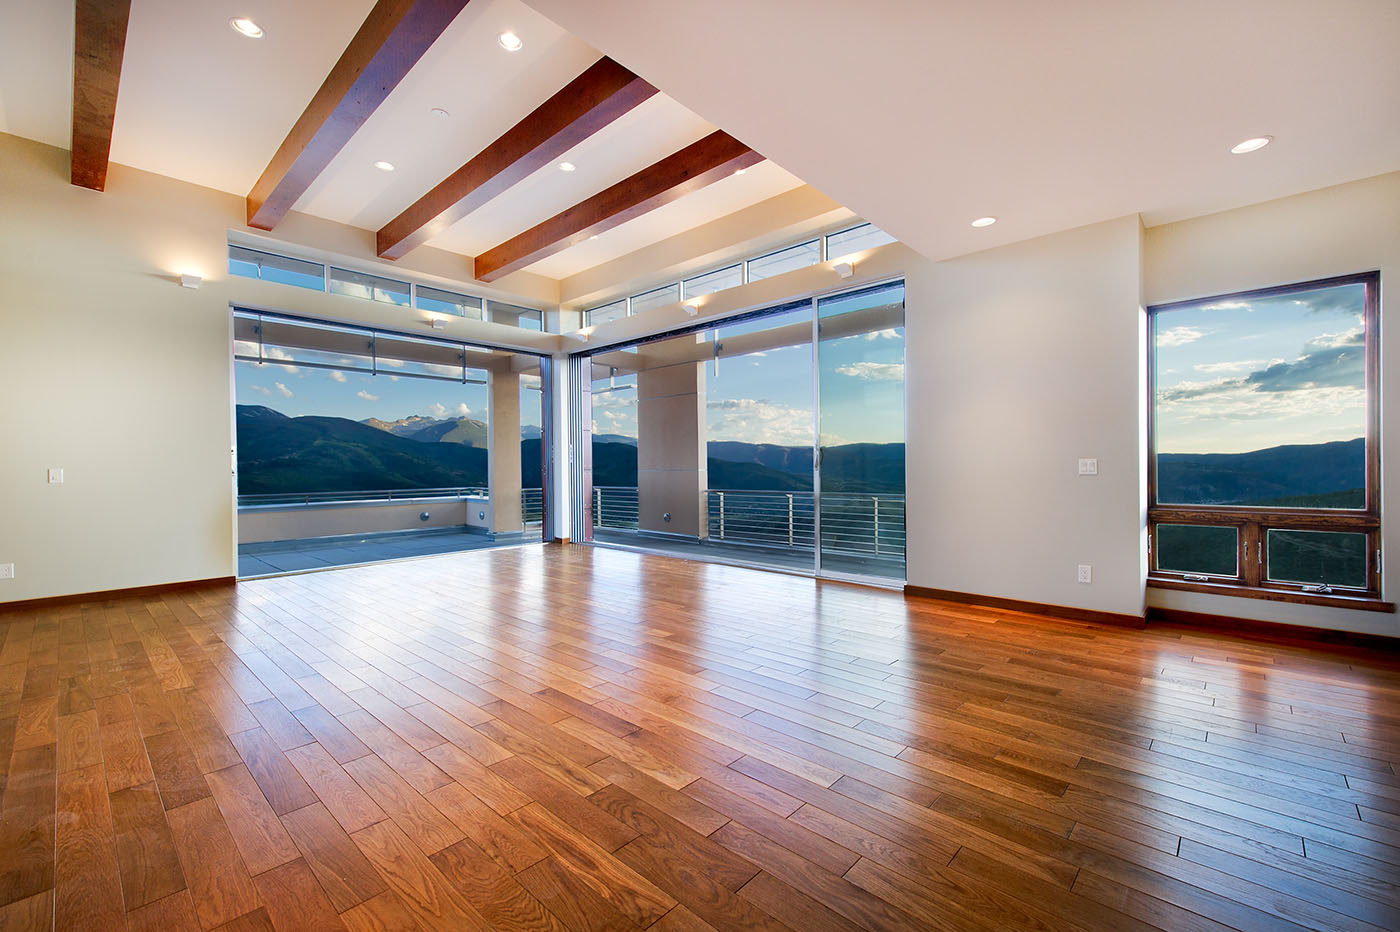
The photo above is one of my favorite interior shots that I’ve ever taken. I love how it brings the indoors and outdoors together, a feature that this room with sliding walls really offers. Lighting this shot took a lot of flash power to balance with the sun; therefore, it worked best to use my AlienBees B1600 Flash Units. These offer a lot of power and are very affordable.
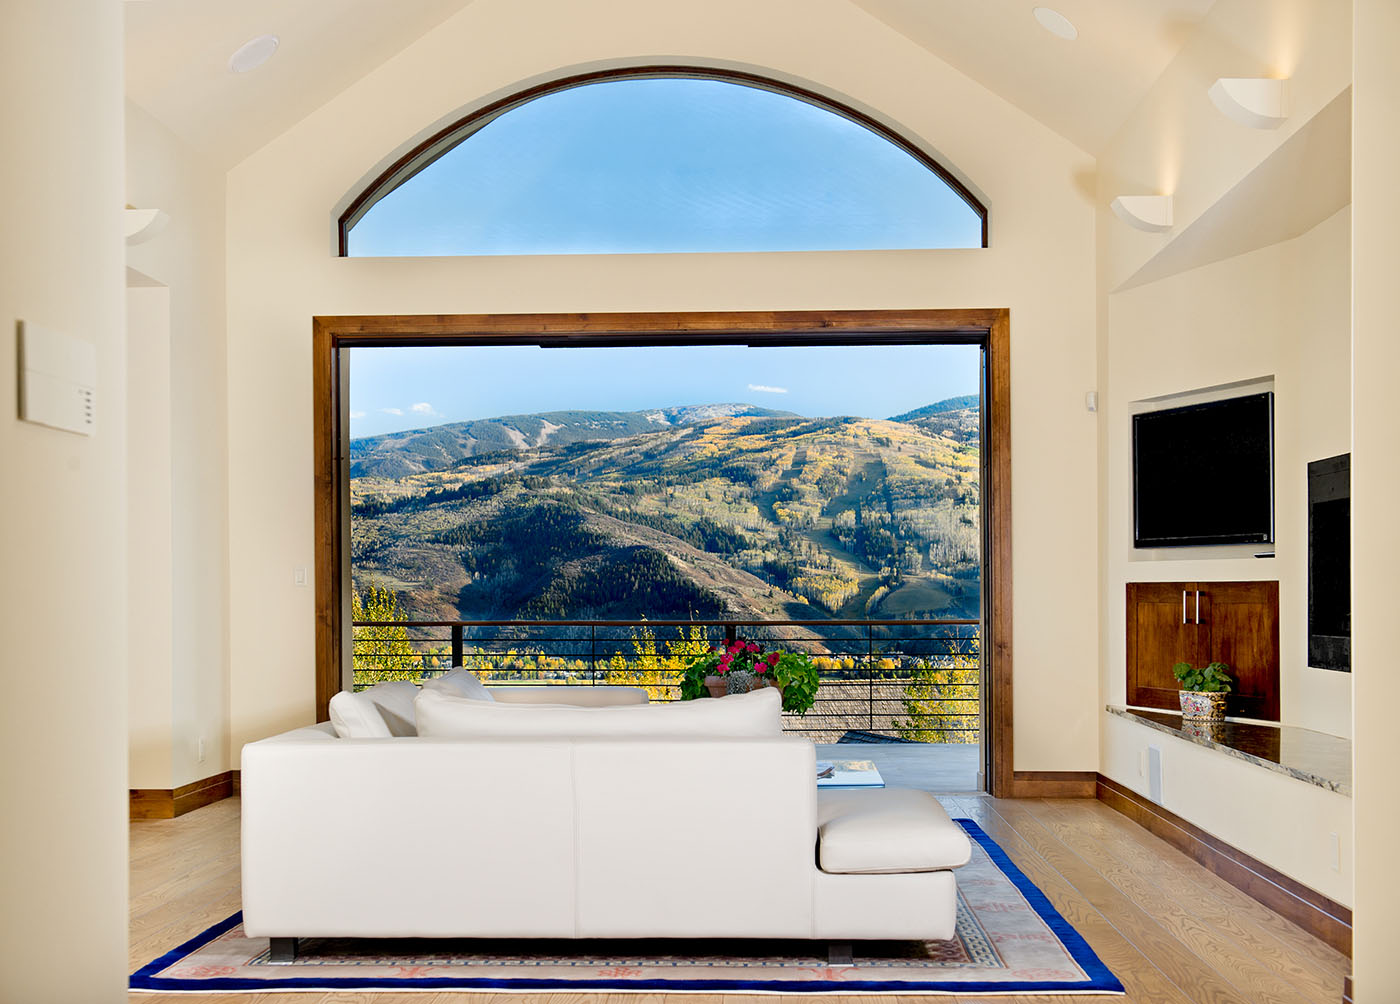
Flash on left is unmodified and bounced off the ceiling and acts as the fill light.
I knew that a starred sun for an interior would really make for an intriguing shot, so I set my aperture to f/16 to make sure it came out in a nice star shape. Because of this, I also knew that the lighting in the room wouldn’t have enough power, but that would be fine since there was so much ambient light already.
I set two flashes for this shot. The first was off to the left and back a little bit, with no modifier and aimed directly at the ceiling. The second was set off to my right with a large umbrella. You typically don’t need an umbrella on a flash that’s bouncing off the ceiling because the ceiling becomes your new and larger light source. The light with the umbrella was used to add a bit of fill and show some depth on the furniture. The one off the ceiling was the overall fill flash. I had to keep the bounce flash close to me so that the beams didn’t get too strong of a shadow cast off them.
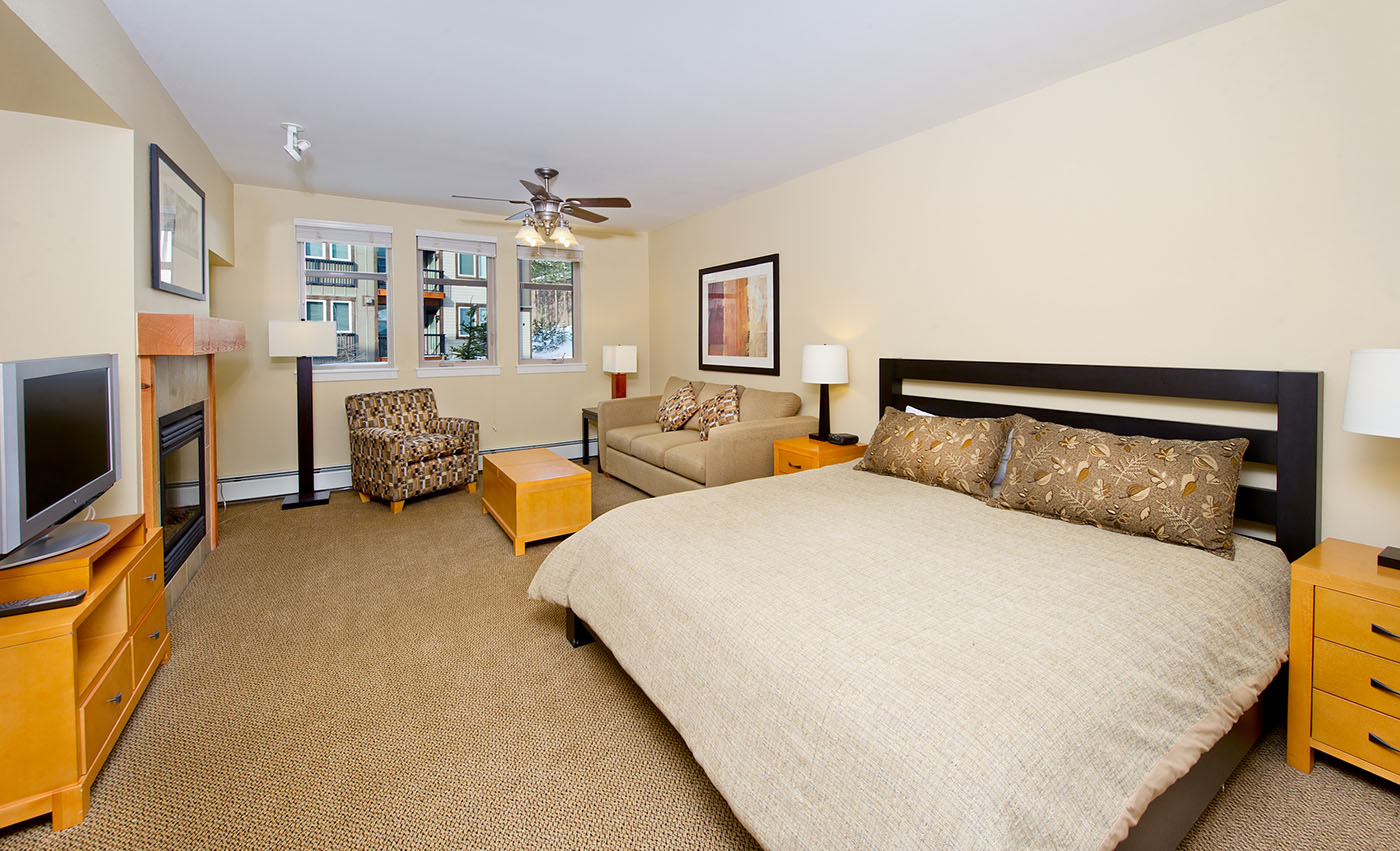
Ring light is about 2′ above the camera and tilted upward to avoid blowing out the bed and provide lighting to the back of the room.
Bedrooms are often the easiest to shoot because they’re typically a bit smaller, but still have enough room to set up lights wherever you need them. This shot was captured with an AlienBees Ringflash that I handheld about 2′ above the camera, tilted upward. The ring light provides a wide spread of light and by placing it off the camera a little bit, it still gives a bit of depth. Tilting it upward provided distance to the shot so that the bed wasn’t blown out and the back of the room received lighting, as well. That’s my quick, go-to setup for small, uncluttered rooms.
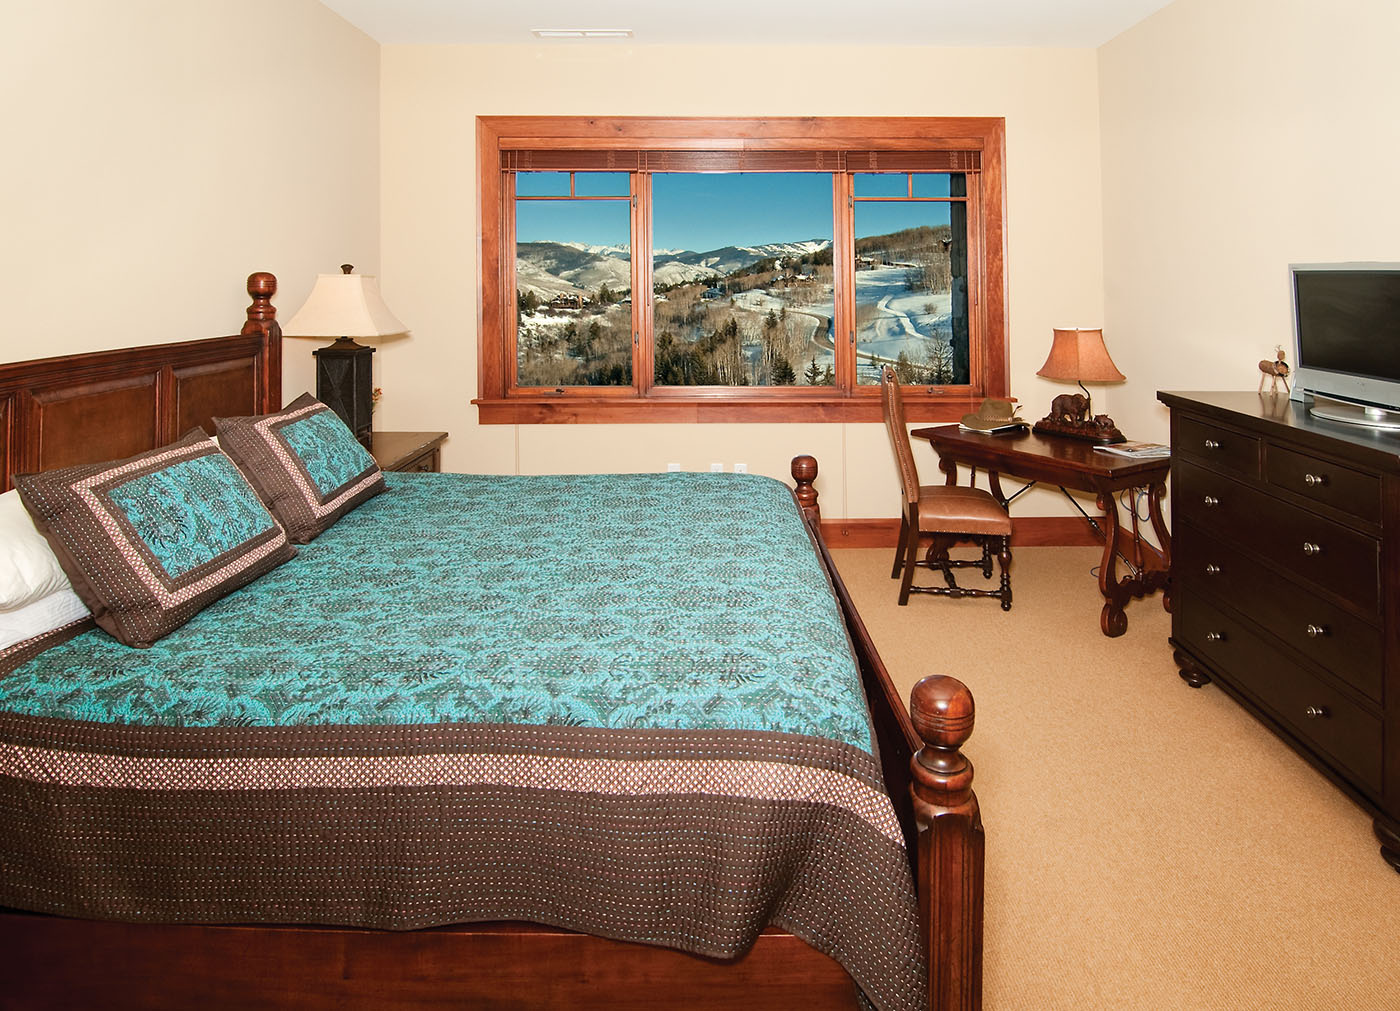
Capturing the view in a scenic place is often what makes the shot complete. For the bedroom shot, I took a second exposure with all lights off and no flash to capture the view with no glare on the windows. I then layered the shots in Photoshop to make the final image.
Large Areas
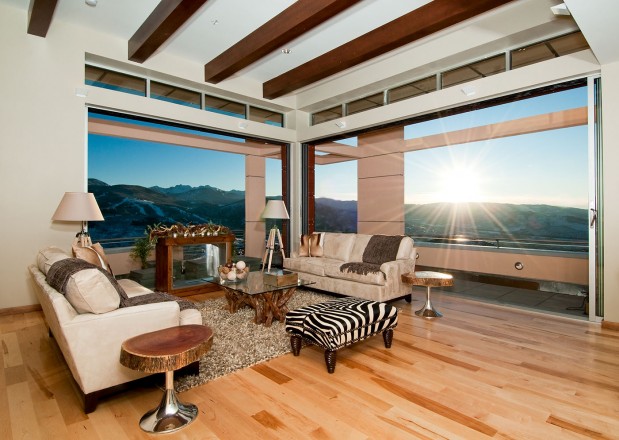
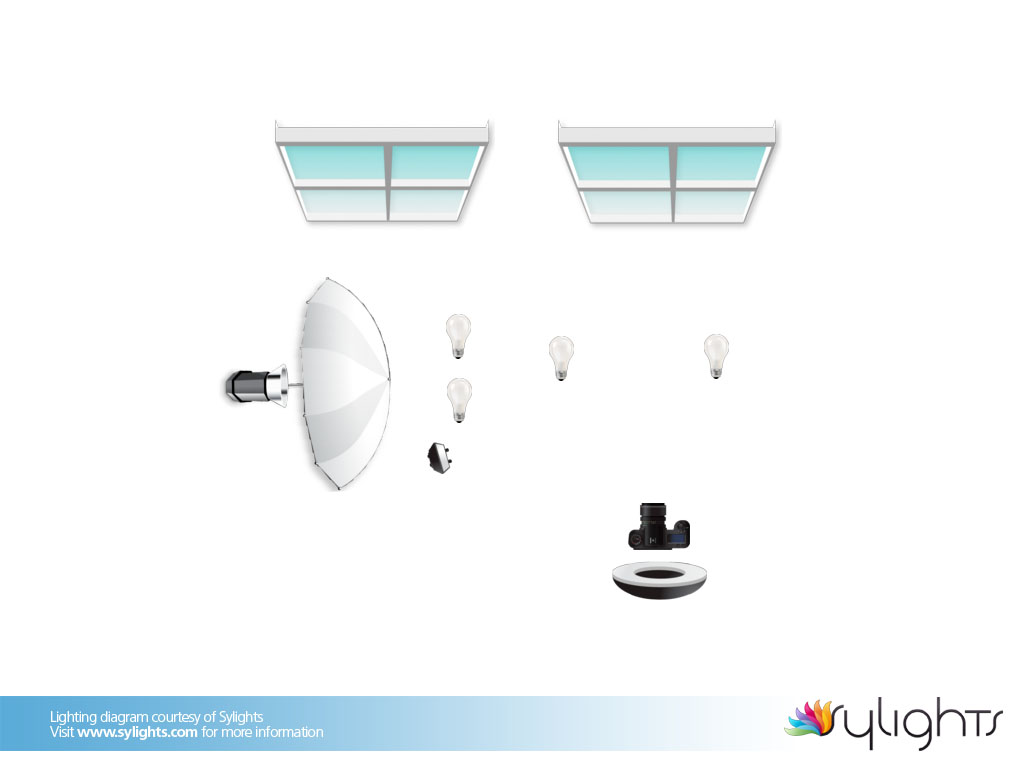
Cluttered rooms can be some of the toughest to capture with even lighting, especially if they’re fairly large. Because of all the furniture in this living room, my first thought was to bounce a flash from my position. This way I would get a fairly even light. I used the Ringflash for this one, held over the camera to bring a wide and even light to the closest elements, and bounced it to light the farthest couch.
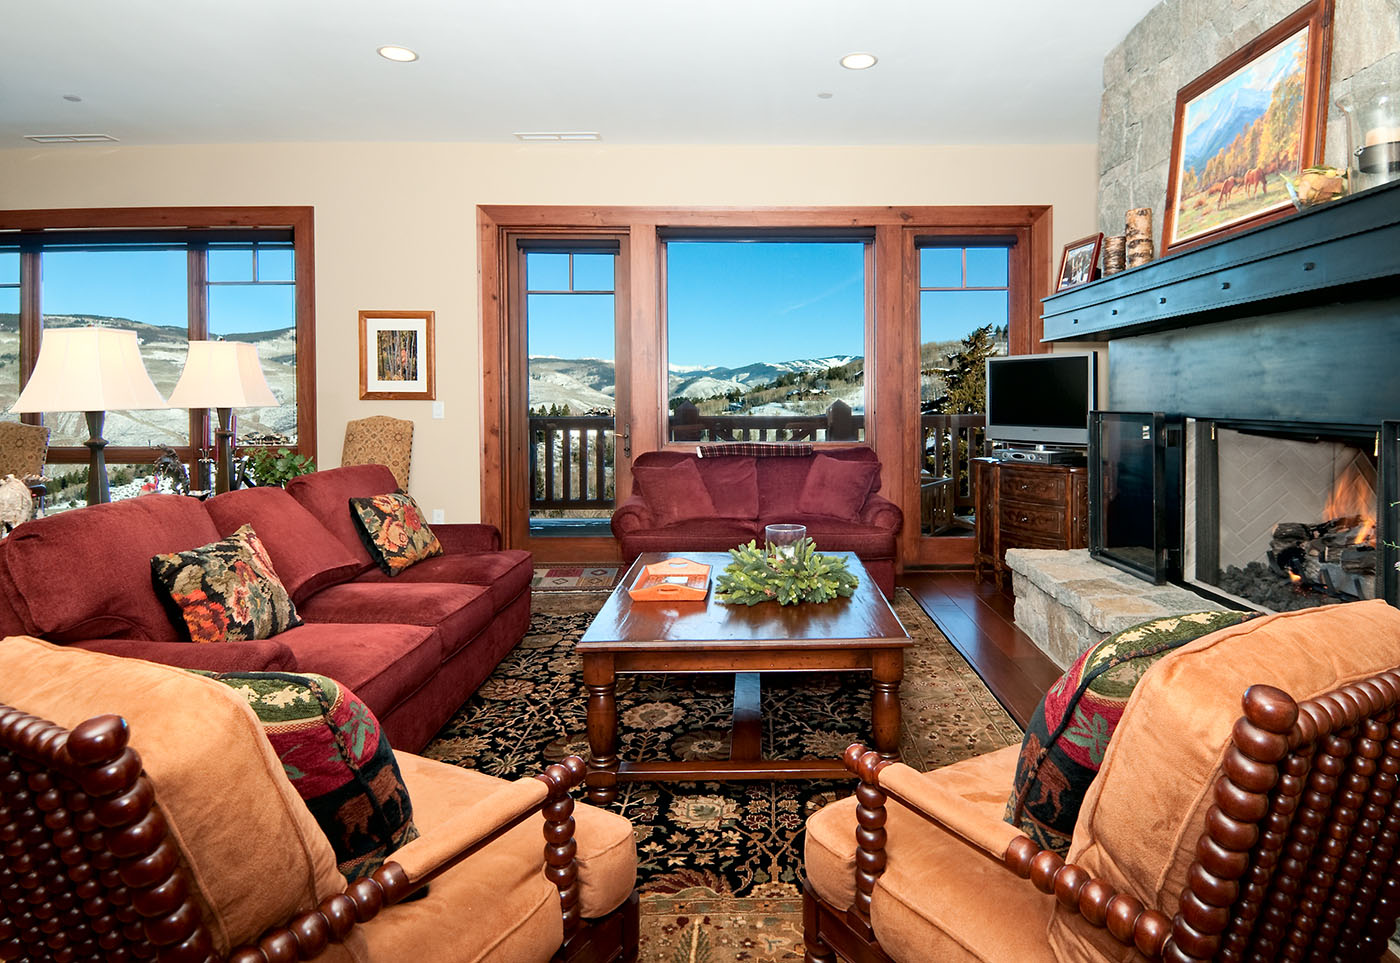
This created a fairly flat image that had no depth to it. On the left is the dining room, and I moved the chairs back and placed a large flash there with an umbrella to soften the light. I tilted this one up fairly far as well to get some bounce and to feather it so that the couch on the left wouldn’t be blown out.
For the final flash, I knew that the mantle and painting above it should be a focal element, even from this angle. I set up a Nikon SB-800 Speedlight aimed at the mantle and zoomed to 105mm, just to bring a bit of light on the piece.
The final image was created from three layered images. One shot with all the flashes, a second with the exterior shot and all lights/flashes off, and a third for the fireplace.
Kitchens
Kitchens and bathrooms are very tricky to work with. The toughest part of a kitchen, besides the amount of room you have for flashes, is avoiding too much glare. Some is unavoidable, but too much will ruin an image.
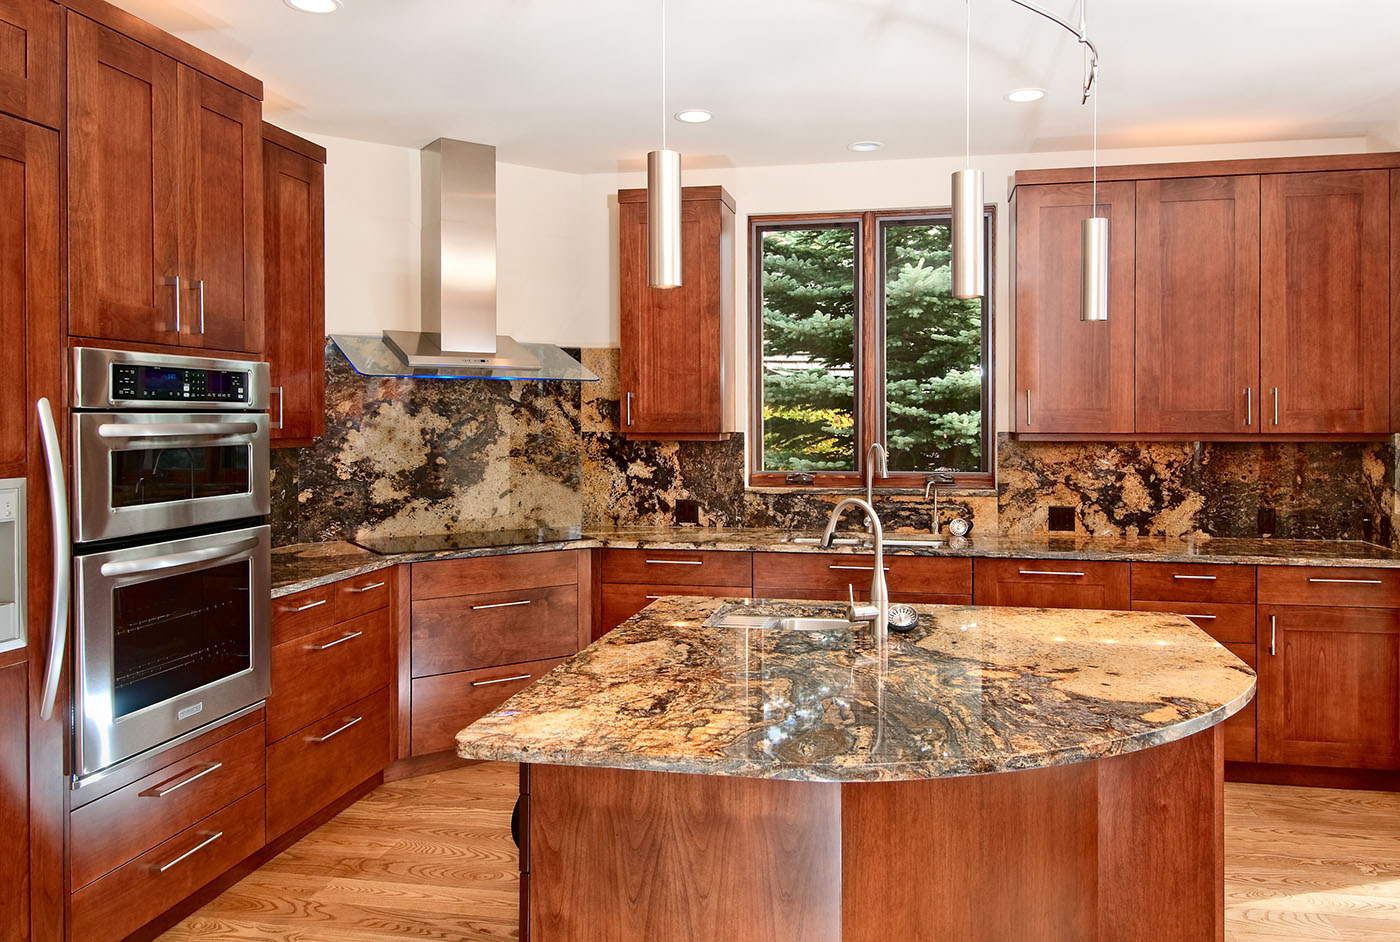
The best way to avoid glare is by getting the flashes a little ways away from you, and placing an umbrella or softbox on them. This shot was captured with an AlienBees B1600 sticking out through the door behind me with a large umbrella. I then feathered it up a little bit to avoid too much glare. This didn’t cover the right side of the room and left shadows on the other side of the counter. I counterbalanced it with an SB-800 Speedlight on the right and bounced it off the ceiling. I actually aimed it a little backward so that no hotspot would be created. Finally, a third SB-800 was added on the other side of the island and aimed at the right edge. This helped fill the lower cabinetry with light to even the shot.
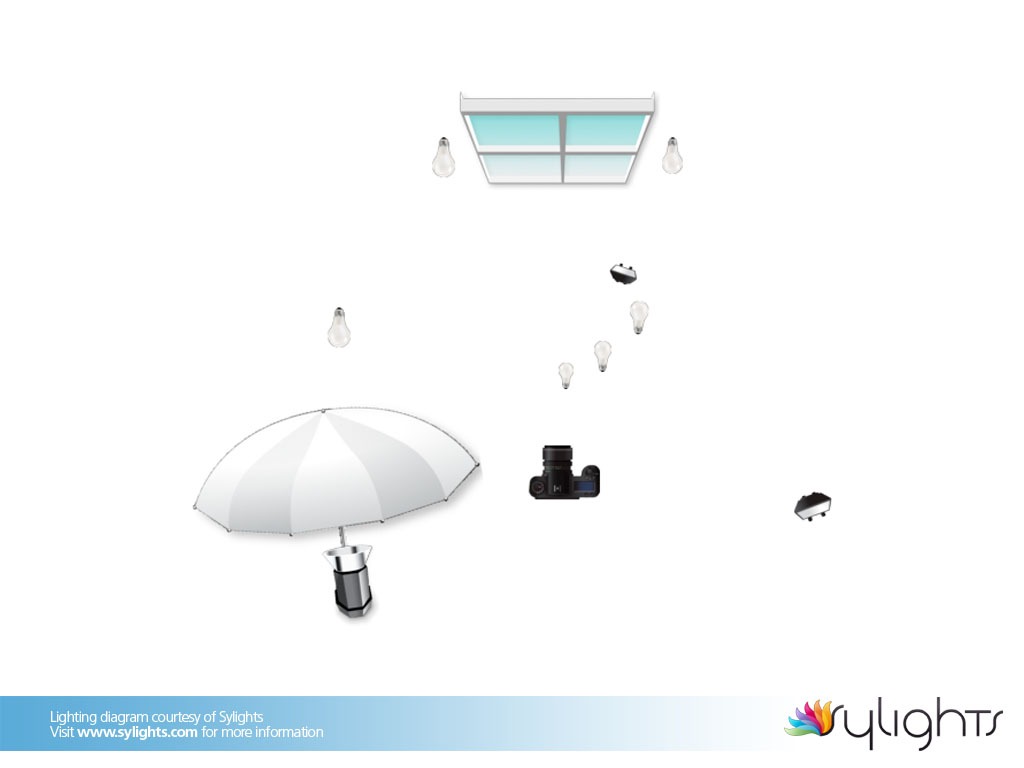
Flash on left is pointed upward; SB-800 to camera right is bounced off the ceiling; SB-800 on opposite side of kitchen island provides fill light for lower cabinets
Divided Rooms
Longer shots that include more than one room, or have walls and cabinets dividing them, call for an entirely different approach. Since I had some space to work with on this shot, I stepped back a bit and captured this at 24mm on a Nikon D300. This evened out the distortion to keep the lines straight.
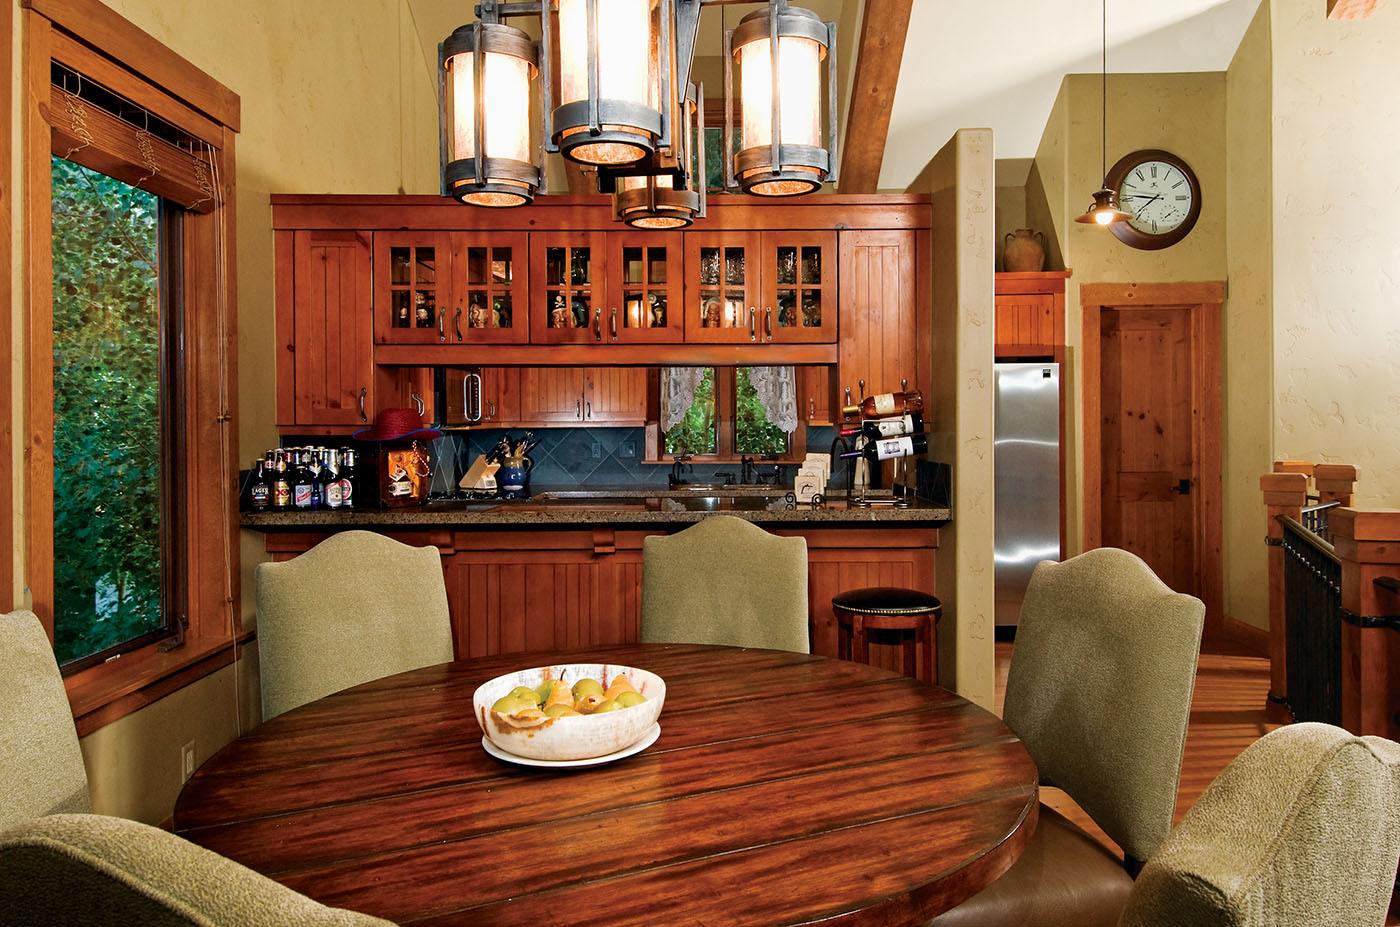
I knew that the table was the center piece in this shot and that it needed even lighting. I placed a B1600 flash a few feet to my right, with a large softbox to soften the blow. This was great for the table, but the rest of the room was still dark. I set another B1600 off to the right in the stairwell. This was raised with an umbrella and aimed toward the cabinets and kitchen. The far left of the kitchen was still dark, so I added an SB-800 on the counter behind the wine rack and aimed it into the far-left corner.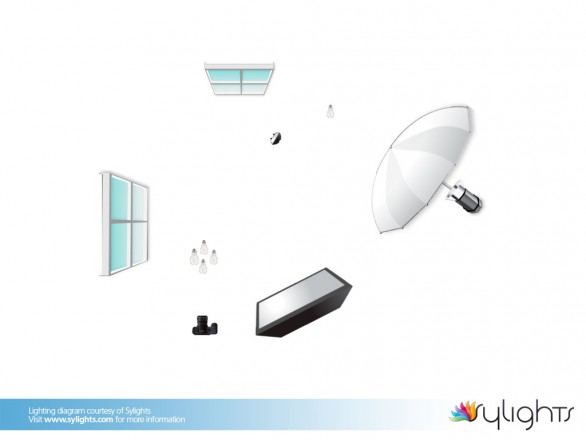 The combination brought light into all the necessary areas and the softbox really brought out the texture in the table.
Spend time experimenting in a comfortable environment before attempting
to shoot commercially with clients looking over your shoulder.
Lighting interiors is all about soft, even lighting and mastering a mixture of light sources, from interior light bulbs to natural ambient light from windows to your flashes. Capturing all three can be tricky but will create the most amazing photos. By controlling the levels of your flashes to match the ambient light, you can create beautiful images that don’t look unnatural and overpowered by flash. Think logically when you place your flashes and look for angles that won’t cast too many harsh shadows. It typically works best to keep them fairly close to you, and add a bounce flash whenever possible.
A great place to start getting into interiors is through your own house and friends. Spend time experimenting in a comfortable environment before attempting to shoot commercially with clients looking over your shoulder.
