
Photo Challenge #8: Shooting the Food!
Welcome to Challenge #8! If your image is selected as the winner, it will be featured on an episode of The Grid Live, it will be published in an upcoming issue of Photoshop User magazine AND you will receive an autographed Scott Kelby book of your choice! Additionally, one GRAND PRIZE winner will be selected from our 10 winners to receive a full KelbyOne membership.
PHOTO CHALLENGE #8: Shooting the Food!
Dates: 7/29 – 8/2 at 11:59pm ET
Winner Announced: Wednesday, 8/5 on The Grid Live at 4pm ET
CHALLENGE TIP
By Scott Kelby
Excerpt from The Digital Photography Book, Part 5: Photo Recipes
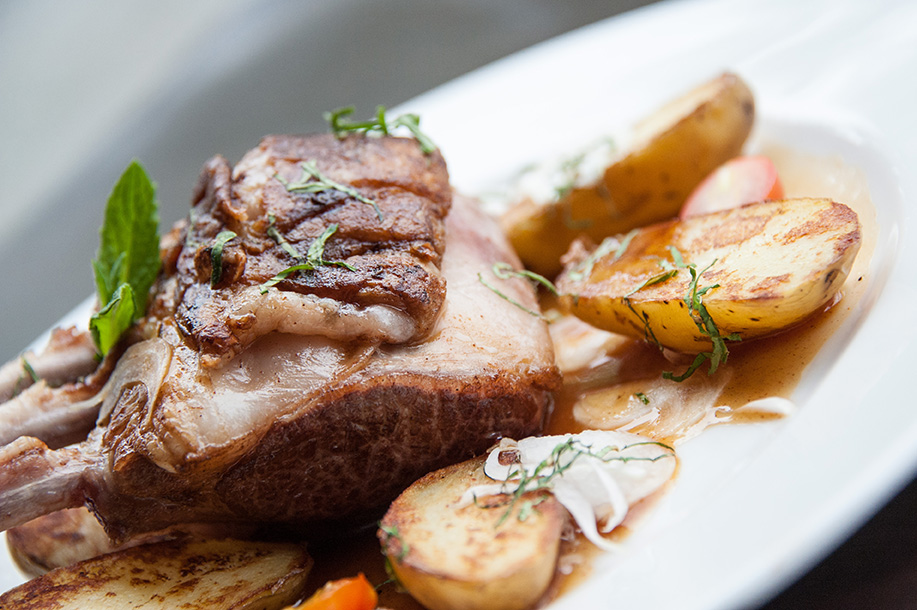
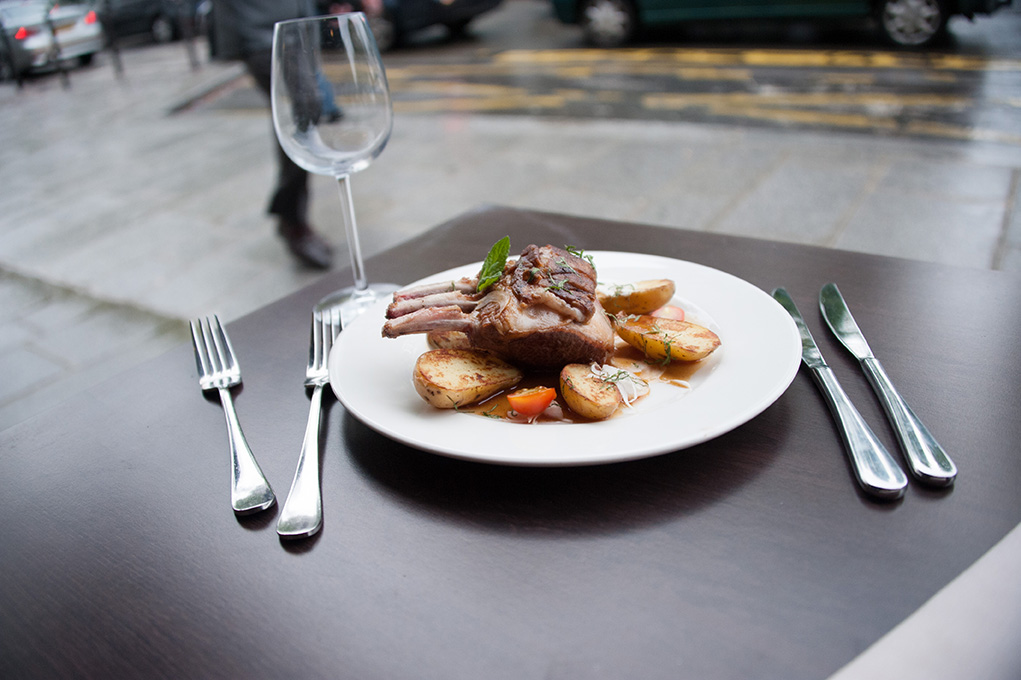
BEHIND THE SCENES: This was taken at an outdoor cafe (well, it’s not an outdoor cafe per se—there’s plenty of seating indoors, but I asked to sit outdoors), right along the Seine River and just behind Notre Dame, in Paris. It’s a simple setting, and I took a wide shot to show you the regular view of a tasty French dish. Hey! Where’s the wine?
CAMERA SETTINGS: For the final shot you see on the facing page, I was using my trusty 28–300mm f/3.5–5.6 zoom lens, and I zoomed in tight to 135mm (I was pretty darn close to the dish, so at 135mm I was really in tight). I used the widest (smallest numbered) aperture I could, which in this case was f/5.6. My ISO was set to 1600, since it was a cloudy, rainy day, but that was actually higher than I needed because my shutter speed was 1/500 of a second. So, I could have come down to maybe as low as 400 ISO and still had at least 1/60 of a second. Lowering that ISO would have given me a cleaner image (noise-wise), but as it is, you really don’t see any noise to speak of (and I didn’t run any noise reduction plug-ins or anything).
CHALLENGE IMAGE
THOUGHT PROCESS: I have a simple recipe for shooting food while on vacation, and it pretty much works every time. It starts with:
(1) Asking to either sit outside or to sit by a window. If you can’t do either, the rest isn’t going to work because when it comes to food, the lighting is critical, and it needs to be natural light. I’m not saying it’s impossible to get a decent food shot inside the restaurant with their tungsten lighting, but it sure is a lot harder because there are usually multiple light sources and weird shadows and color problems. So, if you can either sit outside or at a window, the rest is simple.
(2) Set your f-stop to your lowest (widest) possible setting (in my case, I could only go as low as f/5.6, but if you can get to f/4, or even f/2.8, it will look even better).
(3) Your goal is not to shoot the entire plate of food—just shoot a portion of it (just like with a big building, only shoot the detail). So, stand up, and then zoom in really tight on one area of the dish (as seen here). It’s okay to cut off the ends of the dish—just get in really tight. This will put the front of your food in focus, and the back of the food out of focus. At the same time, when you’re zoomed in tight like this, it puts the foreground closest to you out of focus, as well. Perfect!
(4) Now, tilt your camera at a 45° angle to the left or right (your choice) and take the shot. So, to recap: sit outside or by a window; set your f-stop wide open; stand and zoom in tight; then, tilt and fire!
POST-PROCESSING: Not much to do here. I just added a little contrast and sharpening. Why do I always add contrast after the fact? Because I shoot in RAW mode, which means it turns the in-camera contrast off. So, the photos look flat without me adding some contrast in Lightroom’s Develop module (or Camera Raw) after the fact. If you shoot in JPEG mode, the camera adds contrast automatically.
PS — Don’t forget to share this post via one of our social media buttons at the top of the post to be eligible to win. Accepting Submissions Here: Facebook, Twitter and Instagram with the hashtag #KelbyOneChallenge.
