PDFs are created with specific output in mind. Prepress-bound PDFs are usually large files with high linear resolutions and CMYK color spaces that aren’t optimized for other uses, such as sending via email or viewing on the Web. You can use Acrobat 9 to adjust the content and characteristics of a print-oriented PDF to repurpose it for just such a use.
Step 1: [OPEN PDF; DETERMINE FILE SIZE]
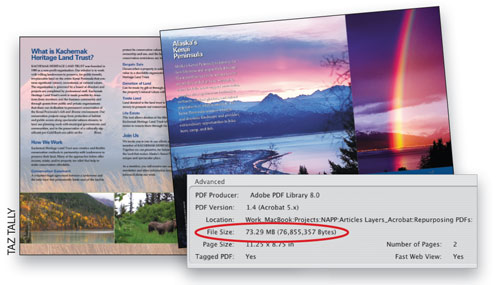
In Acrobat 9, open a commercial, print-oriented PDF (here a two-page brochure with uncompressed, 300-ppi, CMYK images). To determine its file size, choose File>Properties (Command-D [PC: Ctrl-D]) and view the Advanced section of the Description tab. Notice the current file size in this example is 73.29 MB—fine for commercial printing, but you’ll want to make this PDF substantially smaller to make it appropriate for sending or viewing over the Internet. You could create another PDF if you had the original layout files, or you can use the following Acrobat 9 tools to repurpose your PDF.
Step 2:[PERFORM A SIMPLE SAVE AS]
Choose File>Save As to save this PDF as another PDF (we named ours Brochure_Web_1). View this new PDF’s file size in the Document Properties dialog and it’s now 43.85 MB—about 40% smaller than the original file. Performing a simple Save As will often result in the deletion of unnecessary file components that have been retained in the PDF, dramatically reducing the file size without any reduction in the PDF’s output quality.

Step 3:[LAUNCH THE PDF OPTIMIZER]
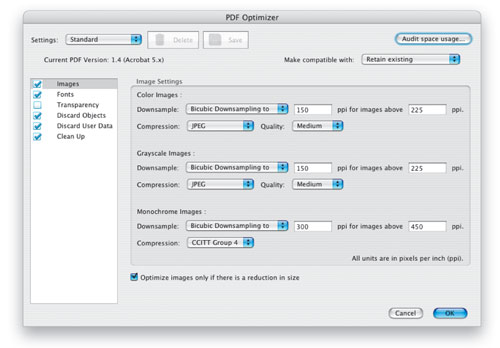
Further reducing the file size of this PDF can involve a combination of removing document components, reducing the resolution of contained images, and compressing file components. You’ll want to carefully consider which combination of these techniques you’ll employ to decrease the size of the PDF. Your goal—and challenge—is to minimize quality loss while maximizing file size reduction. The PDF Optimizer provides plenty of control over file size and quality, so choose Advanced>PDF Optimizer to open the dialog.
Step 4: [DETERMINE SPACE USAGE]
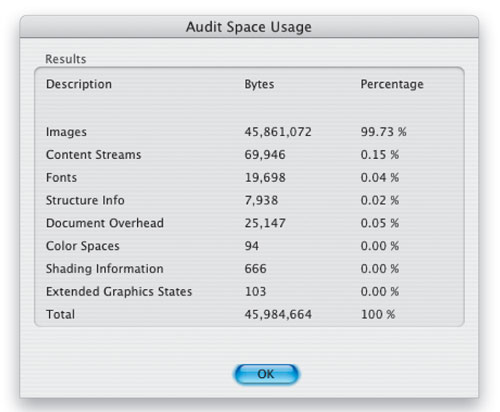
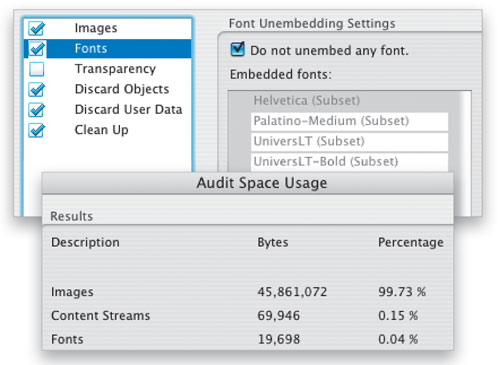
To know where to concentrate your digital weight loss efforts, it’s handy to know where most of the file size is contained. For many PDFs, the majority of the file size is contained in the graphic files. To see a detailed analysis of the content of your PDF, click on the Audit Space Usage button located at the upper-right corner of the PDF Optimizer dialog. For our example, you can see that 99.73% of the file size (45.8 MB of the 45.9 MB) is contained in the images. So we know exactly where to focus our weight loss program: the images.
Step 5: [ASSIGN IMAGE RESOLUTION]
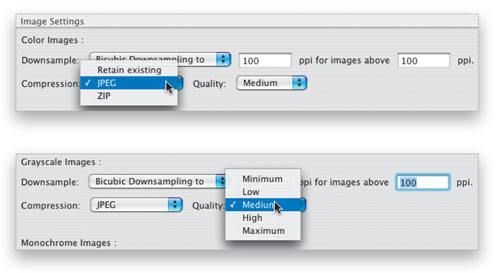
Click OK in the Audit Space Usage dialog and then click on “Images” at the top of the list on the left-hand side of the PDF Optimizer dialog. This is where you control the amount and method of resolution reduction. For both Color Images and Grayscale Images, try 100 ppi in the Downsample fields. (Don’t use 72 ppi, as this may not be sufficient resolution for displaying on a variety of monitors.) Also select Bicubic Downsampling To (the default choice) as your Downsample method to produce the smoothest tonal transitions in your image. For Monochrome Images, try 300 ppi. Don’t click OK yet.
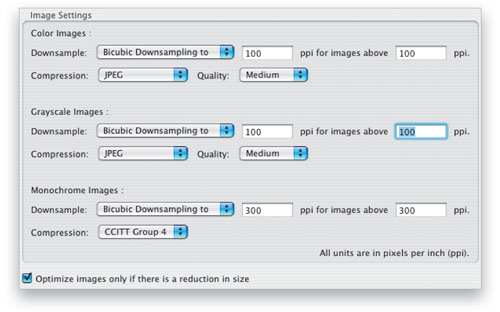
Step 6: [ASSIGN IMAGE COMPRESSION]
The amount and kind of compression you apply will determine how much tonal or color values you’ll lose. To prevent image data loss, try Zip Compression. This will result in less compression (thus less file size reduction) and works best for black-and-white images (and okay for grayscale images too). For substantial compression, assign JPEG, which typically varies from 5:1 to 100:1 compression and reduction in file size. For viewing only, you can often use Medium Quality (substantial but not maximum compression). If you intend to use these PDFs for desktop printing as well, you might want to choose High or Maximum. Experiment!
Step 7: [PREVENT UNNECESSARY OPTIMIZATION]
To prevent the Optimizer from applying unnecessary downsampling or compression, be sure to check the Optimize Images Only If There Is a Reduction in Size box. Even with this option off, Optimizer will automatically ignore any images that are lower than the prescribed resolution, such as Web images or screen grabs you may have placed in your layout (although there are none here in the commercial print PDF, and there better not be!). Note: You can protect delicate images from downsampling by saving them in EPS format prior to placing them in the original page layout before creating your PDF.

Step 8: [PRESERVE FONTS]
In any type of PDF file optimization, you typically want to retain the original font files that have been embedded to maintain the typesetting integrity of your document. Click on the Fonts list choice and check Do Not Unembed Any Font. While it’s true you can reduce the file size of your PDF by unembedding fonts, the file reduction is usually minimal (here embedded font files command only 19 KB or .04% of the file size) and the typesetting consequences are often significant.
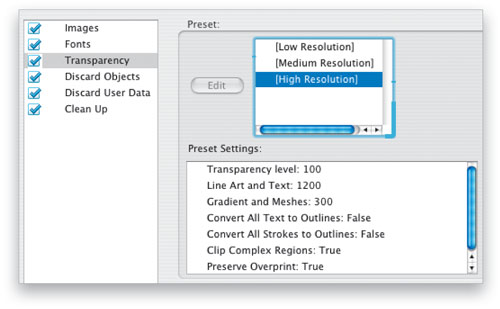
Step 9: [FLATTEN TRANSPARENCY]
Flattening transparency can help reduce file size in your PDF document; however, this may have little or no effect depending on the amount and complexity of the transparent areas. If the Transparency box is checked on, this flattening will be applied prior to any other optimization, such as image downsampling and compression. If you use this feature, try using the High Resolution setting to flatten the transparent areas, as this doesn’t convert text or strokes to outlines, and then count on the image processor to control the resolution and compression.
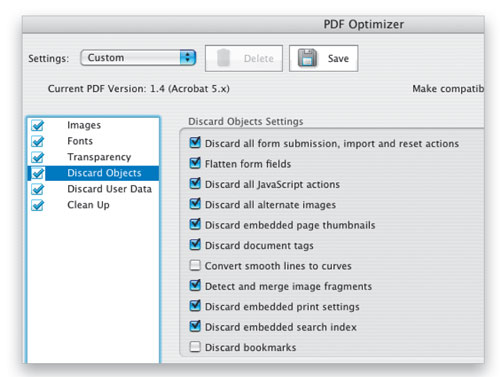
Step 10: [DISCARD OBJECTS]
Objects such as form components, JavaScript actions, and alternate images can add significant file size to your document. To selectively remove the various types of objects that can be included in a PDF document, click on the Discard Objects choice on the left of the PDF Optimizer. (The PDF document we’re using doesn’t have many of these objects.) Look through this list carefully though, as there may be some objects that take up little space but may be very helpful, such as bookmarks. Caution: Avoid checking the Convert Smooth Lines to Curves to prevent any unpredictable line alterations.
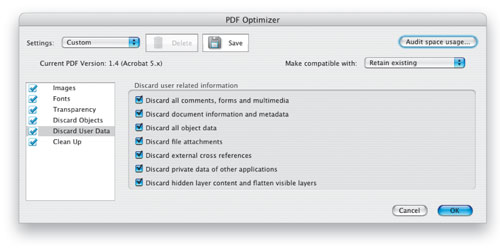
Step 11: [DISCARD USER DATA]
Just like Discard Objects, Discard User Data allows you to selectively reduce file size by removing various file components such as hidden layers, comments, forms, multimedia, and file attachments. In our document, this accounts for less than 1% of the document, but in other types of PDFs, this content may be significant. Again, pay attention to those document elements that you may want to retain, such as comments.
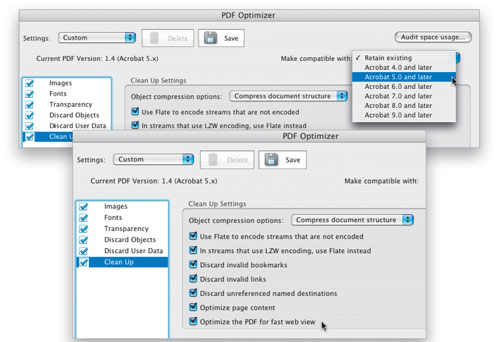
Step 12: [OPTIMIZE FOR WEB VIEW]
The Clean Up setting panel allows you to remove document content and apply compression to document components. But the most important option here is to Optimize the PDF for Fast Web View. This allows your website-placed PDF to be served up one page at a time rather than demanding the whole document
at once. This can really speed up Web viewing! Select Acrobat 5 and Later from the Make Compatible With pop-up menu to provide all-around viewing and opening compatibility of your PDF.
Step 13:[SAVE SETTINGS; OPTIMIZE; CHECK FILE SIZE]
Once you’ve set up the PDF Optimizer to suit your output needs, think about saving these settings (click the Save icon located at the top of the dialog). That way, you can easily use these settings again in the future. Now you’re ready to click the OK button to apply the PDF Optimizer settings. Acrobat will ask you to create and name the new PDF. After you save the new PDF, choose File> Properties to view the file size. Note that our file size is now only 728.88 KB—a 99% reduction in file size!

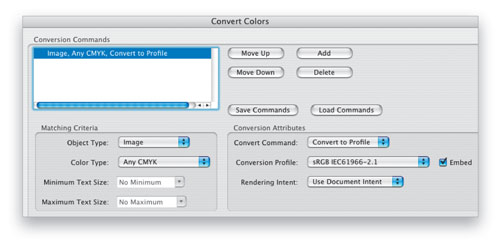
Step 14: [CONVERT CMYK IMAGES TO RGB]
Finally, convert your CMYK images to RGB. Choose Advanced> Print Production>Convert Colors. Under Matching Criteria, choose Image for Object Type and Any CMYK for Color Type. Under Conversion Attributes, choose Convert to Profile for the Convert Command, sRGB IEC61966-2.1 (for generic Web viewing) for the Conversion Profile, and Use Document Intent for the Rendering Intent. Check the Embed option on to provide color profile guidance when your PDF is displayed on various monitors. Click OK. This doesn’t reduce the file size by very much, but it will give you a better idea of how your PDF will appear when it’s displayed on the Web.