One-Light Bridal Portrait: On Location | KelbyOne
In this post, I’ll demonstrate a simple one-light bridal portrait, and keeping it simple is ideal because it lowers your stress level, and the bride’s. Plus, by using one light, you can focus on emotion and expression rather than fussing with a bunch of lights (it’s another one of those “less is more” things).
In this beautiful small church, there was a short hallway leading to an exit door and some storage closets, but the doors were a vivid red color and I thought that would contrast beautifully with our bride (who had a white dress and a pinkish bouquet). I thought we’d go ahead and try posing the bride in that short hallway, even though getting a light in there with the bride, without being seen in the shot, would be kind of tough.
Our lighting setup is just one flash head running off a lightweight portable battery pack, but we could have just as easily used a single hot-shoe flash. We used an Elinchrom Ranger Quadra kit, which consists of a lightweight (about 4 lbs) battery back with a strap on it so you can sling it over your shoulder, and a very small, lightweight (less than 10 ozs) flash head. This is one of my go-to rigs for location lighting because:
- It’s lightweight, portable, and fits in a carrying case that’s smaller than an airline carry-on.
- You get studio-quality light and a much brighter, more powerful light than you would with a hot-shoe flash.
- It has a built-in wireless trigger and lets me control the power of the strobe from my camera (the other matchbox-sized trigger sits on the camera’s hot-shoe mount).
- You can use two strobe heads with this one pack if you decide you need a second light.
- It’s designed so I can use any of my studio softboxes with it, which is exactly what I used. It was a small 27×27″ Elinchrom Rotalux square softbox.
Brad Moore assisted me on the shoot, as always, and he took all the behind-the-scenes shots you see in this article. We also hired a second assistant, Billy, who would sling the battery pack over his shoulder and carry it for hours without either the pack or the strobe getting too heavy. It’s perfect for shoots like this.
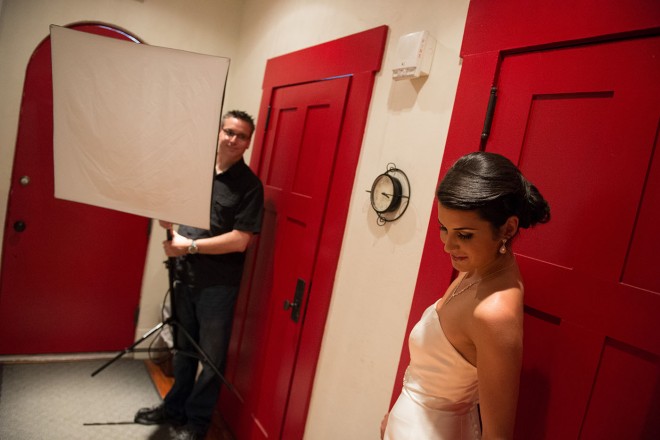
Figure One: The Hallway
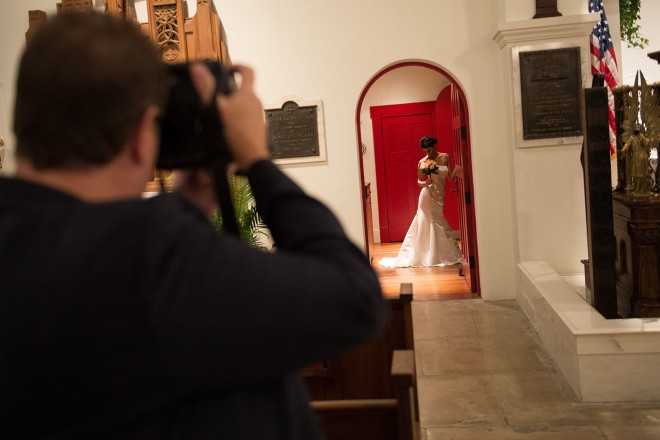
Here’s an over-the-shoulder view of the short hallway with red doors I was talking about. It’s actually much darker in the church than it shows here. Brad took these production shots in Aperture Priority mode at a high ISO, so these behind-the-scenes shots look properly exposed, but in reality it was quite a bit darker, especially in the hallway, which was lit with a few harsh overhead floods.
I would vary my camera height, either sitting or standing between the pews, depending if I was zooming-in tight or going for more a full-length shot, where I’d sit to get a lower perspective. I was using a 70–200mm f/2.8 lens and I prefer to shoot at the long end of the lens (all the way out at 200mm if I can) to get more pleasing lens compression.
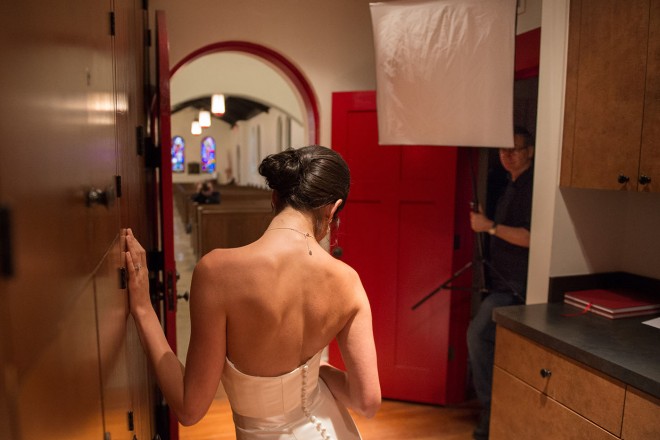
Figure Two: Hiding the Light
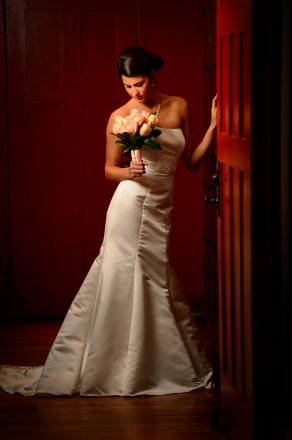
Finding a place to hide the softbox was a challenge in this tight hallway, so we opened a closet door and had our second assistant tuck himself inside the doorway a bit to keep the softbox from extending into the frame. If you look at this behind-the-scenes image, you can see me sitting in the pews, quite far from our bride—that way I could capture the full-length shot you saw at the beginning of this article.
The position of the light was pretty standard at around a 45° angle from the bride, up high and aiming down at the bride. We normally use a monopod for shoots like this (it’s easier to “run and gun”) instead of a light stand with legs, but since we started our shoot using a light stand in the back of the church, we just kind of picked it up and kept shooting. Having the strobe mounted on a monopod makes it easier to move between pews and in tight situations. The only downside? You have to keep holding a monopod—it doesn’t set down very easily (there are no legs and feet) without crunching the softbox, so you wind up leaning it against things, which means you run the risk of it falling over. It’s a tradeoff, like everything, right?
Figure Three: Final Image #2
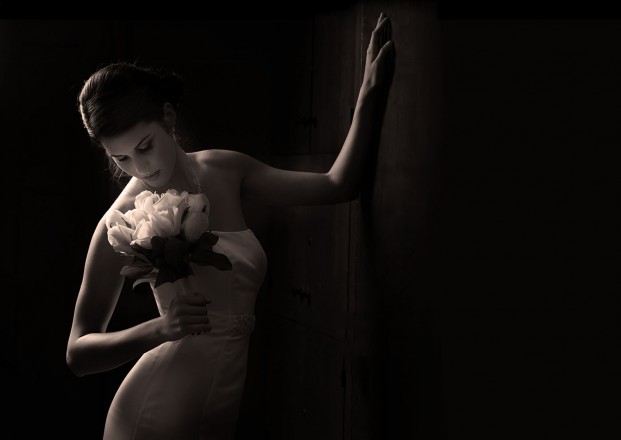
Once I had the full-length shot, I wanted to try a different look—one where the bride would be backlit with a little of the light spilling over. I also knew that I couldn’t have too many shots featuring that red door (it was such a dominant feature), so I went into this shot thinking that I might either make a black-and-white image or a duotone tint out of it, as shown here. The effect was added in the Split Toning panel in Lightroom (or Camera Raw) by using the Shadows Hue and Saturation sliders, and nothing else.
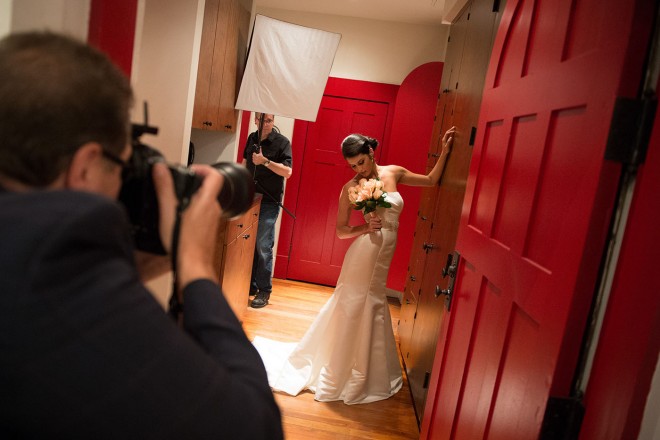
Figure Four: Backlighting Our Bride
I left the bride in the exact same spot, but I had Billy (our second assistant) take the strobe and softbox and move to the other end of the hallway to position the light behind her and off to the side. It’s pretty much the same lighting setup: about a 45° angle, up high aiming down, etc.; it’s just positioned behind the bride this time, as shown here.
I cranked up the power of the light for this backlit shot because I wanted to make sure it was powerful enough to not only put a rim of light around her shoulders, arms, etc., but also spillover enough so you could see her face. I also made sure to have the bride turn her head and body toward the direction of the light. Had she been looking the other way, we wouldn’t have had enough light spilling on her face or bridal gown.
Camera Settings
The only thing I had to do with my camera settings was to try different shutter speeds until I found one that let some of the existing light in the hallway blend with the light from my flash. In this case, after trying everything from 1/200 to 1/30, 1/80 seemed to do the trick. My ISO was set at 100 (the cleanest ISO on my camera), and my f-stop was f/5 so I could have the background a little bit out of focus. Using such a wide-open f-stop meant keeping the power of the light at less than 1/4 power most of the time.
The Biggest Challenge
The lighting itself was easy, as you can see. What we spent most of our time doing was trying to keep the light from bouncing everywhere inside that small hallway. Depending on how we aimed the light (either in the front, or from behind), you’d see a bright hot-spot on the red door she’s leaning against, so we kept trying to rotate the softbox by an inch or so in either direction until we could minimize it. Yes, I probably could have easily fixed it in Photoshop, but I hate having to fix something in Photoshop that I should have gotten right in-camera. I’m not saying I never fix my mistakes, I’d just rather do it right in-camera, or with the lighting. I think that’s a key part of my job as photographer—getting it right to start with, even if I don’t always achieve that goal.
Figure Five: Our Final, Final Shot
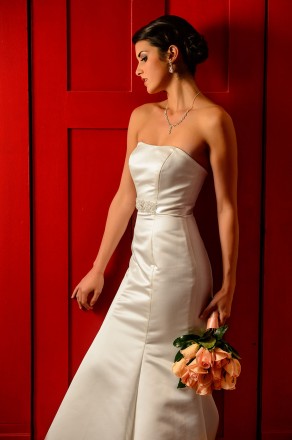
Here’s my third and final image, and this time I had the bride move to the back wall and pose against a different red door (there were a lot of red doors in such a small hallway). The other two images were very low key with just a little bit of light, but I wanted to try something where the door would be really well lit, bright, and prominent with the red color really big and bold, even though I knew that putting her against the door like this would probably create a lot of shadows falling on the door. I’m okay with that; I just want those shadows to be pretty soft.
Retouching note: Light reflects the color it hits, and having the light hit that red door reflected a reddish/yellowish tint onto the bride’s white gown, so in Lightroom (or Camera Raw), I used the Adjustment Brush, lowered the Saturation amount to −50, and then painted over the gown so it looked white again.
Figure Six: Lighting the Red Door
The hallway made an “L” shape, so I had Billy take the light and place it directly to the side of our bride. We took a test shot and the problem was the shadows were really harsh against that door, and the light wasn’t particularly flattering, so I had Billy feather the light (turning the light away from the bride so it’s not aiming directly at her). This softens the light big time and makes it more flattering, and it helped to soften our shadows, as well. It made a big difference.
Well there you have it: A simple one-light shoot, and three varied looks by changing the location of the light; once in front (off to the side); once in back (still off to the side); and one completely lit from the side (and then feathered to soften the light and shadows). Hope that helps!

