
Movie Posters in Adobe Illustrator CS5
As you may know, I’m a big fan of movie posters and I realized that I always create them in Photoshop. Recently, I was asked if it’s possible to do them in Illustrator as well. The answer is a resounding yes, and there’s a real advantage of doing something like this in Illustrator.
1 PSD FILES FOR ILLUSTRATOR
In this design, we’ll incorporate two photos processed in Photoshop into our Illustrator movie poster. Select two photos where the subjects are facing opposite directions and open them in Photoshop. Next, convert the images to black and white, boost the contrast for a more dramatic effect, add black-to-transparent gradients all around to hide the backgrounds in the photos for easier placement, and save the photos as PSD files.

2 CREATE A NEW DOCUMENT
In Illustrator, choose File>New to create a new document, click OK to use the default settings, and then choose View>Hide Artboards. Select the Rectangle tool (M) and click once where the artboard was to open the Rectangle dialog. Enter 8 in for Width and 12 in for Height, then click OK. This is a proportional size to an actual movie poster.

3 PLACE FIRST IMAGE
Choose File>Place, locate the first image, and click Place. Choose the Selection tool (V) and position the image in the upper-left corner of the rectangle. Scale and rotate the image to better fit the composition. Click to select the rectangle alone and choose Object>Arrange>Bring to Front. Shift-click to select the image and press Command-7 (PC: Ctrl-7) to clip the image into the rectangle shape. Now choose the Direct Selection tool (A), click on the path of the rectangle, click the Fill color swatch in the Toolbox, and set the color to black. This will make the image blend with the background.

4 CREATE A CLIPPING SHAPE
Select the Rectangle tool and click on the artboard again. In the Rectangle dialog, set the Width to 8 in, the Height to 3 in, and click OK. This shape is going to be another clipping shape for the second image. Before placing the second image, select the Shear tool (nested under the Scale tool [S]). Double-click on the Shear tool in the Toolbox to open the Shear dialog. Enter –20º for Shear Angle; in the Axis section, set Angle to 90º; and click OK.

5 PLACE SECOND IMAGE
Choose File>Place, navigate to the second image, and click Place. Choose the Selection tool and scale and rotate the image to best fit in the sheared rectangle. Select the rectangle path and repeat the same process we used in Step Three to clip the image to the rectangle shape. Remember to use the Direct Selection tool to reposition the photo inside the sheared rectangle, if necessary. Once the image is clipped inside the rectangle, place it in the poster layout as shown here.

6 GRAPHIC ACCENTS
Let’s add some graphic accents to the images. Choose the Line Segment tool (\) and click on the artboard to open the Line Segment Tool Options dialog. Set the Length to 8 in, the Angle to 0º, and click OK. Choose Window>Brushes to open the Brushes panel. Click on the Chalk – Scribble brush to apply it to the selected path.

7 ADD A STROKE
Open the Stroke panel (Window>Stroke) and set the Weight to 0.5 pt. Shear this stroked path to the same angle that we used in Step Four using the Shear tool. Note: We’re going to keep all the elements the same angle for a uniform layout.
Choose Window>Color, click on the Stroke color swatch, and choose a red color (R:200, G:0, B:0). Using the Selection tool, move this path on top of the second image. Hold down the Option (PC: Alt) key and click-and-drag a duplicate stroke to the lower edge of the image. Scale the width to give these lines some variation.

8 INSERT TEXT
Select the Type tool (T) and click on the artboard to set a text object. In the Control panel, set the Font to Impact and the Font Size to 100 pt. Type the words “REVENGE-OPS,” highlight the text, and set the Fill color to the same red color we used in Step Seven. Also apply the same shear angle that we’ve been using on the other elements.

9 ADD ADDITITONAL STROKES
Using the Selection tool, place the text in the poster layout just below the bottom image in the approximate center. Make some more duplicates of the stroked paths and add them to the top and bottom of the text to continue the theme. Be sure to vary the position and length to add more interest to the text.

10 ADD ADDITIONAL TEXT
Next, duplicate the movie title text using the same method as duplicating the stroke in Step Seven. Because it’s still editable text and has already been formatted to the proper angle, it’s easier to duplicate and enter new text. We’ll use the tagline “DON’T GET MAD. GET EVEN.” Using the Selection tool once more, scale and position the text in the upper-right corner of the layout.

11 INSERT A TEXTURED EFFECT
With all the graphic elements in place, we can now add texture to give the text a grungy look. Choose File>Place, navigate to a textured file of your choice, and click Place. Experiment with different textures. Shift-click to select all the red elements (the stroked paths and the text), then press Command-G (Ctrl-G) to group them. With the group selected, hold down the Shift key and click on the texture.

12 MAKE OPACITY MASK
Choose Window>Transparency, click on the panel’s flyout menu, and choose Make Opacity Mask. Note: You’ll see the text disappear but only because the texture (or mask) file is off to the side. This makes it easier to select the objects and the texture without selecting the background shape.

13 SLIDE TEXTURE TO SEE EFFECT
In the Transparency panel, you’ll see two thumbnails: one for the art and one for the mask. Click the chain link icon between the thumbnails to unlink the mask and the art, and then click on the mask thumbnail to work in mask mode. Select the texture on the artboard and click-and-drag it over the layout. When you release the mouse button, you’ll see the texture show through all the red elements.

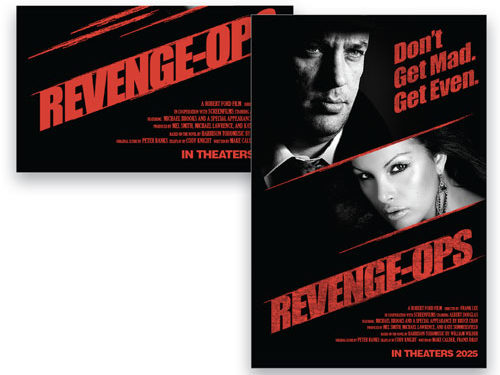
14 FINISH MOVIE POSTER LOOK
Remember to click on the art thumbnail to get out of mask mode, indicated by the bold line around the thumbnail. Finally, add the all-too-familiar credits at the bottom of the layout to finish the movie poster look. Note: If you need to reposition any part of the design, you’ll need to use the Direct Selection tool (the Selection tool will select the entire group and texture as a whole).

