
This is the second of a three-part tutorial on magazine design. If you haven’t done so already, complete the first part of the tutorial first and download the support files to follow along.
Step 1
Open Adobe Illustrator and open the Japanese vector file with the gradient we created in the first part. Open the publication we created in Adobe InDesign. In Illustrator, choose a Selection tool and click on the Japanese gradient flag and go to Edit>Copy. In InDesign, double-click on page 2 icon on the Pages palette. Go to Edit>Paste and resize the object to go across the spread of pages 2 and 3.
Note: In InDesign, you need to hold Cmd (PC: Ctrl) when you resize the object. If you just click-and-drag the corner without holding Cmd (PC: Ctrl), it will crop out that section instead of resizing it.

Step 2
Next, let’s place the photo we want for page 4, the back cover, and you’ll see what I mean. Go to page 4 by scrolling or double-clicking on its icon in the Pages palette. Go to File>Place and place the bubbles.jpg file. With a Selection tool, click-and-drag it to move it so the photo is flush with the bottom of the page and towards the right. To crop out parts of the photo that are unneeded, click-and-drag a corner. If you want to resize it, hold down Cmd (PC: Ctrl).

Step 3
Now let’s add the cover images and titles of the articles. You could add the text into the image file in Photoshop, but if we want to change the text later it’s more of a hassle. It’s preferable to add the text in InDesign as text boxes over the image. In InDesign, go to page 1 and go to File>Place and place the file lines.jpg. Resize it and move it towards the center of the front cover. Go to Object>Rotate to rotate the text along the lines. Designers such as David Carson bring text design in magazines to a new creative level. Instead of just typing in horizontal text, try vertical text or coordinate it with the photo behind it, such as we do here.

Step 4
It should look something like this if it’s placed the same way as I did.

Step 5
Next, let’s create a nice title header for the bottom part of the cover. Open Illustrator and use the Ellipsis tool to draw a perfect circle (hold down Shift to maintain ratio for a perfect circle). Use the Rounded Rectangle tool to draw a shape on top of it like shown here.

Step 6
Click on each of the objects and change the Fill color to an orange color from the Swatches palette. Set the Stroke to None if it isn’t already. With the Text tool, click to add some text. Click again to create another text box for the page number. Resize the fonts with the Control palette. Alternatively, if you just clicked instead of clicking-and-dragging, you can click-and-drag the text to resize the text size. Move it over the objects as shown here.

{module:ads/large_rectangle}
Step 7
Click-and-drag around all the shapes and text, and go to Edit>Copy. In the InDesign document, go to the cover (page 1) and go to Edit>Paste and move the objects to the bottom left of the cover. Go to File>Place to place the same photo we have on the back (page 4), named bubbles.jpg. The cover should look something like this so far.

Step 8
Let’s add a title and an “about us” section of text on the cover. On page 1, click-and-drag with the Text tool to create a title at the top. I used Impact for a strong font. In the bottom right-hand corner, click-and-drag a text box and type out what your publication is about.

Step 9
Now let’s insert the articles. Go to page 2 (the left hand side of the inside spread) and go to File>Place and place the Word document file, Kimonos and Video Games.doc. Once you select the file and click OK, the cursor will turn into a paragraph mouse icon. There’s two ways to place the text. You can either just click somewhere and the entire article will be placed and you can resize the resulting text box. Or click-and-drag out where you want the paragraphs to be.
For this tutorial, let’s use the second technique. Click-and-drag in the left hand side of page 2, from near the top to the bottom to create a column of text. Most of the article will still not be placed, so there will still be text to be placed. Click once on the red plus sign at the bottom of the text box and click-and-drag from the top to the bottom again. Repeat this for a third column, and then repeat it for the rest of the text to go along the bottom like shown here.

Step 10
The text is left-justified, which is what text usually is if you’re using Word or some other word processor. But we want it to fill the columns like they do in newspapers. So select the text in the article and click the Justify icon on the Paragraph palette.

Step 11
One of the biggest problems of beginning layout editors, at least in my experience from advising a university newspaper, is uneven paragraphs (besides copy editing, which is a different subject). There’s an easy way to vertically align the paragraphs. Click-and-drag from the top Ruler down to the text boxes to move it right below the first line of text. Then click-and-drag the text boxes to align them using this guide. Add a title and a subhead by adding new text boxes.

Step 12
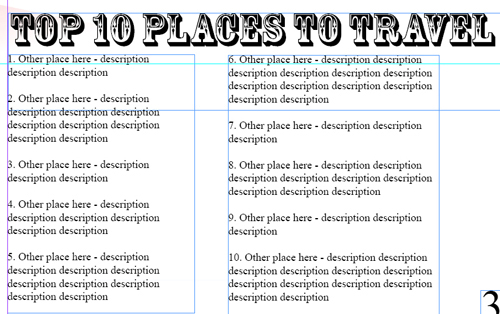
Let’s place two articles on page 3. Go to page 3 and go to File>Place and place the Word document, Top Ten Places to Travel.doc. Use the same techniques from the previous steps to create the columns in a customized way. Add a title above it. I used the Rosewood font. Place this article on the bottom half of page 3.
Step 13
Next, go to File>Place and place the Word document, Thoughts on Travel.doc. Add a title above it in the same font as the other article. (You don’t want too many fonts in a publication; perhaps 2 or 3 at most for body text and titles).

Step 14
Most of you may just manually add indents when typing in a word processor such as Word by using the tab key. There’s another way to indent the first line in paragraphs so you can add the indent after placing the text without having to manually go through and tab every indent. After selecting the text of the article we just placed, go to the Paragraph palette and change the value in the second-from-top field on the left to 1 pica (1p0).

Step 15
This will indent the first line in each paragraph automatically.

Step 16
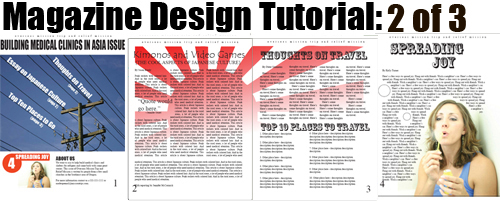
If you’re following along exactly as opposed to customizing the articles to your project, your page 2 and 3 spread should look something like this.

Save the InDesign publication to finish up this publication in the next and final section of this tutorial.
