Launch Your Creativity and Productivity with InDesign
Adobe InDesign CS2 is a great leap forward for efficiency-hungry, type-savvy creative people. Whether your layout work is production- or design-focused, InDesign CS2 offers a substantial portfolio of new tools to improve your workflow: the Quick Apply palette, auto-numbered and -bulleted lists, object styles, quick shape conversion, layers support for Photoshop and PDF files, and more. These tools give you freedom to explore creative ideas and the power to speed up repetitive tasks, like formatting type and objects.
Apply today
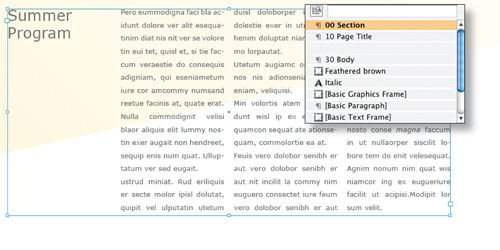
The Quick Apply palette is a space-efficient and speedy way to apply styles to text or objects (see “More style points,” below). The palette remains hidden until summoned with a keystroke or by choosing Edit>Quick Apply. To use Quick Apply, select some text or an object and press Command-Return (PC: Control-Enter). Use the arrow keys to move up and down in the style list, or type a portion of a style name in the search field to narrow the list of styles. Press Return or Enter to apply the selected style to the text or object. To force the text or object to discard any local formatting, press Option-Return (PC: Alt-Enter) instead.
When you’re building documents that have extensive style lists, use Quick Apply to format text and objects instead of opening the palettes for Object Styles, Paragraph Styles, and Character Styles, as this will save screen space for your document page and other palettes. You can also use the Quick Apply palette to edit styles on the fly. When the Quick Apply palette is visible, select a style name and press Command-Return (PC: Control-Enter) to display the dialog for editing character, paragraph, or object styles. This is a very fast way to refine styles across the entire document.
More style points
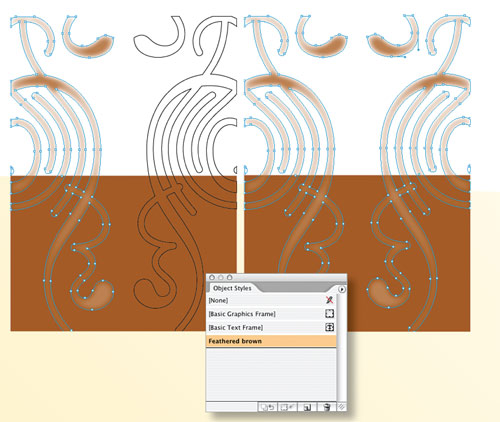
Object styles let you consistently apply the same fill and stroke colors, feathering, transparency, drop shadows, etc. to many objects with one click. In previous versions of InDesign, if you wanted several objects to share the same appearance, it was necessary to manually copy all the attributes between them. With InDesign CS2’s object styles, you can reuse an object’s unique attributes, including its text formatting.
To create a new object style, select a single object whose style attributes will serve as the template and click the Create New Style icon at the bottom of the Object Styles palette (Window>Object Styles). Apply an object style onto other shapes and frames by selecting an object then choosing the object style’s name from the Object Styles or Quick Apply palette. By default, new object styles will not include the paragraph style of the text within a text frame unless you edit the object style to include it. To edit the object style, double-click on the style name in the Object Styles palette. Select the checkbox for Paragraph Styles in the Object Style Options dialog to include a specific paragraph style with the object style.
Anchors away
For several versions, InDesign has supported inline or anchored objects (which can be any single object or a group of objects). To anchor an object within a text flow, copy the object or group to the clipboard, double-click to place your text cursor within a text box, and paste the copied item. When you reflow or edit the text, the anchored object or group will flow within the text frame. InDesign CS2 takes the anchored object idea further by making it possible to float the object outside the bounds of the text flow’s frame(s).
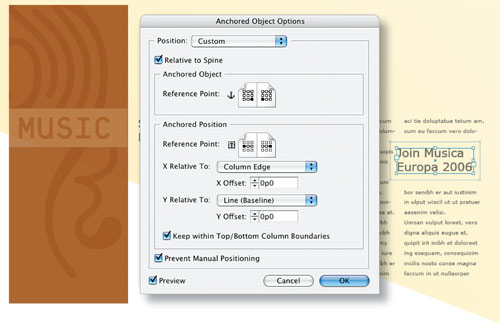
Select an anchored object and choose Object>Anchored Object>Options and choose Custom from the Position pop-up menu to view all the possibilities for placement on the page. Flow the diagrams, callouts, pull-quotes, or notes in the margin of a page, while maintaining control over the anchored object’s placement, relative to the text frame, page, or spread.
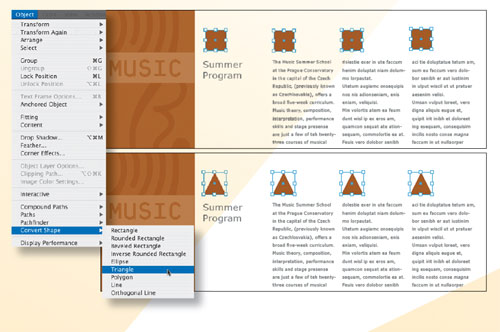
Shape shifter
To transform the shape of an existing frame, select the frame and choose Object>Convert Shape and select from several variations of rectangle, ellipse, triangle, polygon, or line. You can convert a series of rectangles into triangles (or any other shape) in one step.
Fonts list
To view type samples in the font menus, choose InDesign>Preferences>Type (PC: Edit>Preferences>Type), check the box for Font Preview Size, and choose the size of the previewed type from the adjacent pop-up menu. This will display a sample of each font in the font pop-up menus in the Control and Character palettes. If you have many fonts loaded and you find InDesign CS2’s font menus a bit sluggish, try turning off this feature.
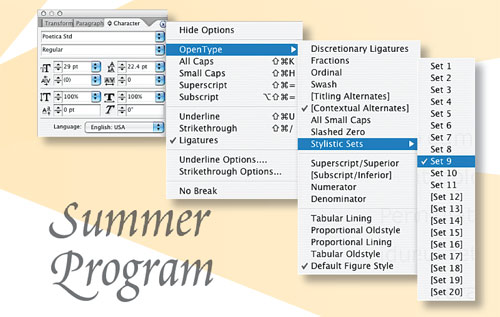
Alternative type styles
Certain OpenType fonts, such as Poetica Std, allow you to apply complete families of typographic alternatives, called Stylistic Sets, to your text with a click. Highlight the text on the page, click on the Control or Character palette’s flyout menu, select OpenType>Stylistic Sets, and choose a stylistic set.
Placing PDF pages
You can place some or all of the pages from a multipage PDF file in your layout. Choose File>Place, and in the Place dialog, select the PDF to import, select the Show Import Options checkbox, uncheck the Replace Selected Item checkbox, and click Open. Choose the previewed page, all, or a specific range of pages in the General pane. Click OK and the multipage PDF cursor appears to place the pages of the PDF.
Click once on your document to place the next page of the PDF. To place all of the PDF pages at once, hold Option (PC: Alt) and click once on your document. There’s no means to place a sequence of PDF pages automatically across document pages, so you must click once each time to place the next page.
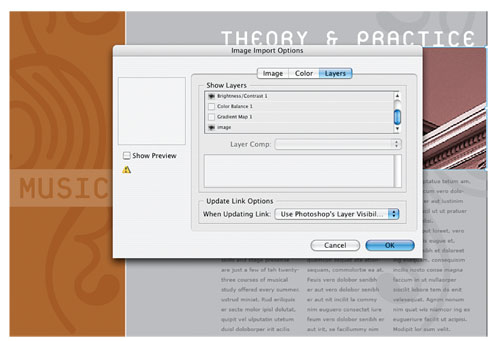
Layer cake
InDesign CS2’s multilayer support allows you to choose which layers of a multilayer Photoshop or PDF file should appear in the placed image. Choose File>Place and select the Show Import Options checkbox in the Place dialog. In the Layers pane of the Image Import Options dialog, click the Eye icon next to the name of an image layer to turn it on or off.
To edit the layer visibility of a multilayer image after it’s placed, select the image with the Direct Selection tool or the new Position tool, and choose Object>Object Layer Options. In the Object Layer Options dialog, click the Eye icon next to the name of an image layer to turn it on or off.
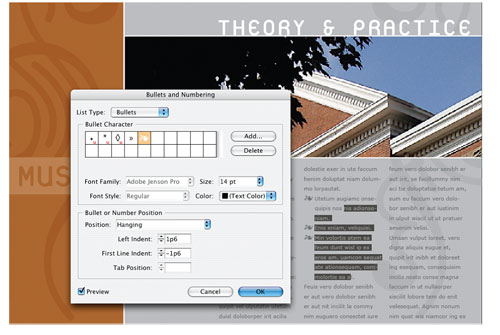
New listings
Lists of paragraphs in InDesign CS2 can be automatically numbered or bulleted. To view the numbered and bulleted list settings, choose Bullets and Numbering from the flyout menu from either the Paragraph palette or the Control palette when it’s in Paragraph mode. From the List Type pop-up menu, choose Bullets, Numbers, or choose None to remove any list formatting. Set the font, color, position, or bullet character for the list. Numbered and bulleted lists are essentially smart paragraph styles that add a user-defined bullet character or number and indent each paragraph for you.
Snippets
You may save an object or a group of objects for later reuse by dragging it onto your desktop, or you may select an object or group, choose File>Export, and choose InDesign Snippet from the Format pop-up menu. A snippet file is an XML file that remembers a group or an object’s contents, color, formatting, position on the page, etc. Use Place (File>Place) to add a saved snippet file to a layout using its original coordinates.
Checking Czechs
As you type, InDesign CS2’s dynamic spell checking (Edit> Spelling>Dynamic Spelling) flags misspellings with red wiggly lines under suspect words. To enable InDesign to fix misspelled words for you as you type, choose Text Autocorrect under InDesign>Preferences>Autocorrect (PC: Edit>Preferences>Autocorrect). You can add your own frequently misspelled words to the list in the Auto-correct preferences.

Solid footing
The footnotes feature creates automatically formatted and numbered footnotes at the bottom of each page within a text flow. Each footnote travels with its reference text as it moves from page to page. Choose Type>Insert Footnote to create a new footnote. For in-depth footnote numbering and formatting choices, choose Type>Document Footnote Options.
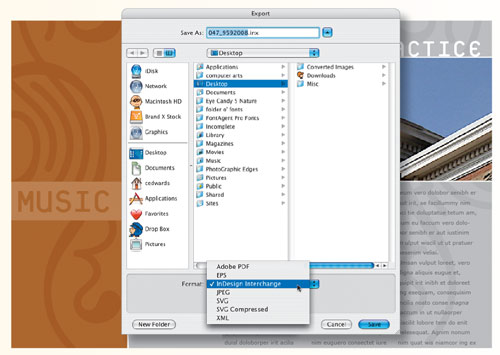
Going backward
While InDesign CS can open InDesign CS2 files, it requires an extra step or two and the process isn’t trouble-free. To export your InDesign CS2 files to a format that InDesign CS can open, choose File>Export, and choose InDesign Interchange from the Format pop-up menu. Files saved in the Interchange (INX) format can be opened with InDesign CS with some exceptions for third-party plug-ins and CS2-only features. Since this process is a conversion, some parts of a CS2 file may not be converted in the expected manner. Also, you may have to disable all third-party InDesign plug-ins and restart InDesign CS2 before exporting a CS2 file to ensure that the resulting Interchange file will open without causing InDesign CS to crash.