Keep Your Eye on the Ball … 3D in After Effects
Animating your After Effects design in 3D space is fun and, for the most part, easy to achieve. However, the camera and objects can have their own agendas in some instances, but a few tricks can change a seemingly uncontrollable camera animation into pure, cool cinematography…
1 CREATE COMP; IMPORT/CREATE FOOTAGE
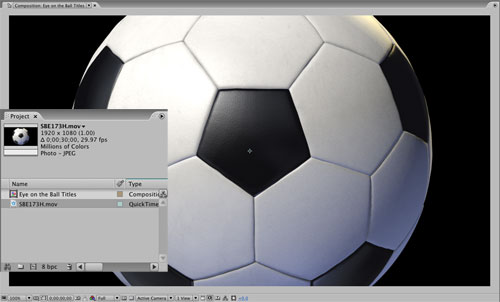
Start out in a blank After Effects CS3 project, and press Command-N (PC: Ctrl-N) to create a New Composition. In the Composition Settings dialog, choose HDV/HDTV 720 29.97 from the Preset menu, enter 6 seconds for Duration, and click OK. Then create, or double-click in the Project panel to import, an item you wish to move the camera around in 3D space. (For this flyby title animation, I’m importing a clip named SBE173H from Artbeats.com—an HD clip of a 3D-animated soccer ball.) A circular element like this will add even more 3D depth to the scene. When imported, drag the clip into the Timeline.

2 MASK CLIP
In the Timeline, double-click the ball clip to open it in a Layer window, then go to the Toolbar and choose the Ellipse tool (nested under the Rectangle tool [Q]). Position the cursor in the center of the ball, start dragging, and then hold down Shift and Command (PC: Ctrl) to proportionately constrain and center the circle. Double-click a point on the mask to position and scale it to fit the edge of the ball, then close the Layer window and select the main Selection tool (V). If you click the Toggle Transparency Grid icon in the Comp window, you can see that the ball is now separated from the background. 
3 ADJUST SPEED; SCALE BALL; ADD SOLID
We want to make the ball spin faster, so click the {} icon at the very bottom left to expand the Stretch pane in the Timeline, then click on the ball’s Stretch value and change it to 25%. Close the time Stretch pain by clicking the {} icon again. With the ball still selected, press the S key to reveal its Scale property, and shrink it to the appropriate size (60% in this example). Now, go to Layer>New>Solid, make the Width and Height 1500×1500 pixels, click the color swatch, choose a bright color for visibility, and click OK. Click OK again, and then click-and-drag the solid below the ball in the Timeline. 
4 3D LAYERS; MOVE SOLID
In the Switches column, click the boxes below the 3D Layer icon next to both the ball and the solid—nothing will change, but now we can add perspective. In the Comp window, ensure that your 3D View Popup is set to Active Camera. Select the solid in the Timeline and press P, Shift-R, then Shift-S to reveal the Position, Scale, Orientation, and Rotation properties. Change its X Rotation value to 90° and its Y Position value (the second field on the Position line) to 900 to place the solid below the ball, acting as a floor. Finally, change the Scale to around 2,000%. 
5 ADD GRID & ADJUST
Animating in 3D space is much easier when you have reference objects or lines to work with—but a ball and a flat color solid don’t look much different from any angle! So go to Effect>Generate>Grid, and a square grid appears on the solid. Set the Blending Mode (in the Effect Controls panel) to Normal to see the original color of the solid, then change the grid settings to suit your needs. You can always switch Active Camera to Custom View 1 in the Comp window and then use the Orbit Camera tool (C) to view the scene from a different angle—showing the ball as a flat 2D object. 
6 ADD CAMERA; AUTO-ORIENT BALL
Switch back to Active Camera view, then go to Layer>New>Camera. Choose 35mm from the Preset menu, ensure the Enable Depth of Field checkbox is turned off, and click OK. As you saw in Step 5, looking at the ball from a different angle reveals a problem—the 3D layers are flat. But here’s a super little trick: Select the ball layer in the Timeline, go to Layer>Transform>Auto-Orient, choose Orient Towards Camera, and then click OK. Now the ball will auto-rotate to stay face-on to the camera! 
7 ANIMATE THE CAMERA
Let’s test this by animating our camera now. At 0 seconds in the Timeline, select the Camera 1 layer, hit P to open the Position property, and set the X, Y, and Z values to 2700, 500, and –1000, respectively. Click the Time-Vary Stopwatch icon to add a Position keyframe, then scrub along the Timeline to 5 seconds and change the values to –800, –600, and –300. Now scrub back and forth along the Timeline (or hit 0 on the keypad to RAM Preview), and you’ll see the camera and grid show movement, and the ball always looks totally 3D. Very cool but… 
8 ADD NULL; ANIMATE
…the ball is always dead-center of the screen, and this looks fake. So let’s do a small trick to fix that. At 0 seconds, go to Layer>New>Null Object, and then click the 3D box for the new Null 1 layer in the Timeline. Press P to bring up the Position property, change its X, Y, and Z position values to –600, 360, and 0, respectively, and then click the Stopwatch icon to add a keyframe at 0 seconds. Scrub along to 5 seconds and change the Null’s X, Y, and Z position to 500, 400, and 400. This is basically animating the Null to move in close proximity to the ball’s position, but with a different speed and end result. 
9 EXPRESSION CAMERA POI
So now we can tell the camera to look at the Null—and not the center of the ball—during its position animation, and this will offset the motion beautifully. Select the Camera layer and hit A to reveal its Point of Interest property (POI). This, by default, is always pointed at the center of the 3D scene, but it helps greatly if this is told to follow an object instead. Hold down Option (PC: Alt) and click on the POI Stopwatch icon, click-and-hold the Expression Pickwhip (swirl) icon, and drag it to the Null 1 layer’s Position value. 
10 ADJUST ANIMATION
Now when you RAM Preview, you can see a much more cinema-like feel to the camera movement—the ball goes off-camera slightly to one side, and the final resting position is more controllable, which allows for insertion of text, titles, and other elements. Go back to the Camera Position keyframes (select the Camera layer and press P), scrub to 5 seconds, select the second keyframe, and adjust its values to –800, –1000, and –800. Now Shift-click the final Position keyframe for the Null 1 layer so that it’s selected as well. Go under the Animation menu and choose Keyframe Assistant>Easy Ease In to ease the motion in slowly. 
11 ADD SOLID SHADOW; MASK
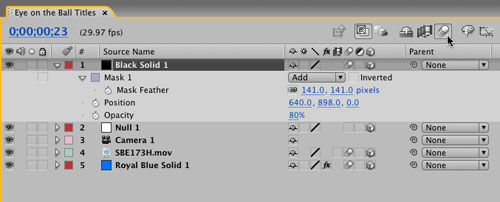
To give the ball some “lift” from the solid ground, let’s add a shadow. Using a light wouldn’t work very well, as the ball casting the shadow would be—remember—rotating to follow the camera, so the shadow would adjust its shape in a strange way. Instead, at 0 seconds go to Layer>New>Solid, set the size to 750×750, change the color swatch to black, and click OK. As we did in Step 2, use the Ellipse tool to create a circular mask from the center to about half way to the four sides of the black solid. 
12 ADJUST SETTINGS; ADD MOTION BLUR
Turn the masked solid layer into a 3D layer. Hit R to reveal its Rotation values, and set its X Rotation to 90°. Hit P to reveal its Position values, then set its Y Position to 898 until the solid is just above the floor. Hit F to reveal the mask’s Feather property and adjust to your desired softness. Finally, hit T to reveal its Opacity value, and lighten it slightly to show the floor through the shadow. Cool, eh? Now, in the Switches panel, turn on Motion Blur for the ball, shadow, and floor solid, and then click on the Enables Motion Blur icon in the Timeline. A RAM Preview sure looks great now! 
13 EMBELISH & COMPLETE
Now you’re free to change out the floor for other elements and graphics, adjust the position keyframes and timing, and get more daring with the moves and find keyframe combinations that really suit the project you’re working on. The main thing is, you now have full control of your camera and can accurately animate smooth cinematographic moves without the guesswork. Enjoy! 

