Troubleshooting in Photoshop, InDesign, and Illustrator
Be Your Own Creative Suite Help Desk
There are some lucky people out there who have IT departments that can fix any problem that arises on their computer systems. Then there are even luckier people who have an IT help desk that actually knows how to fix issues with the Adobe Creative Suite. The rest of us are on our own, wearing the help desk hat along with the designer, photographer, Web designer, and retoucher hats. If you’re in that situation, read on for some strategies on solving problems in Photoshop, InDesign, and Illustrator (and how to avoid problems in the first place).
First, let’s start with Photoshop and narrow down the main types of problems into two categories: (1) weird and unexplainable; and (2) tools or functions not working. By weird and unexplainable we mean things such as this: You launch Photoshop and in the Toolbox there’s an empty square where the Clone Stamp tool is supposed to be. Or, you click on the Move tool and Photoshop just freezes. (We’ll get to the solutions in a moment.) The second category includes anything that isn’t working in Photoshop. For example, you go to a menu and some or all of the options are grayed out. Or, you try to use the Brush tool but nothing happens. Let’s examine these two main categories a little closer.
THE UNEXPLAINABLE
To a large degree, the behavior of Photoshop is determined by an important file known as preferences (more specifically, Adobe Photoshop CS2 Prefs).  This file, typically around 150 KB in size, plays a major role in ensuring Photoshop runs properly, and it’s usually the culprit when weird things happen. So if you launch Photoshop and tools are missing, dialogs look strange, or you’re experiencing slowdowns or crashes, there may be something wrong with the preferences file. This is often described by saying, “Your preferences are corrupted,” which to me always conjures up images of tough-looking preferences from the wrong side of the tracks leading astray my poor, innocent preferences. I know that’s not at all what corrupted preferences means, but it does make for an interesting mental picture, doesn’t it?
There’s a simple solution for these kinds of weird behaviors or poor performance: reset the preferences. The easiest way to do this is to quit Photoshop and then restart it while holding down the Command-Option-Shift (PC: Control-Alt-Shift) keys. A dialog will appear asking if you want to “Delete the Adobe Photoshop Settings File?” Click Yes to delete the current preferences and replace them with the default preferences.
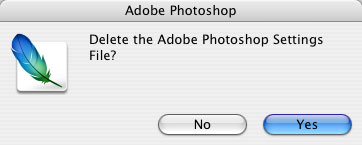
It’s important to note that any changes you have made in the Preferences dialog will be lost when the preferences are reset in this manner. So before you reset the preferences, you might want to press Command-K (PC: Control-K) to open Preferences and go through each dialog to make note of any customized settings. Then after you reset the preferences, you can manually change any settings to match your previous settings.
Some people suggest resetting the preferences on a regular basis as a form of “preventive medicine.” Although there’s nothing wrong with this idea, it’s worth remembering that any specific settings that you’ve changed will be lost when you reset the preferences. The only time you need to delete the preferences is when things just aren’t working right. On the other hand, if you work in a situation where a number of people share one workstation (a classroom, a scanning workstation, etc.), then you should consider resetting the preferences each time you start using Photoshop CS2. That way you can avoid any odd settings the previous person has used.
It’s less likely that you’ll ever need to reset your preferences in either Illustrator CS2 or InDesign CS2, but if you ever need to, the procedure is pretty much the same as it is for Photoshop CS2 with a couple of minor differences. When you use the keyboard shortcut Command-Option-Shift (PC: Control-Alt-Shift) when launching Illustrator, you will not get a warning dialog. In fact, you won’t see any change at all; Illustrator rebuilds the preferences in the background while it’s starting up. InDesign uses the same keyboard shortcut on the PC, but it’s slightly different on the Mac: Command-Option-Control-Shift.
When preferences are working
Here’s another option to resetting the preferences, and the only real trick is to remember to do this! When everything is working well for you and you have all your preferences set up the way you want, create a backup version of the preferences file. Then when Photoshop starts misbehaving, drag a copy of this backup file to replace the bad preferences.
To do this, locate your preferences file. On a Mac, go to Hard Drive:Users:[username]:Library:Preferences:Adobe Photoshop CS2 Settings:Adobe Photoshop CS2 Prefs.psp. On a PC, go to C:\Documents and Settings\[username]\Application Data\Adobe\Photoshop\9.0\Adobe Photoshop CS2 Settings\Adobe Photoshop CS2 Prefs.psp.
Duplicate the Prefs file and move it to a location outside the Photoshop application folder. When you think you need to delete the preferences file, instead make a copy of your backup preferences and drag it into the Adobe Photoshop CS2 Settings folder, replacing the existing file.
THINGS THAT JUST DON’T WORK
The second category of problems we face is when tools, filters, commands, or other functions don’t work, or don’t work the way we were expecting. This is usually caused by one of two things: document-specific settings, such as the color mode or the layers in the document; or application-specific settings, such as tool settings in the Options Bar. (To help distinguish between these issues, document-specific settings will vary with each document you work with, while application-specific issues will be a problem even when you change documents.)
Here’s a simple way to very quickly narrow down the problem: create a new document. If the problem goes away, that suggests that the issue is with something specific to the other document. If the problem persists in a brand-new document, then it’s most likely that an application setting is causing the problem.
In the past when you ran into a tool or function that wouldn’t work you’d often get the Cancel symbol (circle with a slash though it) that didn’t tell you much of anything, but Photoshop CS2 has made major strides in clarifying the problem. For example, if you try to use the Brush tool and see the Cancel symbol, click once and a dialog will appear telling you exactly where the problem lies (in this example, the target layer is hidden).
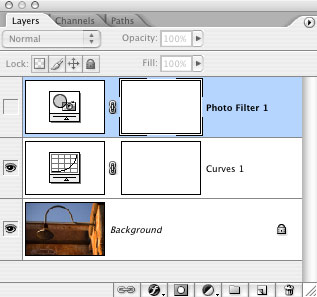

In The Photoshop CS2 Help Desk Book we identified more than 60 error dialogs, and that doesn’t include repeats for common errors such as, “Could not use the _____ tool because the target layer is hidden.” Needless to say, if you get a warning dialog, take advantage of it to help you deal with the problem by correcting the error (showing the hidden layer, unlocking the layer, making a selection, or whatever else the error message is suggesting).
If you try to use a tool and it doesn’t work—and you don’t get an error message—here are a few things to check. First, take a look at the Layers palette. If you’re working on a multilayered document, there a number if potential problems, some of which might result in an error dialog, while others won’t. For example, the blend mode of a layer may be set to a choice that causes the color you’re painting with to not show at all. Or perhaps the Opacity is set too low, or the layers are in the wrong order. The bottom line is take a look at the layers and make sure that you’ve clicked on the correct layer, that it’s visible, and that all the settings are correct. If all the settings in the Layers palette seem correct, then take a look at the tool settings.
With few exceptions, the way a tool operates is determined by the settings in the Options Bar. Once you’ve changed a setting, that setting becomes the default for that particular tool until you change it again. If you last used the Clone Stamp tool a week ago and had it set to Lighten mode at 50% Opacity, that’s how it will continue to operate until you put the settings back to normal. That suggests that every time—and we mean every time—you start to use a different tool, take a look at the Options Bar and make sure that the settings are appropriate for what you want to do with the tool. (In other words, you shouldn’t necessarily put the settings back to the defaults: You may want to change the opacity, blend mode, or feather amount, depending on how you want to use that tool at that particular time. Just keep in mind that tool settings are “sticky,” so any changes you make will stay that way.)

Create Tool Presets
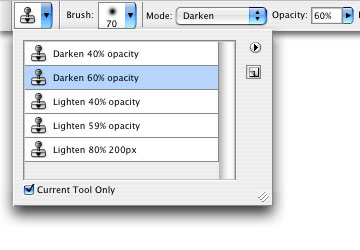
Some people suggest always resetting your tools so that the Options Bar is set to the default setting. Although that’s a good theory, in reality, some of the default settings are not the greatest. Instead, consider creating and using Tool Presets for each tool. That way you can actually create several custom settings for each tool. Here’s how:
First, change the tool settings the way you want. Next, click on the pop-up menu beside the tool thumbnail located on the far left of the Options Bar to open the Tool Preset Picker. Choose New Tool Preset from the flyout menu, name the preset, and click OK. That’s it. You can create as many presets for each tool as you want. So from now on, before using the tool, choose from your saved presets to decide which default you want to use.

Troubleshooting checklist
Here are some other questions that should be on your checklist when things aren’t working:
Selections:
Many operations in Photoshop begin with a selection or are affected by whether an area is selected or not, so ask yourself these questions: Did you forget that something was selected? Did you hide the selection by turning off the Extras (Command-H [PC: Control-H]) and forgot you did? Did you intend to select something first, but didn’t? Too much feather, not enough feathering, no feather?
Color:
Do you have the correct color set as your Foreground and Background? Is the document in the correct color mode? (Some colors will not print in CMYK, some filters don’t work in Grayscale, and some other functions work differently in Lab mode.)
Transforming:
If you’re transforming a selection or using Free Transform (Command-T [PC: Control-T]), you can’t do anything else until you’ve finished transforming. So if you see menus grayed out or other things aren’t working, press Enter to confirm the transformation or Esc to cancel.
AVOIDING PROBLEMS IN THE FIRST PLACE
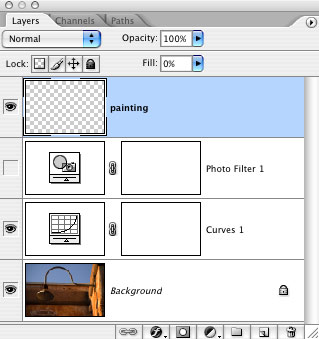
Some people paint themselves into a corner by the way they work in Photoshop, which leaves them wondering how they can change their minds. Consider working in the most flexible way possible so that you give yourself plenty of opportunities to change your mind (and the document). For example, rather than applying Curves directly to an image, add a Curves adjustment layer. Instead of cloning on the Background layer, add a blank layer and use the Sample All Layers option in the Options Bar to have the results of the Clone Stamp tool appear on a separate layer. Don’t erase portions of a layer, add a layer mask and hide them.
Tip: Use the option to edit keyboard shortcuts (Edit>Keyboard Shortcuts) and change the shortcut Command-M (PC: Control-M) to add a Curves adjustment layer rather than applying Curves directly to the active layer. The same goes for any of the adjustment commands that are also available as an adjustment layer.
Flexible editing
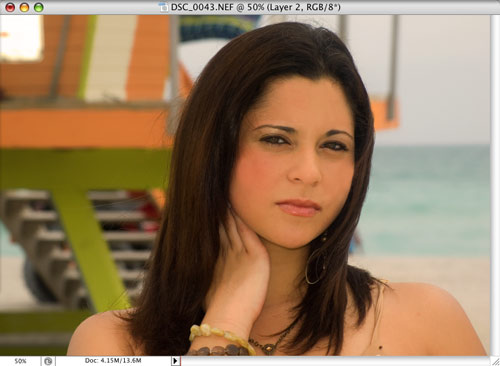
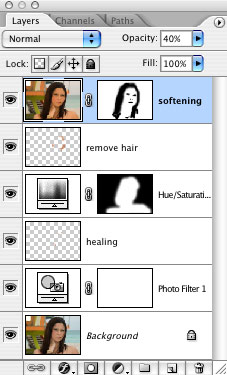
In this example, I wanted to make some major changes to a photo, while still giving myself the opportunity to return to the original image. 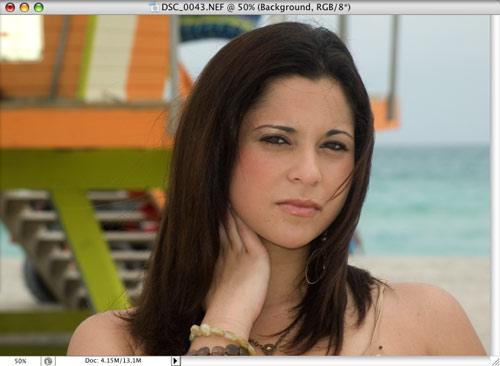 I added a Photo Filter adjustment layer to warm up the photo. Then I added a blank layer and used the Spot Healing Brush with the Sample All Layers option on to remove a few minor blemishes. To add some saturation to the subject of the photo, I used a Hue/Saturation adjustment layer and painted with black on the layer mask to keep the background unchanged. On another blank layer I used the Sample All Layers option for the Clone Stamp tool to clone away some stray hairs. Then I pressed Command-Option-Shift-E (PC: Control-Alt-Shift-E) to make a flattened version of the image as a new layer, applied the Surface Blur filter (Filter>Blur>Surface Blur) to the new layer, lowered the Opacity for this layer in the Layers palette, and added a layer mask to keep some areas sharp.
By taking advantage of all these flexible methods, the original Background is untouched, and I have plenty of options for changing my mind—and avoiding some of the problems I may have encountered otherwise.
Here’s what I hope you take away from all of this: Before you do anything, get in the habit of checking things (such as the Layers palette and tool settings), and then work in the most flexible ways possible to try to avoid problems. If you do run into problems, use some of the suggestions here to track down the cause of your difficulties.
Top 5 Problems/Solutions with InDesign CS2
By Terry White
Although InDesign is a revolutionary application, there are things that can trip up new users, especially if those users are used to doing workarounds in their legacy/former page layout app. They tend to begin by trying to do the same workaround in InDesign when it’s not necessary and may also cause problems.
Scaled text
Avoid text scaling issues by not grouping your text frames with other objects before scaling. Text that was grouped with pictures coming from a QuarkXPress document may exhibit strange behavior when you go to change the point size of the grouped text in InDesign. You may see the point size with another point size in parentheses next to it. This is displaying your actual and scaled point sizes. To solve this problem after the fact, ungroup your text (Object>Ungroup) and then select your text frame with the Selection tool (V). Choose Scale Text Attributes from the Options Bar or Transform palette flyout menu. This will reset the point size to represent the actual size of the scaled text.
If you simply want to scale text that you’re creating in a new or existing InDesign document, don’t group it first. Just select all the objects you want to scale and use the Scale tool (S) to scale them all together.
Avoid rasterized type
Just because you can do something doesn’t always mean you should. I’m speaking of transparency. InDesign lets you make any object transparent; however, there are rules to follow to maximize your output. It’s all about stacking order. Let’s say you have some text in a frame and you have a blue box behind it that you set to 50% Opacity. Everything is fine in this case because the text is on top of the blue box. However, if you were to draw the blue box on top of the text and set the Opacity to 50% so that you could see through it, when your document prints your text will be rasterized instead of printing nice, clean vectors. This is because transparency is raster-based, not vector-based, and anything that a transparent object sits on top of will be rasterized.
Transparency and white boxes
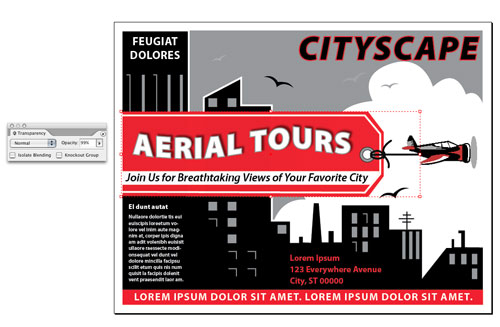
I was asked this question a dozen times at a recent Photoshop World: “Why do I sometimes get a white box around text (on the printed page) that I’ve applied a drop shadow to?” The short answer is not all RIPs work the same way. Some may handle the flattened transparency differently than others. To fix this, send the text, drop shadow, and the object that it’s sitting on top of (which is the real problem) through the Transparency Flattener. To do this, select the object that your shadow is being cast upon and set its Opacity to 99% in the Transparency palette (Window>Transparency). There won’t be any visual difference, but that little change will also send it through the Transparency Flattener so that it doesn’t have the white box.
Create color swatches
InDesign allows you to create colors in your document that aren’t defined as Swatches. While there’s nothing technically wrong with this, it makes it more difficult if you want to change those colors all at once, and it will probably drive your service provider nuts. So to keep everyone happy, the next time you want to create a color, use the New Color Swatch option from the Swatches palette flyout menu. This will allow you to mix your color in the proper color space and it will add it to the Swatches palette at the same time. Then, if you ever need to change that color, it’s as simple as double-clicking the swatch and changing its definition. Also, if you delete the Swatch, InDesign will prompt you to replace all the instances of it with another one.
Use the correct PDF setting for the correct output
InDesign can generate PDFs for all uses. This means that it can make a small PDF for your brochure so that you can put it on your website, or it can make a press-ready PDF suitable for offset printing. The key is choosing the right Adobe PDF Preset from the File menu. There are choices between High Quality Print (great for a desktop printer), PDF/X-1a and -3 (great for standards-based offset printing), Press Quality (for service providers that have more modern equipment), and Smallest File Size (for the Web and emailing proofs).
Top 5 Problems/Solutions with Illustrator CS2
By Scott Weichert
Illustrator users often experience minor problems that can be easily overcome. Here are the some of the most common issues facing Illustrator users.
Accessing Artistic filters and Filter Gallery
For the Filter Gallery, Effect Gallery, and Artistic menu options to become available, the Illustrator document must be in RGB color mode. When editing raster objects, the object being edited must also be embedded in the document. Linked images and CMYK color modes will not allow many Filters and Effects to function.
Prevent the Brush and Pencil tools from editing paths as you draw
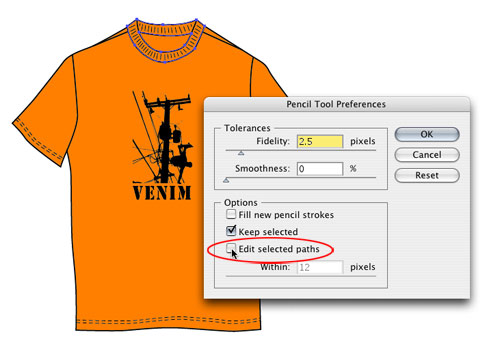
By default the Brush and Pencil tools are set to edit any selected path. To prevent this, simply double-click on the appropriate tool and uncheck the Edit Selected Paths option. You may also note the other options available in the dialog. Changing any of these options will retain those settings for the tool, not just the open document.
Expanding dashed strokes
When a dash is applied to a stroke in Illustrator, expanding the path (Object>Expand) results in a solid object. The dashes are lost. This is also true if using Object>Path>Outline Stroke. To overcome this, choose Object>Flatten Transparency from the menu bar. Set the Raster/Vector Balance slider to 100, check the Convert all Strokes to Outlines, then click OK.
Getting text to wrap or justify
In order to wrap or justify text, text must be Area Type. To create Area Type, click-and-drag with the Type tool to create a box. Add text, then choose the wrap or justify options desired. In addition, wrapped text must be behind any object around which it is wrapping and on the same layer.
Pasting Illustrator art into Photoshop
In order to gain access to all of Photoshop’s pasting options, preferences in Illustrator must be changed. In Illustrator, choose Preferences>File Handling & Clipboard from the Illustrator (PC: Edit) menu. In the Clipboard on Quit section, check both PDF and AICB and choose to Preserve Appearance and Overprints. Illustrator will then copy all the information needed to make every option available in Photoshop CS2.

