Every now and then an app gets an update that really impacts your daily routine, and I’m happy to say that InDesign CS4 has some new-and-improved features that will do just that. InDesign is a page layout app, so anything that helps that process is a welcome addition, so let’s take a look at how CS4 will speed up your day-to-day work.
Smart Guides
1 OPEN DOCUMENT; LAUNCH BRIDGE CS4
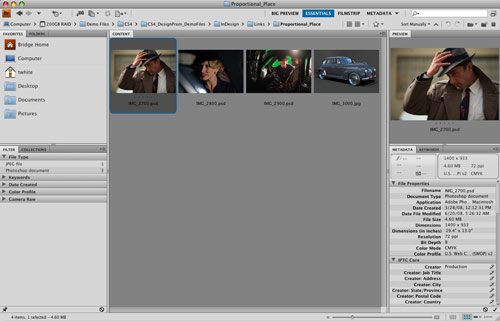
We’re going to take a look at proportional placing first. You can either work with an existing document or create a new one. To create a new document, choose New>Document from the File menu and accept the default settings. Although you can place images from the File menu in InDesign, it’s actually easier to do it from Adobe Bridge. Choose Browse from the File menu, which will switch to, or launch, Bridge. Navigate to the folder containing your images, select one image, and choose File>Place>In InDesign. This will take you back to InDesign with a loaded cursor.
2 PROPORTIONAL PLACE
At this point you could just click on the page and InDesign would dynamically create a new frame and place the image at 100% size. However, in InDesign CS4 when you drag out a frame on the page, the frame will maintain the same proportions as the image. This is a huge improvement! Deselect the frame by hitting Command-Shift-A (PC: Ctrl-Shift-A).

3 PLACE IMAGES AT THE SAME SIZE
Now let’s take a look at the new smart guides in InDesign. Make sure you have smart guides turned on by choosing View>Guides & Grids. Click the Bridge button in the Control panel to go back to Bridge. Select another image and choose File>Place>In InDesign. Back in InDesign, line up your cursor with the top-right corner of the first image that you placed and drag out the new frame. As you drag, smart guides will appear to let you know when the new frame is the exact same size as the first image.

4 EVENLY SPACE YOUR IMAGES
Smart guides can also even out the spacing between multiple images. Place a third image to the right of your first two images. (Note: You can select multiple images in Bridge and place them one by one without having to go back and forth between the two apps.) Now drag the middle image until you get the amount of spacing you want between it and the first image. The magic comes in when you drag your third image into position. When the spacing between your second and third images matches the spacing between your first and second images, your smart guides will kick in to let you know the spacing between all three is the same.

Smart Text Reflow
1 ADD ANOTHER PAGE
The next feature we’re going to look at is smart text reflow. In order to use smart text reflow you need at least two pages in your document. So if you don’t already have a document open with at least two pages, go ahead and insert another page. Choose Add Page from the Layout>Pages menu.

2 CHANGE YOUR SMART TEXT REFLOW PREFERENCE
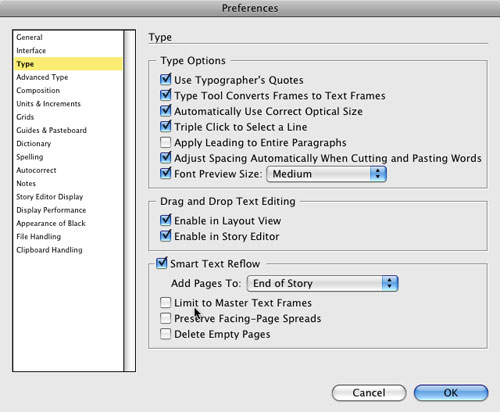
InDesign CS4 defaults to only allowing smart text reflow on master page text frames. We want to use this feature on regular text frames, so we’ll need to make a change in our preferences. Open your Type preferences by choosing Type from the InDesign (PC: Edit)>Preferences menu. Be sure to uncheck the Limit to Master Text Frames box in the Smart Text Reflow section and click OK
3 THREAD TOGETHER TWO FRAMES
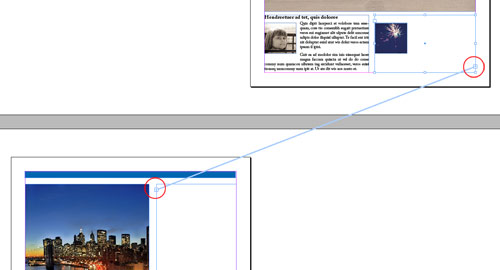
For smart text reflow to work, you’ll need to thread together at least two text frames on two separate pages. So grab your Type tool (T) and create a new text frame on the first page. Switch back to the Selection tool (V), click the out port of the frame you just created, and drag out a new text frame on the next page. The second frame will be automatically threaded to the first frame. If you want to see this link visually, choose Show Text Threads from the View menu.
4 ADD SOME TEXT
Switch back to your Type tool and click in the first text frame you created. Your cursor will be flashing ready for you to type. For the sake of example, you can choose Fill with Placeholder Text from the Type menu. This will fill both frames with text.
5 ADD MORE TEXT
Since your text frames are now full of text, if you add any more text you’d normally be in an overset situation; however, because you have smart text reflow enabled, adding more text will now add an additional page. So if I put my cursor at the end of the text on the second page and continue typing, InDesign will add a page with a new threaded frame for the additional text.

6 REMOVE EXTRA PAGES
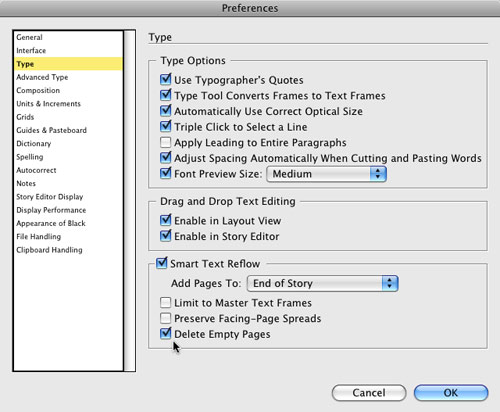
Having InDesign create pages automatically as needed is great; however, what happens when you remove text and no longer need the additional pages? We can turn on a feature that will automatically remove those extra pages that InDesign created. Choose Type from the InDesign (PC: Edit)>Preferences menu. Enable the Delete Empty Pages option in the Smart Text Reflow area and click OK. Now if you remove enough text from your threaded frames, InDesign will automatically delete the extra page. Keep in mind that this only works if the page is empty of any other items.