
Digital Workflow: Collaborative Image Review, Part 1
When creating a collection of images for use in a multiperson project where you’re seeking collaborative feedback, sharing and acting on everyone’s comments can be confusing and time-consuming. Just creating the image collection can take a great deal of time, especially if the initial images have varying dimensions, file sizes, multiple color spaces, and different formats. And the process of altering image dimension and resolution typically requires sharpening, which takes time as well. Creating a consistently formatted collection that will be used in a presentation for viewing onscreen and over the Web is a challenge custom made for the Adobe Creative Suite.
Gather your images in Adobe Bridge
Adobe Bridge is the tool of choice for gathering, viewing, and sorting your images. Here are some tips for taking full advantage of Bridge’s capabilities:
STEP ONE:
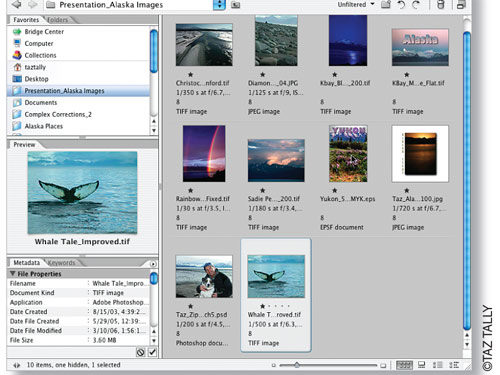
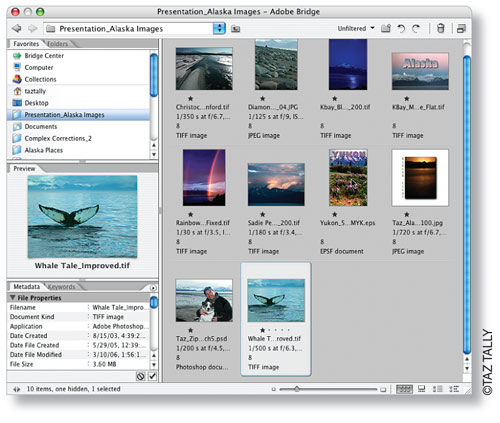
In Bridge, create and name a folder (File>New Folder) to hold the images that you’re considering for review (we named ours Presentation_Alaska Images). Move this folder to the Favorites tab (File>Add to Favorites) so you can quickly locate it during the re-view process. Option-drag (PC: Alt-drag) to place copies of the image files you want to re-view into the new folder in the Favorites tab.
STEP TWO:
Label and sort through your images using Bridge’s star rating and/or color la-bels (in the Label menu) and filtering system (the pop-up menu near the top right of the Bridge window). Drag-and-drop the files to manually sort the order in which you’d like to have the images processed in Bridge. Note how the filtered image set shown here has TIFF, JPEG, EPS, and even PSD images of varying resolutions and encompassing both RGB and CMYK color spaces.
Create Photoshop sharpening action
Although this step won’t happen until later, you’ll want to sharpen your images once their dimensions have been altered. To be able to automate this process, you should create a Photoshop action now.
STEP ONE:
Open any image and activate your Actions palette (Window>Actions). Click the Create New Action icon at the bottom of the Actions palette. Name the action “RGB_Lab_USM_RGB.” Click Record.
STEP TWO:
Choose Image>Mode>Lab Color and select the Lightness channel in the Channels palette. Next, choose Filter>Sharpen>Unsharp Mask (or Smart Sharpen if you pre-fer). Enter your settings and click OK. Select Image>Mode>RGB Color. Click the Stop Play-ing/Recording icon at the bottom of the Actions palette.
Note: You’re converting to Lab and applying sharpening to the L channel to prevent the creation of any color shifts along high-contrast edges. You’ll return to this action shortly.
Control image characteristics in the Image Processor
One of Photoshop CS2’s great productivity-enhancement tools is the Image Processor, which allows you to address many characteristics in one dialog. And even better, you can access this tool through Bridge.
STEP ONE:
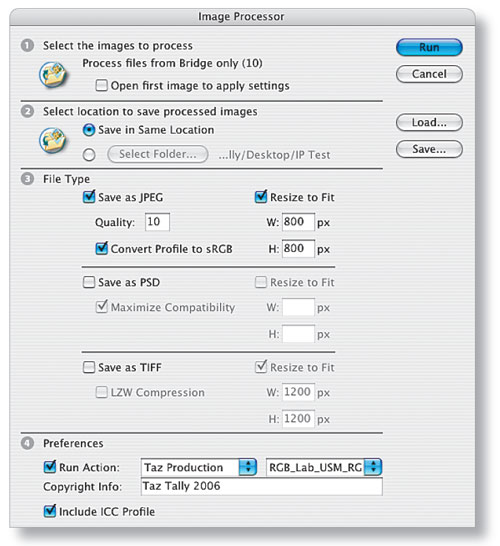
Through the use of Bridge’s filtering tool (here the five-star label), make visi-ble only the images you want to include in your presentation. Alternately, you can Com-mand-click (PC: Control-click) on just the images you want included, but I suggest filtering your view. Press Command-Shift-A (PC: Control-Shift-A) to deselect all the images. This will inform Bridge to automatically process all the images visible in your Bridge window.
STEP TWO:
Select Tools>Photoshop>Image Processor. In the Image Processor dialog, check that all images (we had 10) are set for processing, and then turn off the option to Open First Image to Apply Settings. In the next section, click Save in Same Location. This will cause the Image Processor to place the processed images in a subfolder within the current folder. In the File Type section, check Save as JPEG, set the Quality to 10, and turn on Con-vert Profile to sRGB (for consistency with Web viewing). Next, check Resize to Fit and set Width and Height to 800 pixels. This sets the largest image dimension, whether landscape or portrait orientation, to 800 pixels, so you need not process portrait and landscape images separately. In the Preferences section, check Run Action then select the RGB_Lab_USM_RGB action you created earlier. This instructs the Image Processor to con-vert and sharpen each image after resizing. Add your Copyright Info and check Include ICC Profile. Click Run and your images will be processed and converted into consistently sized, formatted, color space controlled, and sharpened images and placed in a subfolder labeled JPEG.
Note: If you get an error message, go to Edit>Color Settings in Photoshop and select Off in the RGB pop-up menu in the Color Management Policies section and try again. [For more on the Image Processor, see Taz’s article in Layers Jan/Feb 2006.—Ed.]
Create your collaborative document
Your document format of choice for collaborative view and commenting is PDF. Once again, you can access all the tools you need through Bridge.
STEP ONE: Access the JPEG processed image folder created above. Don’t select any im-ages, so Bridge will automatically include them all.
STEP TWO:
Select Tools>Photoshop>PDF Presentation. Configure the PDF Presentation Dialog to create a Multi-Page PDF, rather than a Presentation, as you expect your collabora-tors to view and comment on you images at this point. Note: Acrobat provides a complete set of Presentation controls that you can apply later.
STEP THREE:
Name your PDF document and save it in the same folder as your images. In the Save Adobe PDF dialog that appears, choose Compression from the list on the left. Set Options to Do Not Downsample and Compression to None (you’ve already controlled these characteristics in Photoshop). Next, choose Output from the left and set Color Conversion to No Conversion (again, you’ve already controlled this in Photoshop). If you like, you can choose Security and configure it to allow commenting on, but not editing to, the PDF. Be sure to record any passwords you use. Click the Save PDF button to create your PDF.
Note: If you intend to often create these types of custom PDFs with these settings, you might consider creating an Adobe PDF Preset with these settings to speed up their selection and ensure consistency.
Document collaboration in Acrobat
Open your PDF document in Acrobat and click on the Pages tab on the left. You can now sort your images by dragging them around this panel. Your PDF is ready for you to add in-structions and/or comments and to send on to your collaborators.
In Part 2 of this tutorial, we’ll cover using the collaboration tools in Acrobat to comment on the document and share feedback. Click here to begin reading Part 2 now.
