
There’s no denying that the Apple iPad is a popular and successful product. One of the things I was most intrigued by was the format that Apple chose for their eBooks (iBooks). The good news is that they went with the industry standard EPUB format, and the even better news is that InDesign exports EPUBs natively. I created my first iBook for iPad using InDesign CS5. Let’s take a look at the workflow.
1 CREATE A NEW DOCUMENT
Although we’re creating an eBook that can be scaled and reflowed to any size the device displays, it’s probably still a good idea to create a document that more closely resembles a book. Therefore, go to File>New>Document to create a new 5.5×8.25″ document. Enable the Facing Pages and Master Text Frame checkboxes in the New Document dialog, and click OK.

2 ENABLE SMART TEXT REFLOW
InDesign CS4 introduced Smart Text Reflow, and this is a perfect time to use it. This way as you write your book, InDesign will automatically add new pages as needed. Go to InDesign (PC: Edit)>Preferences>Type and make sure that the Smart Text Reflow and Limit to Master Text Frames checkboxes are enabled. Also check the Delete Empty Pages box, and click OK.
Because we enabled the Master Text Frame checkbox in the previous step, your first page will have a text frame on it, but we don’t need it. Hold down Shift-Command (PC: Shift-Ctrl), click on the page to unlock this frame, and press the Delete (PC: Backspace) key.

3 DESIGN AND PLACE YOUR COVER IMAGE
Your first page will actually be your book cover and has to be one piece. That means either you create the entire image in Photoshop or Illustrator, or you create a separate InDesign document for your cover, lay it out, and File>Place it on this first page. After you’ve inserted your cover, insert four new pages after the cover by clicking the Create New Page icon at the bottom of the Pages panel (Window>Pages). Then delete the master text frames on pages 2 through 4. Note: If a warning sign pops up regarding the master text frames, click OK, ignoring this dialog.

4 CREATE HEADLINE PARAGRAPH STYLE
The creation of a headline paragraph style will be used to identify new chapters or sections in your Table of Contents (ToC), and it will also be used to dictate the beginning of a new page in the book. Hold down Shift-Command (PC: Shift-Ctrl) and double-click to insert your cursor on page 5. Create the headline the way you want it to look and then add it as a style in the Paragraph Styles panel (Window>Styles>Paragraph Styles) by Option-clicking (PC: Alt-clicking) the New Style icon, naming your style “Headline,” and clicking OK. You should also create a paragraph style for your body text.

5 PLACE YOUR FIRST INLINE GRAPHIC
Although InDesign allows you to place things anywhere you want, you need to keep everything inline after the ToC for your EPUB to work. Now, on page 5, place your cursor after the headline and go to Object>Anchored Object>Insert. From the Content drop-down menu, choose Graphic and specify a Height and Width in which you want your graphic to abide by. From the Position drop-down menu, choose Inline or Above Line and click OK. Then you can place your graphic (File>Place), or you can wait to place all your images at once—it doesn’t really matter.

6 START TYPING OR PLACING TEXT
Now comes the part where you actually write your book. Click below the frame you created in the last step, press Return (PC: Enter), and select your body text paragraph style in the Paragraph Styles panel (if you don’t type a return, your headline at the top of the page will switch to your body text paragraph style, as well). You can either start typing, or you can paste text you’ve already written. If you get to the end of the page and need another page, InDesign will add more pages for you.

7 ADD HYPERLINKS
To give people a way to find out more about the things you’re writing, use hyperlinks. This support will vary by device, but the iPad can use mobile Safari to go to those links. Highlight the text in your document that you want to create a hyperlink for, and then go to the Hyperlinks panel (Window>Interactive>Hyperlinks). Click in the URL field, type your URL, and press Enter. If you see a black rectangle around the text in your InDesign document, you can make this invisible by going to Hyperlink Options in the Hyperlinks’ flyout menu, but it doesn’t show in the EPUB, so you can leave it as is.

8 CAN I INCLUDE MULTIMEDIA CONTENT?
This isn’t really a step, but it’s probably one of the top five questions I get, and that is, “Can you include multimedia content in your EPUB, such as movies and animations?” The technical answer is yes; however, the problem is that you’re at the mercy of the device your EPUB will be seen on and what it supports. Although InDesign supports placing video and Flash content, the iPad isn’t currently capable of playing back this content in the iBooks app. The same goes for fonts. Although you can style your EPUB with CSS, it’s up to the device to support it.

9 GENERATE YOUR TABLE OF CONTENTS
With your text and images laid out as one continuous document, it’s time to generate the ToC. Although the ToC will be a page in your InDesign document, it won’t actually be a page in your EPUB—it will become the EPUB navigation. Choose Layout>Table of Contents, select your headline paragraph style in the Other Styles list, and click the Add button to move it into the Include Paragraph Styles list. Select a paragraph style for the title of your contents as well as the Entry Style, and click OK. Now click-and-drag your ToC on page 3. (Note: It doesn’t have to be inline and you can make the text as small as you want.)

10 EXPORT YOUR EPUB
Now we’re ready to export the EPUB. First, you need to add the Author to the InDesign metadata. Do so by going to File>File Info and using the Description tab. Click OK. Next, go to File>Export For>EPUB. Choose a location for your EPUB file and click Save. You’ll see a Digital Editions Export Options dialog. In the Images category, choose High for Image Quality in the JPEG Options section. In the Contents category, enable the Include InDesign TOC Entries, Suppress Automatic Entries for Documents, and Use First Level Entries as Chapter Breaks (new in CS5) checkboxes in the Table of Contents section. Then click Export. Watch out, it’s fast!

11 TEST IT IN ADOBE DIGITAL EDITIONS
One of the things you can do to save yourself some time is to download the free Adobe Digital Editions player (www.adobe.com/products/digitaleditions/?promoid=DNRHY). This will allow you to test the look and feel of your EPUB, as well as the navigation, to make sure it does all that you want it to do before you put it on your device.

12 DRAG IT INTO ITUNES
If your EPUB is destined to go on your iPad, currently the only way to get it there manually is to sync it via iTunes. Open iTunes (Mac or PC) and then drag your exported EPUB into the Books section in the Library area on the left side.

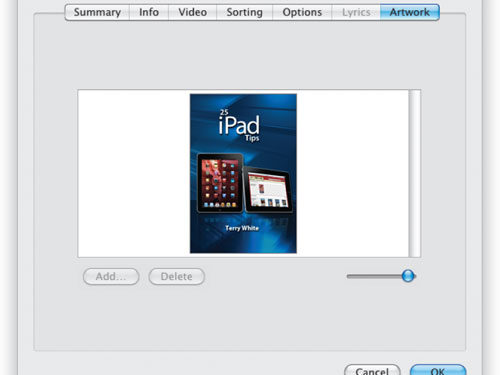
13 ADD A COVER IMAGE AND METADATA
At this point your EPUB will work on your iPad, however, you probably want to dress it up a bit. Unfortunately, you have to do this part in iTunes. Select your EPUB and go to File>Get Info. Here you can add your cover image in the Artwork section (use the Add button) and you can add a better Title than the filename in the Info section. Also, iTunes should have picked up the Author from the InDesign document. Feel free to add any other info in the Info section and click OK.

14 DISTRIBUTE AND SYNC TO YOUR IPAD
Your iBook (EPUB) is now ready for the world. You can, of course, sync your new iBook to your iPad and it will appear in the iBooks app. You can also go to File>Show in Finder to go to the folder containing your updated iBook (EPUB). This is the file that you can distribute to others or submit to your publisher to be included in the iBookstore or other electronic bookstores. You can download my 25 iPad Tips iBook for free at http://terrywhite.com/techblog/archives/5179.

