
Artistic Expressions: The Dark Side
Shadows add dimension to an image; without them an object will appear flat.
In the world of imaging, one of the most important things to consider is that lighting sets the mood. The composition and subject matter are one thing, but how a scene is lit tells the story. The time of day, the light source, and the subsequent shadows all come together to form the image. This is a crucial consideration, especially when you’re compositing multiple images into a single image. All the elements must relate to each other and cast shadows that conform to the overall lighting of the scene.
The importance of shadows
Shadows add dimension to an image; without them an object will appear flat. Both Illustrator and Photoshop are two-dimensional programs, but shading a scene properly will give it the illusion of a third dimension.
Composition-wise, lights and shadows will determine the relationship of one object to another and their place within the total scene. When you’re compositing multiple objects into one scene or adding an object to an existing scene, it’s crucial that the light intensity, direction, color, and shading for each object match correctly. Even an untrained eye will be able to spot a discrepancy. For instance, an object sitting under a lamp can’t have a shadow on its top.
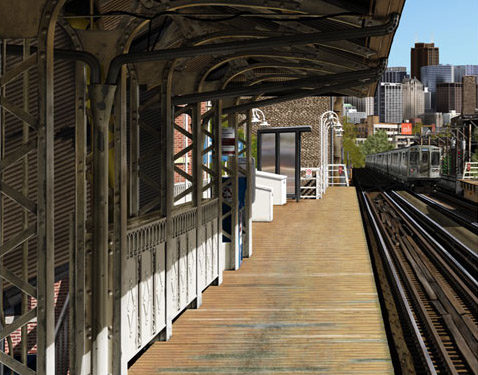
Light travels in a straight line. As it meets an object, it casts a shadow that falls within that straight line. If you were to add an object to an existing image, the first thing you’d need to do is determine the light source and direction. This example shows a platform of an elevated train. If you were to place on object on the platform, it would have to cast a shadow onto the platform that matches the shadows in the rest of the scene. In our next example, a briefcase has been placed onto the platform—it looks off. It’s too bright and casts no shadows, making it appear as a pasted in object.


Match placed object to scene
Study the overall scene and you’ll see that the sides of the structure on the platform are in shadows and appear darker. The first thing to do is to match the shade for the side of the briefcase that’s facing the viewer. This is simply a matter of selecting the side of the briefcase and applying any of the methods for darkening that Photoshop has to offer. Here you can see how the side of the briefcase has been darkened.

Now it needs a shadow to set it in its place on the platform. To do this, it’s necessary to determine the direction of the light source (in this example, it’s the sun). Unfortunately, the sun is out of the field of view in the image. This isn’t a problem because the effects of that light source are clearly visible in the scene. To determine the position of the sun, draw a line in a layer from the edge of the canopy top to where the shadow first appears against the railing below. Following this line tells you precisely where the sun is in the sky.


To set up a guide to create the shadow, move the line depicting the angle of the light source down so it touches the top of the briefcase. The line shows where the shadow will fall against the platform. Using the Pen tool (P), create a path to represent the shadow. Create a new layer to contain the shadow, then fill the path with black. Lower the Opacity for the shadow layer so it matches the intensity of the rest of the shadows in the scene. The result makes the briefcase appear as if it belongs there.


Considerations
There are many factors to consider when creating lighting effects for your scene. Among them are:
- The number of light sources
- The position of the light sources
- The strength of the lights
- The color of the lights
- Do other objects block the light?
This last point brings up an interesting problem: What if the briefcase is closer to the railing? If this is the case, then the shadow will travel along the platform floor as before, but it will also travel up the railing. As you can see here, the briefcase is closer to the railing, thus casting a shadow up the side of the railing. This was accomplished by duplicating the layer containing the shadow. The duplicate shadow was rotated 90° clockwise (Edit>Transform>Rotate 90° CW) and flipped horizontally (Edit>Transform>Flip Horizontal) to match the angle. Layer masks were then applied to each of the shadow layers to conceal the areas where the platform and railings end.
This is not a formula; it’s what worked in this instance. Things may vary in your particular situation. The direction of the light source determined how high up the railing the shadow would travel.


Do your homework
It’s not as complicated as it seems. You might say, “This is fine but my situation is different.” The solution to all problems lies within your grasp. It’s a matter of looking in the right places for the answers. I never guess at what something should look like. I study the world around me for the answers. When it comes to complex shading situations where I have no sources that I can refer to, I create models to study how a shadow will look. What if you need to have a shadow traveling up a staircase? What will it look like? Here you can see a staircase that’s simply a sheet of paper that was folded to form the steps. An object is lit in front of the makeshift staircase and the shadow falls into place, giving you a reference from which to create your shadow.

Shadows are crucial. They add life to an image. Study them. Use them. They will make your images come to life.
ALL IMAGES BY BERT MONROY

