
Artistic Expressions: Needlework
Some things can be so complex. Isn’t it great that Photoshop makes them easy? All you need to know is how things work and you can do whatever your imagination conjures up.
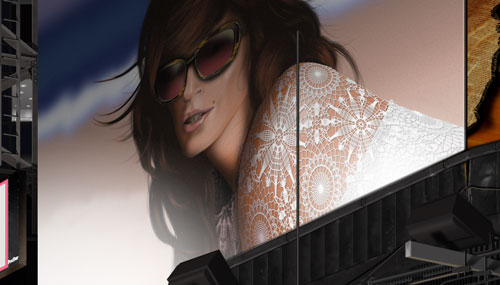
One of the billboards in my Times Square painting contains a model wearing an intricate, crocheted top. I’ve no doubt that making this garment was a time-consuming, laborious task. Fortunately for me, using Illustrator and Photoshop took a lot of the grunt work out of it. It was just a matter of using some of the features in Illustrator combined with others found in Photoshop. And, unlike the real garment, I didn’t have to go to China to get it made!

STEP ONE:
It all starts in Adobe Illustrator. Select File>New to create a new, square document (we used 10×10″ at 150 ppi). Turn on the Rulers by pressing Command-R (PC: Ctrl-R), click-and-drag a vertical guide from the left to the center of the page, then click-and-drag a horizontal guide that crosses the vertical line through the center of the page. Where these guides meet will serve as the center of our circular design. Create two additional vertical guides equidistantly on either side of the original vertical guide and create two horizontal guides at the top of the document. These four guides will be used to create the overall shape of a single strand of the pattern. If you find the Rulers to be a distraction, press Command-R (PC: Ctrl-R) once more to turn them off.
STEP TWO:
Now, using your guides to ensure symmetry, click-and-drag to create a path that forms an arc using the Arc tool that’s nested with the Line Segment tool (\), generating it far enough away from the horizontal center guide so that the arc will form the outer edge of your crocheted shape. Shift-click with the Selection tool (V) to select both parts of the arc. Note: If you inadvertently use the Direct Selection tool (A), you won’t select all the points, which will prevent the next step from working properly.
STEP THREE:
Choose the Rotate tool (R). Place the cursor at the center where the vertical and horizontal guidelines cross. While holding down Option (PC: Alt), click at the center to bring up the Rotate dialog. In the Rotate dialog, set the Angle for rotation to 15° and click the Copy button. (Note: Your choice of Angle value will depend on the size of your document.) This makes a copy of the original arc that is rotated at the specified angle, rotating around the central point selected. Press Command-D (PC: Ctrl-D) to repeat the last action performed. This next arc will be 15° from the previous arc. Press Command-D (PC: Ctrl-D) several times to duplicate and rotate the arc until a full circle has been created. You’ll know if it’s going to work once you get halfway around. If your bottom arc doesn’t align exactly with the top arc and center guide, start over at Step Two.


STEP FOUR:
Repeating these steps with other shapes, each placed closer to the center, will give you the ability to create some unusual designs. In two separate layers, generate two additional sets of shapes using the same techniques but alter the arc shape to add variety. Note: Clicking on the Create a New Layer icon at the bottom of the Layers panel (Window>Layers) and creating each set in its own, separate layer will make it easy to select them and move them around independently of each other. This will become an obvious necessity with the next step.

STEP FIVE:
Duplicate the shape various times and place all of the shapes together to form a pattern. They should touch each other as if they’re all connected into a single crocheted pattern. Hide the guides to inspect your work undistracted by pressing Command-; (PC: Ctrl-; semicolon), or remove them by going under the View menu and selecting Guides>Clear. Click-and-drag with the Selection tool, to encompass the entire work and select all the paths. Copy them to the clipboard by selecting Edit>Copy. Now it’s time to put Photoshop to work.

STEP SIX:
Open Photoshop and press D then X to set your Background color to black. Go to File>New, choose the document’s sizes and from the Background Contents menu, choose Background Color. Click OK and go to Edit>Paste to paste the paths into the file.
Note: We’re given a few choices for how these paths can be imported in the Paste dialog; they should be pasted as paths, so click the Path radio button and click OK. We didn’t assign any color or shape information in Illustrator because all these attributes will be created in Photoshop. Also, a smart object isn’t necessary because we’re only dealing with paths. These paths will be used to guide the brush to generate the stitches of the crochet.
STEP SEVEN:
Choose the Brush tool (B). Open the Brush panel (Window>Brush). In the Brush Tip Shape section, select a circular, hard-edged brush tip with a Size of 9 px, and disable all checkboxes except Smoothing. Then increase the Spacing slider to 75% so the circular brush tips slightly touch each other. Click the Foreground color swatch at the bottom of the Toolbox, and in the resulting Color Picker, choose what color you want your threads to be (in this example we used white), then click the Create a New Layer icon at the bottom of the Layers panel to create a new layer to contain the crocheted pattern.

STEP EIGHT:
With the Brush tool still selected, open the Paths panel (Window>Paths). Click the Stroke Path With Brush icon at the bottom of the Paths panel. The results should create a look that resembles threads of a crochet pattern. If yours doesn’t, simply press Command-Z (PC: Ctrl-Z) to Undo, adjust your setting in the Brush panel, and try again.

STEP NINE:
Check to ensure your crochet looks good by placing it against a skin color: With Layer 1 selected, Command-click (PC: Ctrl-click) the Create a New Layer icon to create a new layer below Layer 1 (Layer 2), click the Foreground color swatch, pick a skin-tone color (we used R:188, G:133, B:111), click OK, then press Command-Option (PC: Ctrl-Alt) to fill Layer 2 with the color.
The final touch to make the threads come to life is a little layer style application. Double-click the Layer 1 thumbnail in the Layers panel to bring up the Layer Style dialog. Click to choose Drop Shadow from the list of layer styles on the left; we want to make the threads look as if they’re laying over the surface of the skin below. To do this, click-and-drag down on the pattern to pull the drop shadow out from below; release it when there’s just a slight bit of space between the needlework and the drop shadow. Then click Bevel and Emboss. Increase the Size to 4px, change the Angle to 122º, and the Altitude to 30º. Since the threads used in this article were white, we clicked the color swatch for the Highlight Mode, changed it to a medium gray (R:100, G:98, B:98) color, clicked OK, and set the Highlight Mode to Multiply. This gave different dark tones to the outer edges of the white threads, thus making them look three-dimensional. When you’re satisfied with the way your needlework looks, click OK to close the dialog.

Remember, the important thing being shown here isn’t the end result, but rather how that result was achieved. You may never have to create a crocheted pattern but a little change in shape here, and a different style there, could be the answer to the particular problem you’re being faced with. It’s a question of understanding how things work and how you can make Photoshop do what you want. Photoshop and Illustrator are very accommodating. Play with them and most of all—have fun!

