
Artistic Expressions: A Brush with Inspiration
This extremely versatile feature (brush engine) has become the indispensable tool for photographers and artists alike.
Of all the creative features in Photoshop, there are few that offer the possibilities that the brush engine does. Introduced back in Photoshop 7, this extremely versatile feature has become the indispensable tool for photographers and artists alike. With its wide array of features, you can spend hours just creating special effects brushes in this one panel. Here we’ll examine this small, yet powerful feature and get into creating and modifying our own custom brushes.

All features in all brushes
At first glance, the Brushes panel (Window>Brushes) can seem daunting, but in actuality, it’s pretty straightforward. It’s remarkably intuitive and once you start playing with the settings, I think you’ll agree. First off, Adobe has managed to put all the features related to all brushes in one convenient panel. I say all brushes because not only can you modify the behavior of the standard Brush tool, but also all other tools that use brushes, such as the Clone Stamp, Eraser, Dodge, Burn, Blur, and Smudge, to name a few. You simply select the desired brush tip in the Brushes panel, activate the features you like, and modify the parameters within each option.
When we think of brushes in Photoshop, we tend to think of simple round, hard-, and soft-edged brushes but that’s only the tip of the iceberg: You have the ability to take a simple brush and make it something totally different; you can select from the standard set of brushes or load a number of specialized brushes that come with Photoshop (more on this in a moment); and you can define your own custom brushes using artwork. Once you have a better grasp of how the brush engine works, I guarantee you won’t look at brushes the same way.
A word on presets
As mentioned above, Photoshop comes with a variety of built-in brushes called “presets.” To access any preset, simply open the Brushes panel, click on “Brush Tip Shape” near the top of the list on the left of the dialog, and choose any of the available brushes. Select any size brush tip and then modify its behavior by clicking on the various options in the list on the left.
To load a specialized group of brushes, click on the flyout menu (at the top right of the panel) and toward the bottom of the menu choices, you’ll see several “effects” brushes separated into various categories. Just click on the desired set and a dialog appears where you have the option to either Append that set of brushes to your existing set or Replace the current brushes with these brushes.

When you select a brush, the preview at the bottom of the panel shows the brush on a simple linear path as if someone painted a smooth, continuous stroke. This is because the preset was saved only as a brush tip and its behavior hasn’t been modified using the options at the left of the panel. It’s up to you to modify the brush for your needs.
Another type of preset is known as a “tool preset.” Unlike brush tips, which are only the actual shapes of the brush tips, tool presets are a little more involved. They not only include a defined brush tip but also all of the other parameters set up in the Brushes panel options. It’s important to remember the difference between these two types of presets as they’re handled in different ways.
To access your tool presets, look for the icon of the tool you’re using at the far left of the Options Bar. Click on the down-facing arrow beside the icon and the Tool Preset picker opens—it’s a menu of built-in tool presets. Click on one and you’ll see its various properties in the Brushes panel.

Even though a tool preset has built-in properties, you can modify it even further to your liking and then save it as a New Tool Preset. This gives you the option of creating a custom brush using either a tool preset as a starting point or from scratch.
Custom brush tips
Sometimes you’ll encounter a scenario that demands a special type of brush or perhaps a specific behavior for a brush. Creating a custom brush is simple enough but it’s important to understand how Photoshop defines brushes. And it’s also important to keep in mind that pretty much any graphic element can be defined as a brush—you can even define an entire image as a brush, if you want!
When you tell Photoshop to define a brush it’s going to look at the entire range of tones in your image to determine its overall density. The white areas of your defined brush will be completely transparent and the black (or darkest) areas of the defined brush will be 100% opaque. Any in-between gray tones will have varying degrees of transparency. This is also the case when you define a brush based on a color image. All gray tones closer to black will be more opaque and any tones closer to white will get progressively more transparent. I’d encourage a little practice with this so that you get used to how Photoshop analyzes the pixels when creating a brush.
Brushes in action
So let’s put what we’ve learned into action by creating a custom brush and then applying some specialized properties and then creating a tool preset.
STEP ONE: Create a new document (File>New) with a white Background. For this, I recommend creating a square-shaped document, say 5×5″ inches. What we’re going to create is a stylized scatter brush that will give us a sort of fairy-dust effect. (It’s based on a tutorial I did recently on the NAPP member website.)

CREDIT: ©ISTOCKPHOTO.COM/CEVDET GOKHAN PALAS
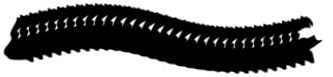
STEP TWO: Click on the Create a New Layer icon (at the bottom of the Layers panel) Grab the Lasso tool (L) from the Toolbox and draw a very abstract shape on this layer.
Tip: Draw your “brush” fairly large and then after you define it, size it down in the Brushes panel. If you make it too small, it can lose quality when you try to size it up later in the Brushes panel.

STEP THREE: Now that we’ve created our selection, we need to fill the shape with a color. Just so you can see how the varying tones affect the transparency of a brush, let’s apply a slight gradient to this selection. Select the Gradient tool (G) from the Toolbox and drag a simple Black, White gradient through the selection (this is the third gradient in the Gradient Picker up in the Options Bar). Press Command-D (PC: Ctrl-D) to deselect. (Note: You don’t necessarily have to deselect since you have a white background, but I did it to make a point in the next step.)

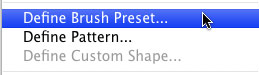
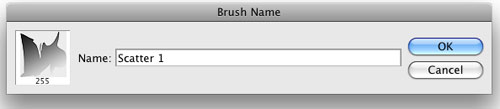
STEP FOUR: Many users will first make a selection of a shape before defining it as a brush—but it isn’t always necessary to do so. We learned earlier that when Photoshop defines a brush, it ignores the white area and leaves it transparent. Since our graphic is on a white background in this example, all we need to do is go under the Edit menu and choose Define Brush Preset. You’ll notice in the preview window that only the areas with the various tones of black have been defined as the brush. Name your brush and you’re done.
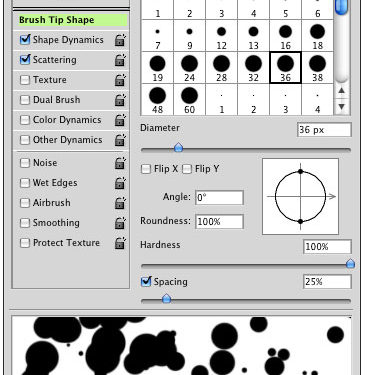
STEP FIVE: Now that we’ve created our brush tip, we need to modify its behavior in the Brushes panel. First, make sure that the Brush tool (B) is selected in the Toolbox, then open the Brushes panel by clicking the icon at the right-hand side of the Options Bar, or go under the Window menu and choose Brushes. Click on Brush Tip Shape and locate the brush you just created—it should be the last one in the menu.
STEP SIX: Click on the words “Shape Dynamics” in the list on the left-hand side of the Brushes panel to open that menu. Drag the Size Jitter all the way to 100%. If you’re using a pressure-sensitive tablet, go ahead and set the Control to Pen Pressure.
Further down the menu, you’ll see Angle Jitter and Roundness Jitter options; set both of these to 100%, as well. Notice in the preview window at the bottom how the brush changes as you adjust each setting.

STEP SEVEN: Now click on the Scattering option. Make sure that Both Axes is checked on and then just drag the Scatter slider to the right. How much is really a matter of preference, so watch the preview window as you adjust the slider.

All you need to do now is go to a new blank canvas, set your Foreground color swatch (at the bottom of the Toolbox) to the desired color, and start painting with your new brush. If you find the brush not behaving exactly the way you like, just modify the settings and continue.
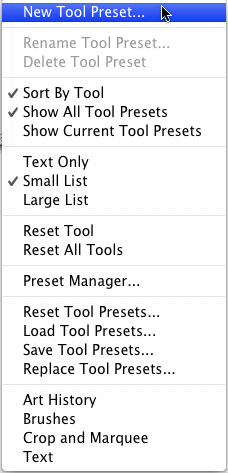
STEP EIGHT: Now that you’ve applied all these modifications to your brush, there’s a good chance that you’ll want to be able to use them again later. But if you select another brush and change any of the settings in the Brushes panel, you’ll lose all your previous settings, which can be frustrating, especially if you took some time creating that brush. To make sure this doesn’t happen, click on the down-facing arrow beside the tool icon at the far left of the Options Bar to open the Tool Preset picker. Now just click on the right-facing arrow at the top right of the picker to access its flyout menu and choose New Tool Preset. In the dialog, give it a name and click OK. Now, anytime you need that brush with those specific settings, there it is.
The goal here was to give you a better understanding of how the brush engine works—and understanding how something works in Photoshop is half the battle. So now you have the tools necessary to embark on some serious exploration and create some really outrageous brushes. And if you’re feeling ambitious, why not combine your experimentation with layer styles to get some really cool effects. Here’s an example of a scatter brush I created with a modified Bevel and Emboss layer style to achieve a water splash effect—all with just a brush and little creative exploration.

CREDIT: COREY BARKER

