
Creating PDFs in Photoshop CS2
The new Photoshop CS2 boasts new capabilities for creating, controlling, and editing PDFs. With each release of the Creative Suite, PDF becomes more fully integrated into Photoshop. Photoshop CS2 also contains a variety of PDF creation presets that you can use as-is or edit to suit your needs. Or, if you choose, you can even create your own PDF presets from scratch. In addition, PSD and TIFF images with layers and channels can be saved in an editable PDF format, providing much more flexibility for using PDFs in Photoshop.
Accessing Photoshop PDF presets
Photoshop CS2 contains a variety of PDF presets that can be used to create specific types of PDFs. Let’s start by taking a closer look at the Adobe PDF Presets dialog.
STEP ONE:
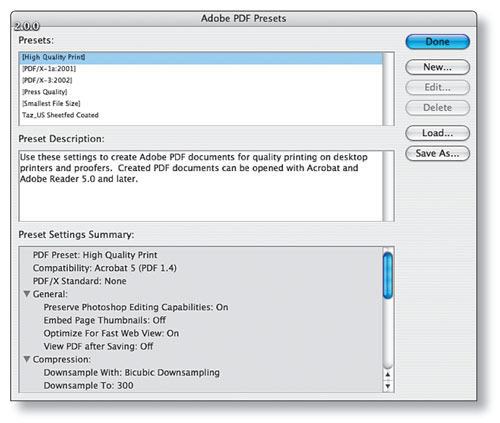
Select Edit>Adobe PDF Presets. When the Adobe PDF Presets dialog appears, you’ll see a series of PDF presets including High Quality Print, PDF/X-1a:2001, PDF/X-3a:2002, Press Quality, and Smallest File Size. Also, any custom Adobe PDF presets you’ve already added to the Adobe PDF Settings folder will be visible in this list of Presets, such as “Taz US Sheetfed Coated” shown at the bottom of our example. (Note: The PDF/X settings are prepress-oriented Adobe PDF Pre-sets.)
STEP TWO:
Click on one of the presets (we chose High Quality Print in our exam-ple) and in the Preset Description, you can read a general description of the preset. To view a more detailed summary of the specific settings, scroll down the Preset Settings Summary.
Create a custom preset
You can also customize any of the included presets to create a new preset. Here’s a customized set of adjustments that I make to the standard PDF/X settings when pre-paring PDFs for prepress.
STEP ONE:
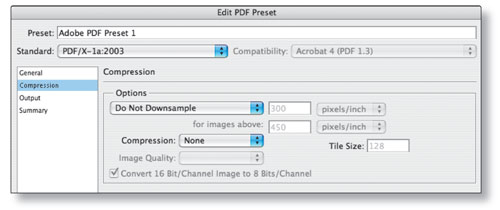
Click the New button in the Adobe PDF Preset dialog and in the Edit PDF Preset dialog that appears, click on the Standard pop-up menu and select PDF/X-1a:2003. (Note: The Compatibility pop-up menu on the right side of the dialog is automatically disabled and assigned a setting of PDF 1.3, the required compatibility for PDF/X.)
Click off the Optimize for Fast Web Preview checkbox because when it’s on, this setting activates page serving, which allows a PDF document to be served up one page at a time across the Internet. While this setting typically doesn’t have an impact one way or the other in prepress, there have been a few reported RIP conflicts, so I suggest you get in the habit of turning off this selection.
STEP TWO: Click on Compression in the list on the left-hand side of the Edit PDF Preset dialog. Then in the Options area, click on the downsampling pop-up menu, and select Do Not Downsample. The PDF/X default, which is to downsample any image with a resolution greater than 450 pixels/inch, may be a wise choice for files where you might be unsure of the incoming resolutions; however, I carefully control the resolution of my images and don’t want the PDF creation process to perform any downsampling, as it can soften them noticeably.
Now in the Compression pop-down menu, select None. Again, I prefer not to have the PDF creation process apply any image adjustments, such as applying lossy compression to my images.
If you’re working with 16 bit/channel images, leave the Convert 16 Bit/Channel Image to 8 Bits/Channel checkbox on, as most RIPs won’t handle 16-bit data. (Note: This option will be grayed out unless you have selected a Compatibility for either Ac-robat 6 or 7, which you can’t chose if you’ve selected one of the PDF/X standards.) Don’t click OK yet.
STEP THREE:
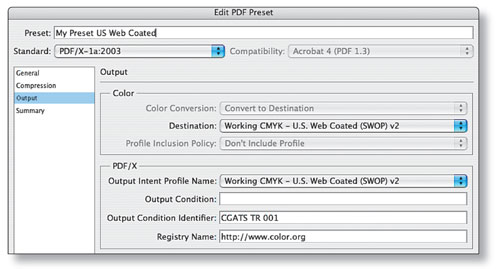
Now, click on Output on the left-hand side of the dialog. Under the Color area, the Destination pop-up menu will display the current Working CMYK color profile that you have selected in the Working Spaces section of the Color Set-tings dialog (Edit>Color Settings). Under the PDF/X area, click on the Output Intent Profile Name pop-up menu and select the output profile you want to be used to con-vert the image to CMYK—in our example, it’s U.S. Web Coated (SWOP) v2.
(Note: If you’re working with an RGB image in Photoshop and you save it as a PDF using an Adobe PDF Preset with a CMYK Destination Profile, Photoshop will convert the RGB image to CMYK using the designated Destination Profile. Photo-shop will also simplify the image by flattening it—applying and removing layers—and deleting any alpha channels present.)
There’s one more step before we’re done.
STEP FOUR:
Give your custom preset a name in the Preset field at the top of the dialog (we named ours My Preset US Web Coated). Now you can click OK. Your new Adobe PDF Preset will be added to the list of Presets in the Adobe PDF Preset dialog.
Finally, click Done to complete the PDF preset creation process.
Using PDF presets
Now let’s take a look at how to use our PDF preset.
STEP ONE:
Start with an RGB image (we used an image with layers and channels). Select File>Save As, then choose Photo-shop PDF from the Format pop-up menu. Leave the Alpha Channels and Layers checkboxes on, rename the File with “CMYK” at the end of the name, and then click Save. A warning dialog will appear stating that “the settings you chose in the Save Adobe PDF dialog can override your current settings in the Save As dialog.” Just click OK and the Save Adobe PDF dialog appears.
STEP TWO: From the Adobe PDF Preset pop-up menu, select the preset you’d like to use (we used the custom My Preset US Web Coated that we created above). Click Save PDF.
STEP THREE:
Now try to close the image. Photoshop will warn you that the file could not be saved completely and ask if you’d like to Save the document in a format that supports all its features.
Click the Save button and follow the Save process through again. (Note: This second resaving process can be avoided if you flatten the layers and remove the channels either manually or by unchecking them in the Save As dialog.)
STEP FOUR:
Open the new CMYK PDF file in Photoshop. Notice that all the layers have been flattened and the channels have been removed.
Creating and using PDF Presets will allow you to closely control the content and quality of your PDF files from Photoshop—especially useful if you want to create PDF/X-compliant PDFs right out of Photoshop.
Tip: RGB images with layers and alpha channels saved as RGB PDFs can be saved with the editable layers and channels intact in the PDF. Give it a try!
