
The Art of Type: One-Click Typesetting
Nested styles in InDesign are a great time saver, reducing complex formatting tasks to a single mouse click.
Setting type should be a creative effort, but too often it’s a tedium of repetitive formatting: roman to italic, italic to bold, up a point size, down a point size—mind-numbing stuff that eats up your day. Spare yourself: Nested styles in InDesign are a great time saver, reducing complex formatting tasks to a single mouse click.
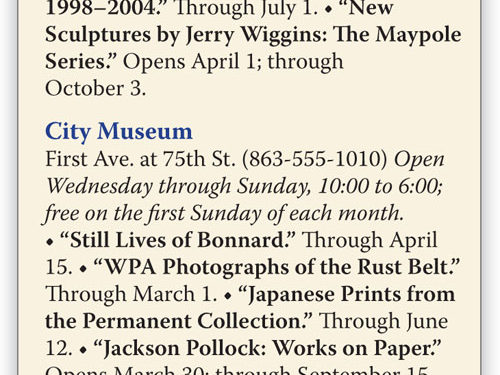
You may already use character and paragraph styles for applying many type specs at the same time, but nested styles—character styles embedded within paragraph styles—allow for real automation. In this example, the listings are set up to be formatted using just two paragraph styles. Despite all the typographic variations, all the text was formatted with only two mouse clicks: one for the two-part heading, and one for the museum listings. The same technique could be applied to a table of contents, an index, or catalog—any place where the text structure is repetitive and predictable.

Styles within styles
InDesign lets you create styles based on text you’ve already formatted. For the main heading of our sample listing, the Character panel was used to switch “Art” (originally in caps and lowercase) to caps and small caps and to select Warnock Pro as the font. It was then colored red using the Swatches panel. The subheading, “Museums and Galleries,” was set in a smaller-size, semibold type.
To create a new character style, place the text cursor in the first line of text, then from the Character Styles panel’s flyout menu, choose New Character Style. In the dialog, name the Style “Section Heading” and click OK. InDesign creates a new style based on that text’s formatting—easy! Then, create a second character style in the same way for the subheading text (ingeniously named “Section Subheading” here).
Simple enough, but now comes the clever bit. Instead of separating the heading and subheading with a Return, use a forced line break—Shift-Return—which puts the subheading on its own line without making it into a new paragraph. Now, you can create a single paragraph style to format both lines. From the Paragraph Styles flyout menu, select New Paragraph Style and give it a name (we called ours “Section Head”). If your cursor is still in the target text, all of that text’s paragraph formatting—disallowing hyphenation, for example—will be applied to the new style. Of course, you can override any specification you want by selecting paragraph attributes from the list on the left side of the dialog (shown here).

Select Drop Caps and Nested Styles from the list on the left, then click on the New Nested Style button. Click on [None] under Nested Styles to display all available character styles in a drop-down menu and select Section Heading. Clicking “through” makes another drop-down menu available, where you can choose between “through” and “up to.” The two fields to the right make the meaning of these options more apparent. “Through” lets you specify a number of characters, sentences, or any of a slew of optional signposts in your text as the end point for the style you’ve chosen. When InDesign comes to the signpost you’ve indicated, that style yields—after the signpost—to the next nested character style on the list. Alternatively, choosing “up to” causes that signpost feature to get the following style. In this case, we wanted the formatting of “Art” to end after one line, so we set that nested-style entry to read “Section Heading through 1 Forced Line Break.” This allows the new style to work for any other listing heading, no matter how many words it contains.
Although it’s not obvious from the options in that “signpost” field, when the field is selected you can type in any character and that will become the marker that triggers the style change. (Later in this example, we’ll variously use punctuation marks, as well as line endings, to trigger the changes.)
Click on the New Nested Style button again, and create a new entry that reads “Section Subheading through 1 Forced Line Break.” This has the effect of telling InDesign to use that character format until the end of the paragraph.
With a click on OK, a single paragraph style has been created that can format both the heading and subheading at the same time. With the text cursor anywhere in those two lines, a click on Section Head in the Paragraph Styles panel completely formats both.
The second paragraph format is for the museum listings themselves. From creating the first paragraph style, you can see that a key to nested styles is having predictable signposts in the text that trigger the onset of successive styles. If you look at the first listing’s text, you can see that the first character style (the heading) ends with a forced line break; the second ends after the closing parenthesis of the phone number; the next ends after a period at the end of the opening hours; and so forth. Each of these uniquely formatted entities gets its own character style. This lets you script the sequence of nested styles quite easily, using the same technique used for the Section Head (including ending the heading with a forced line break, not a Return).
But there’s a complication: The listings themselves contain an unpredictable number of exhibits, apparently making it impossible to create a single script of style changes that works for all of them. But InDesign has an ace in the hole, which keeps you from having to create unique styles for such non-conforming paragraphs.
You can use the [Repeat] operator in a series of nested styles. When InDesign has worked through the prescribed sequence of styles and hits the [Repeat] command, it loops back however many steps you specify and starts again. In our example, this allows any number of exhibit listings and their schedules to appear one after the other, and as long as their text is identically structured, they’ll be formatted properly. This continues until the end of the paragraph.

The problem with the [Repeat] command is that you can’t add any other style after it. You have to plan things so it can be the last step in your nested style sequence, running until the paragraph ends.
Troubleshooting Tips
Sometimes applying styles produces unexpected results. This is usually due to some default formatting that’s being applied behind the scenes, which needs to be stripped out. If your styles aren’t behaving properly, select all your text and apply the character style [None] and the paragraph style [Basic Paragraph]. This will blotto any residues of existing styles or other overrides (which is what InDesign calls settings made in addition to those applied by styles). It leaves you with a blank slate to test your styles.
The logic of nested styles may be elusive at first, but once you’ve caught on, you’ll have a very powerful tool in your hands. It’s up to you to decide what to do with all the time you save.

