
Creating captions, one of the most mundane tasks in page layout, can now be automated in InDesign CS5. Using an image’s metadata, InDesign can create live captions. The beauty here is that once it’s set up in your document, your captions will automatically update if the image changes or if the image’s metadata changes. We’ll also show you how you can use Buzzword to collaborate between different documents.
Live Captions
1 CREATE A NEW DOCUMENT
Like most of our InDesign tutorials, you’re going to need a document to work with. Although you can certainly open an existing document, we recommend creating a new one so that there aren’t stylesheet conflicts. Open Adobe InDesign and go to File>New>Document. Choose Letter from the Page Size menu and click OK. In this tutorial we’re going to use Adobe Bridge to input metadata to be used in InDesign. Go to File>Browse in Bridge to open Bridge.

2 ADD METADATA DESCRIPTION
Navigate to an image of your choice and select it—it can be a PSD, TIFF, JPG, EPS, etc. In the Metadata panel (Window>Metadata Panel) go to the IPTC Core section, click in the Description field, and type a description of your image. You can add as many things about your image as you like; InDesign supports just about all of the fields shown here. When finished, click the Apply icon (checkmark) at the bottom of the Metadata panel. (If your image already has metadata from Lightroom or another application, that will work too.)

3 PLACE IMAGE INTO INDESIGN
With the image still selected, choose File>Place>In InDesign. This will take you over to your open InDesign document and let you place your image with a loaded cursor. Click to place your image, and resize accordingly if need be.

4 CREATE TEXT FRAME AND CAPTION
Although the live caption feature will generate the text frame automatically, we’re going to set up a sample caption text frame first so that we can create a paragraph style. Select the Type tool (T) and draw a text frame directly under the image. Now type a sample caption—don’t worry about what it says; you’re going to delete it later anyway.

5 CAPTION STYLING
Style your text using the fonts, colors, etc. to create the appearance that you want for all your captions when using this specific paragraph style. Highlight your text using the Type tool and apply styles in the Options Bar. For this example, we used Minion Pro Italic at 10 pt. Now we’ll use the sample caption to create a paragraph style. In the Paragraph Styles panel (Window>Styles>Paragraph Styles) hold down the Option (PC: Alt) key and click the Create New Style icon. In the New Paragraph Style dialog type the word Captions in the Style Name field. Enable the Apply Style to Selection checkbox and click OK.

6 CAPTION SETUP
At this point we no longer need the sample caption text frame. Select it with your Selection tool and delete it by pressing the Delete (PC: Backspace) key on your keyboard. Now it’s time to set up the live captions feature. Using the Selection tool, click on your image to select it, and then Right-click on your image and choose Captions>Caption Setup from the contextual menu.

7 CHOOSE CAPTION OPTIONS
The Caption Setup dialog lets you choose which metadata you want to bring in and what text you want to appear before and after it. It also dictates where the caption will be placed and how it will look. For this example, we’re going to select the Description option since that’s what we entered into our metadata in Bridge and our paragraph style that we created earlier. So from the Metadata drop-down menu, choose Description, and from the Paragraph Style drop-down menu, choose Captions. Accept the rest of the Caption Setup dialog’s default options and click OK.

8 GENERATE LIVE CAPTION
Setting up the live caption options is only the first part. Nothing happens in Step 7 when you click OK. Right-click your image again and choose Captions>Generate Live Caption. InDesign will now generate a live text frame and caption directly under your image with the description you gave it in Bridge. If you want to center your type, click on it with the Type tool and select the Align Center option in the Options Bar.

9 APPLY TO OTHER IMAGES
Of course you’re going to want to do this with multiple images. You can do so by selecting one or more images in InDesign and going to Captions>Generate Live Caption again or you can duplicate (Edit>Duplicate) the live caption text frame you just created, and as long as the duplicate live caption text frame is touching another image with a description in its metadata, InDesign will pull in that description. The magic’s now in the frame itself.

Buzzword
10 USE BUZZWORD FOR COLLABORATION
One of the often-overlooked features of Acrobat.com is Buzzword, an online word processor. Not only does it allow you to create and edit documents but it also allows you to share those documents with others so they can make changes. Here we’re going to explore these features. Go to Arobat.com and click the Sign In button at the top of the webpage to login—you can use your Adobe ID. (If you don’t have an Adobe ID you can click the Sign Up button to create a new free account.)

11 CREATE A NEW BUZZWORD DOCUMENT
Once signed in, you can create a Buzzword document from scratch by clicking the New link near the top of the webpage and selecting Buzzword Document from the menu. In your new document, you can enter content by typing or copying-and-pasting into the document. If you choose to paste your content, go to Edit>Paste or press Command-V (PC: Ctrl-V). Then, save your document by going to Document>Save.

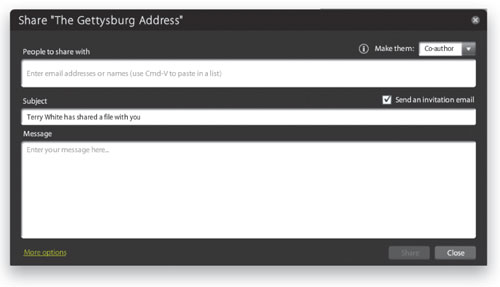
12 SHARE WITH OTHERS
If you want someone else to collaborate with you on your document or perhaps proofread and edit it, you can share it with whomever you want by going to Document>Share, or click the Share File link at the bottom-left corner of the Buzzword webpage. Then, click the Share It With Individuals text link that pops up. In the Share dialog, enter an email address in the People to Share With field and a message in the Message field if you wish. Click Share to send your document.

13 PLACE IN INDESIGN CS5
How does this relate to InDesign? I knew you were going to ask! In InDesign CS5 there’s a Place from Buzzword command. Go to File>Place from Buzzword and select your saved document in the Place Buzzword Documents dialog. The Replace Selected Item option is selected automatically. Click OK and you’ll have a loaded cursor ready to place your document.

14 UPDATING CONTENT AUTOMATICALLY
Now you can click to place that document and edit it right in your InDesign file. This is also a great way to allow your writers to give you content and update that content without having to rely on multiple emails of text documents. If you enable the Link to Document checkbox in the Place Buzzword Documents dialog, your Links panel (Window>Links) in InDesign will give you a warning anytime that document has been modified online. You can then use the Links panel to update the InDesign file automatically.

ALL IMAGES BY TERRY WHITE UNLESS OTHERWISE NOTED
