
Creating Fire in After Effects CS3
One of the toughest things to achieve in After Effects is a true feeling of space, environment, and temperature even. One way to infuse your scene with reality is to add light—and not simply a spotlight with a feathered edge and a few shadows here and there, but a realistic light cast from the very essential form of illumination: fire!
[If you’d like to preview the final effect, click here to download. All files are for personal use only.]
1 Import Image Files
The specs for this project are an NTSC D1 square-pixel composition of 720×450 pixels, 29.97 frames per second, six seconds long, a black background, and named “Flame.” The first step is to assemble the elements you want to use. In this case, we’re going to use three items: a logo (or icon), a texture for the floor, and a movie clip for the flame. Double-click in the Project panel to bring up the Import dialog, then locate the items you wish to use. For our example, we’ll import an 1800×1800-pixel file called “Texture.psd,” and a small 350×73-pixel vector logo called “Energi Text.ai.”

2 Import Movie File
Now locate the movie clip of fire or flame you wish to use (this could also be one you’ve created with a particle system such as the one in Motion). We’re bringing in one of Artbeats’ wonderful flame clips from their ReelFire 1 collection, “RF108.mov.” Now all these items are assembled in the Project panel, we can start to piece the scene together.

ARBEATS REELFILE 1 COLLECTION
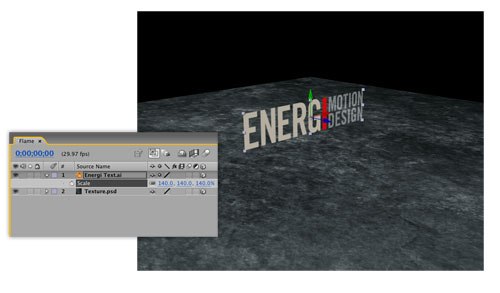
3 Create 3D Floor; Rotate
Select your texture image in the Project panel and drag it into the Timeline at 0 seconds. Click the 3D Layer icon in the Switches panel for this layer, then go to the Active Camera menu at the bottom of the Composition window, and choose Custom View 1. Press R on the keyboard to reveal the layer’s Rotation property, then click on the +0.0° value next to X Rotation and change it to +90°, pressing Enter to confirm when done. This rotates the texture to become the floor.

4 Add 3D Logo; Position & Scale
Press C on the keyboard to access the Orbit Camera tool and drag it around in the Composition window to view the scene from a better angle. Press V to return to the Selection tool. Now, drag your logo or icon (ours is Energi Text.ai) image from the Project panel into the Timeline above the image at 0 seconds also. Turn this into a 3D layer, then drag the green Y-axis arrow in the Composition window to position the logo above the floor. To scale the logo up or down, press S on the keyboard to reveal the Scale property and adjust it to suit your design.
5 Add 3D Flame; Adjust Anchor Point
Now drag in the your flame clip at 0 seconds in the Timeline—note how the layer’s anchor point is in the center of the rectangle. Select the Pan Behind tool (Y) from the Toolbar and drag the flame’s anchor point toward the lower middle of the flame itself. This will make scaling and positioning easier, as this is the point from which the layer will transform. It will also give us a handy reference for the position of our light in a short while.

6 Key Flame; Make 3D Layer
Let’s quickly remove the black background of the clip. Press V to return to the Selection tool, then go to Effect>Channel>Shift Channels. In the Effect Controls panel (ECP), choose Red from the Take Alpha From option to use the layer’s red channel to create transparency. Now, go to Effect>Channel>Remove Color Matting and the original brightness and color of the flame will be restored. Now, click this layer’s 3D switch in the Timeline to turn it into another 3D layer.

7 Scale & Position Flame
Switch from Custom View 1 to Front, then hit S to reveal the flame’s Scale property. Drag to the left on any one of the three 100% numbers and scale the flame down to the size you prefer. Then use the green Y- and red X-axis arrows in the Composition window to move the flame into the desired location. In our case, it’s going to sit directly on top of the I in ENERGI.

8 Add Point Light; Turn On Shadows
Switch back to Custom View 1 now, then go to Layer>New>Light and in the resulting Light Settings dialog, choose Point from the Light Type pop-up menu. This creates a light source that shines in all directions (we called it Firelight). Turn Casts Shadows on, set the Intensity to 120%, Shadow Darkness to 60%, and the Shadow Diffusion to 20%, then click OK. A new light is sitting toward the lower right of our scene and you should be able to see it illuminating a small section of the floor—not a bad start!

9 Position Light within Flame
Let’s position the light in exactly the same location as the flame, as that’s where the light source is to come from—and this is also why we adjusted the anchor point of the flame! Select the flame layer, hit P to reveal its Position value, click on the word Position, and then press Command-C (PC: Ctrl-C) to copy the value. Now, select the Firelight layer, press P, select the word Position, and press Command-V (PC: Ctrl-V) to paste in the copied value. Perfect—except everything’s gone dark, and there are no shadows…

10 Adjust 3D Material Properties
Adding lights in After Effects only illuminates layers that are a distance from the light source (such as the floor); but this light is in the right position, so let’s tell the logo and flame to self-illuminate. Select both the logo and flame layers in the Timeline, then hit AA to reveal their 3D Material properties. Set the Accepts Lights option to Off and you’ll see the layers again. Now, select only the logo layer and change Casts Shadows to On.

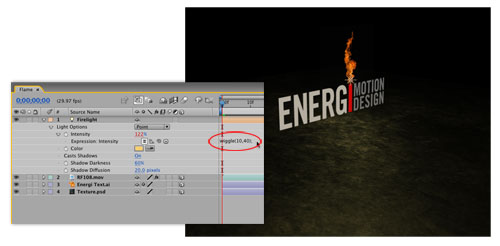
11 Change Light Color; Add Intensity Expression
Now, let’s make the light source much more realistic. Double-click the Firelight layer to bring up the Light Settings dialog, click the Color swatch and change it to a light orange. Click OK, then press AA to reveal the Light Options in the Timeline. Hold down Option (PC: Alt) and click on the stopwatch next to Intensity to add an Expression field. Type “wiggle(10,40)” in the filed and then press Enter to confirm. If you scrub the Timeline now, you can see the light intensity flickering very nicely on the floor.
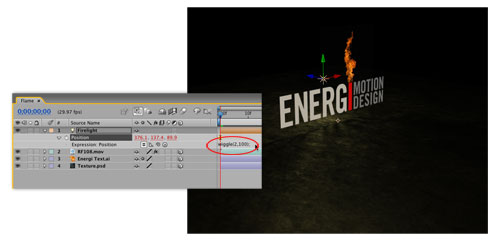
12 Add Position Expression
To now reveal the shadows and make them “dance” as the flames jump around, let’s use a similar Expression for the Firelight’s position. Press P to reveal its Position property, then Option-click (PC: Alt-click) on the stopwatch to add an Expression field. This time, type “wiggle(2,100)” and then press Enter to confirm. If you now press 0 on the keypad to RAM Preview, you’ll see the shadows cast from the logo moving very nicely across the floor, and also beautifully diffused as they get further away from the light source.
13 Add Camera; Adjust & Keyframe
Now we can create a simple camera move around the logo to really get a sense of space. At 0 seconds, go to Layer>New>Camera, then choose 28mm from the Preset pop-up menu in the Camera Settings dialog. Click OK, then in the Composition window, switch back to Active Camera. Press C and drag the Orbit Camera tool around to set your starting view, then press P and click the stopwatch to add a Position keyframe for the camera at 0 seconds.

14 Animate Camera
Hit End on the keyboard to jump to 6 seconds, then drag the Orbit Camera tool again to set your end view. Do a final RAM Preview, or render, and you should see some wonderfully realistic lighting effects, making this simple scene so much more alive. Remember the light intensity, color, shadow darkness, diffusion, and position movement, as well as the relative distances between the light, the floor, and the logo can all be adjusted to get infinitely varied results. Enjoy!

