

The most recent release of Lightroom is better than ever. It’s faster and more robust, includes some great new tools, and much more. And it’s just a preview of things to come when the final version ships later this year. So let’s take a look at a few tips that will help you take advantage of some of the new features in the Photoshop Lightroom 2 Beta.
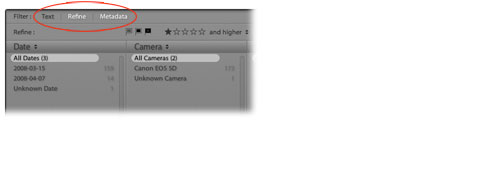
1 FAST FILTERS
One of the advantages of digital capture is the ability to create a high volume of photographs; on the downside, as photographers shoot more, it becomes more difficult to find images. Not to worry, the new Filter feature will help. Press G to enter Grid view in the Library module. Next, click on one of the filtering options: Text, Refine, or Metadata. Use Text to type in words to search based on filename, metadata, and more; use Refine to search based on rating, flag, or label; or use Metadata to search based on a newly enhanced set of criteria.
2 COOL COLLECTIONS
If you used Collections in the previous version, forget what you know because that feature is now smarter and more functional. Accessing Collections from the left-side panels area in the Library, Print, Slideshow, and Web modules, you can use them to create groups or sets of images based on specific criteria. Use “regular” Collections to group selected images and use Smart Collections to group images based on specific predefined metadata. To create a Collection or Smart Collection, select multiple images in the Filmstrip or the Library Grid view, click the plus icon, and choose the type of collection from the list.

3 ADDING KEYWORDS TO IMAGES
On the right-side panels area in the Library module, you’ll find two panels to add/manage keywords in Lightroom: Keywording (see Tip 4) and Keyword List. Start by selecting one or more images in the Library Grid view. To use the Keywording panel, just type keywords in the space provided, separating the keywords with a comma. If you’d like to use the Keyword List panel instead, just click on a keyword and drag it over the image thumbnail, or click on the image thumbnail and drag it over to the specific keyword.

4 KINETIC KEYWORDS
Now you know how to add keywords to your images, but it takes time. Here’s some great news: Keywording just got simpler and the more keywording you do, the faster it will become. New to this version is the Suggested Keywords feature: When you add one keyword, Lightroom will do some serious behind-the-scenes work to figure out what other keywords might also be appropriate (suggestions are based on time, subject matter, other keywords, and more!). If you like the suggestion(s), just click to add the keyword to the selected image.

5 DEVELOP IS DYNAMIC
The Develop module is where you make your images really come to life. It’s the most important module in Lightroom and it’s incredibly important to learn how to navigate quickly. Did you know that in Lightroom 2 Beta, you can modify your images without using your mouse? Here’s how: Press Option- (PC: Alt-) to scroll through and target the various adjustments in the Basic panel. And once you highlight the adjustment name, press Option-+ or – (PC: Alt-+ or –) to increase or decrease the slider amounts. Add the Shift key for greater increments.

6 RAW PAINTING IS RADICAL
One exciting capability of Lightroom (and of RAW image processing in general) is being able to make nondestructive adjustments to your images. In Lightroom 2 Beta, this capability has been extended to retouching with the all-new Retouch tool (circled). This is about more than a new tool; this is about a new way of thinking. We can now make retouching edits, burn and dodge, and more to our images without drastically increasing file size or without permanently affecting the pixels. For many photographers, this will literally revolutionize how we work on our images.

7 INTRO TO THE RETOUCH TOOL
Click on the Retouch tool under the Histogram in the Develop module (or press K) to open the menu. Next, click on the menu to the right of Paint to select the type of effect you’d like to modify or paint: Exposure, Brightness, Saturation, Clarity, or Tint. Then define the Brush: Size is the overall size of the brush; Feather, the hardness/softness of the brush; and Flow, the intensity of the effect. (I recommend that you start with a low Flow amount and then slowly build up more of the effect.) Just click and begin painting on the image.

8 RETOUCHING: NEXT STEPS
Once you’ve “painted” with the Brush, it’s time to add some finishing touches. First, hover over the retouching node to see a preview of the retouched area, then click on the node and drag to the left or right to decrease or increase the amount of the overall effect. Or click on the Edit button in the retouching controls to modify the retouching. If you’re content with the overall edit, click New to add another retouch effect to the image. If you don’t like the retouching, click on the node and press the Delete key.

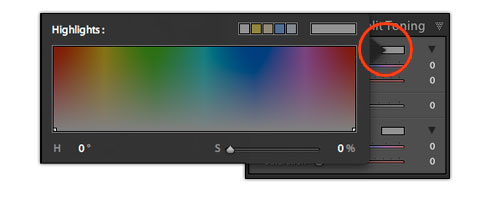
9 SLICK SPLIT TONING
Split Toning gives you the ability to add color tone to highlights and shadows. It’s a unique feature that you can use to add subtle or dramatic visual interest to your images. In the past, using this feature was a bit awkward but with this latest release, it’s sophisticated and simple at the same time. To choose a color, click on the color swatch to open the color selector dialog (shown here). Click-and-drag to choose a new color or drag the Hue and Saturation sliders.
10 DELICIOUS DETAILS
The Detail panel has also been upgraded in Lightroom 2 Beta. Previously, this panel only contained Noise Reduction and Sharpening; now it includes Chromatic Aberration sliders as well. In this way, you can really focus on all the small detail work at one time. But wait…there’s more: a 100% preview window built right into the panel so that you can actually preview the effects of the sharpening!

11 VERY COOL VIGNETTES
Adding a vignette can strengthen your overall image. Because the eye is attracted to brightness, darkening corners or edges of the frame keeps the viewer focused on the subject in the frame. Many photographers have taken advantage of the Vignettes feature in the Develop module in Lightroom, except in previous versions, this feature didn’t work when you cropped your image. Now in Lightroom 2 Beta you can choose a Post-Crop vignette that follows the size and shape of your crop. Sweet!

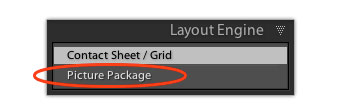
12 GROOVY GRID AND PICTURE PACKAGE
There’s nothing more exciting than seeing the final print of an image. And now, printing in Lightroom 2 Beta is better than ever. In particular, there’s a new layout feature called Picture Package in the Print module that gives you incredible layout flexibility. The Layout Engine panel allows you to choose between Grid and Picture Package to print multiple images on one (or more) page(s). Choose the Grid layout for a standard grid or Picture Package to position images freely on a page without the confines of a grid.
13 PROLIFIC PRINTING
In the previous version of Lightroom, printing was a bit limited, but you can now define Print Resolution, Print Sharpening, and even print to 16 Bit Output. Another new feature is the ability to Print to JPEG File: In the Print Job panel, choose Print to: JPEG File to view the other menu settings (as shown). Then define File Resolution, Print Sharpening, Custom File Dimensions, and Color Management. These settings will ensure that all your end results will be as good as possible.

14 MULTIPLE MONITORS ARE MONEY
When you’re working in a software application, screen real estate is always a consideration. This is especially true when working on photographs because it’s so critical to minimize the interface to really focus in on the image. Now in the Lightroom 2 Beta, there’s support for multiple monitors. Just click on the monitor icon (Show Secondary Window) above the Filmstrip on the right and you can view images on a second monitor in Grid, Loupe, Compare, and Survey mode.

