Creating Accessible Tables for Data Using Dreamweaver 8

With a host of new features, Dreamweaver 8 makes it easier than ever to build accessible tables for data. Using the Accessibility preferences, Dreamweaver 8 prompts designers and developers to provide captions, headers, and summary information as the table is inserted.
Here’s a basic overview of how to create accessible tables using Dreamweaver 8, with discussions on the following topics:
- Screen Readers and Tables
- Inserting a Table
- Adding Captions and Summaries
- Specifying Headers
- Screen Readers and Tables
Before creating accessible tables, it’s important to understand how screen readers interact with tables. First of all, tables are generally used in one of two ways: to control the layout of a page and to present data.
Using tables for page layout is an easy way to create columns, align elements on a page, or control page width. Earlier versions of screen readers had great difficulty handling tables of any kind, so designers were discouraged from using tables for layout. The latest generation of screen readers now works more effectively with tables.
In general, current versions read tables row by row, from left to right. As long as the contents of the page make sense when read across, you can use tables for page layout.
Tables used to present data are read the same way. The screen reader will read the top row from left to right, and continue reading across each of the following rows. One problem with the current method is the difficulties screen reader users may have in remembering column headings during the reading, as the following example illustrates:
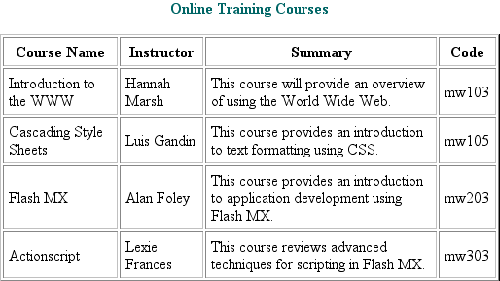
A screen reader would likely read this table as follows:
Online Training Courses
Course Name
Instructor
Summary
Code
Introduction to the WWW
Hannah Marsh
This course will provide an overview of using the World Wide Web
mw103
Cascading Style Sheets
Luis Gandin
This course provides an introduction to text formatting using CSS
mw105
Flash MX
Alan Foley
This course provides an introduction to application development using Flash MX
mw203
ActionScript
Lexie Frances
This course reviews the advanced techniques for scripting in Flash MX
mw303
Without the column headers to help keep track of the purpose of each piece of information, it’s difficult to make sense of the table. To help organize the information, screen readers often have a table-reading mode. In this mode, the column or row headers (if they are properly marked up) may be read before each piece of data. Using the table-reading mode, the first two rows of the same table might be read as follows:
Online Training Courses
Course Name
Introduction to the WWW
Instructor
Hannah Marsh
Summary
This course will provide an overview of using the World Wide Web
Code
mw103
Course Name
Cascading Style Sheets
Instructor
Luis Gandin
Summary
This course provides an introduction to text formatting using CSS
Code
mw105
It’s much easier to grasp and keep track of information presented in this mode, with the header read before each piece of information. In addition, screen reader users may also read a table summary, which provides a quick overview of the table to help orient users to the information presented.
Inserting a Table
When you add a table, you’ll be asked to provide a caption, summary information, and header layout, in addition to the dimensions of the table itself.
Adding Captions and Summaries
The following dialog box appears when you insert a table on the page:
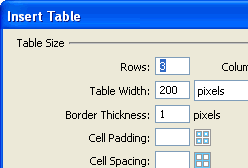
The first six options in this dialog box are Rows, Columns, Width, Border, Cell Padding, and Cell Spacing. For more detailed information about these properties, see Setting Table Properties in Dreamweaver 8 Help.
Enter a table title in the Caption text box. The title (caption) should be brief and describe the information contained in the table. The caption will be displayed as a table title by default. You can use the Align Caption option to align the caption to the left or right, or to place it at the bottom of the table.
The Summary text box allows you to describe the data presented in the table. This description should give users a general understanding of the information without data-specific details. Summary text will not be visible on the page.
Specifying Headers
The use of headers in a table helps organize the information read by screen readers. The Header option shown in the preceding dialog box enables you to easily specify headers and link the table data to those headers. However, this feature will only work with relatively simple tables (one or two levels of headings). More complex tables (three or more levels of headings) require a more complex HTML mark-up than is represented here.
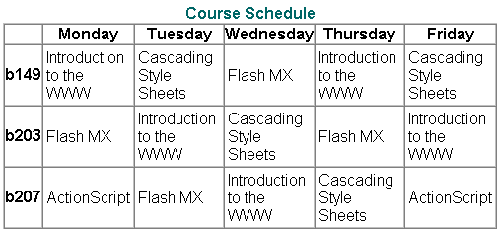
The Heading text box offers four choices. The first selection, "None", specifies no headers. The second Heading selection, "Left", inserts row headers, i.e., the first cell in each row is marked up as a header. Here’s an example of a table with row headers:
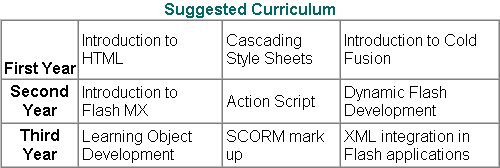
The third Heading selection, "Top", inserts column headers, i.e., the first cell in each column is marked up as a header. You can see an example of this selection at the beginning of this document. The final Heading selection lets you change both the first row and first column of the table into headers. Here’s an example of a table with row-and-column headers: