
Dramatic Shadow Effect in Illustrator
Recently, I saw a trailer for a new movie called The Adjustment Bureau with Matt Damon and was intrigued by the title art. It’s an interesting reversed shadow effect that you can re-create simply by using the new Perspective Grid feature in Illustrator CS5.
1 CREATE DOCUMENT; SET TYPE
Choose File>New and in the New Document dialog, set New Document Profile to Basic RGB and click OK. Select the Type tool (T), then go to the Control panel and set the font to Arial and the size to around 48 pt. Click on the artboard to set the text object, and type ADJUSTMENTLAYER without a space between the words. Using the Type tool, highlight just the word ADJUSTMENT and change the font to Arial Black. The different weight of the words will make it easier to read. Plus it looks cool.

2 COPY, PASTE, FLIP
Switch to the Selection tool (V). Press Command-C (PC: Ctrl-C) to copy the text to the clipboard, then press Command-V (PC: Ctrl-V) to paste a duplicate copy of the text object. Choose Object>Transform>Reflect and in the dialog that appears, click the Horizontal setting in the Axis section, then click OK. This will flip the object horizontally, giving you a mirror image.

3 ADD GRID; ADJUST PERSPECTIVE
Select the Perspective Grid tool (Shift-P). By default, Illustrator displays a two-point perspective grid; however, for this effect we need a one-point perspective grid. To change this, choose View>Perspective Grid>One Point Perspective>[1P-Normal View]. Use the control handles (circled) to widen the grid area and push the ground plane up to get a lower angle.

4 SELECT PLANE; ADJUST TEXT
Now locate the Active Plane widget. (Note: A grid must be visible in order to see the widget.) Click on the bottom plane of the cube; it should turn green. This ensures you’re working only on this plane of the grid. Choose the Perspective Selection tool (Shift-V), click on the mirrored text we created in Step 2, and drag it into the ground plane of the perspective grid. Holding the Option key (PC: Alt key), drag one of corner handles with the Perspective Selection tool and scale the object so it covers a wide area of the ground plane, as shown here.

5 HIDE GRID; REPOSITION TEXT
With the text scaled and positioned where you want it, choose View>Perspective Grid>Hide Grid. Even though the grid isn’t visible, you can still move the text around on the ground plane with the Perspective Selection tool. Now, choose the Selection tool (V), select the original upright text we created, and place it above the perspective text. Shift-click-and-drag a corner handle to scale it so that its bottom edges line up as close as possible to the top edges of the perspective text so that the perspective text appears to be a shadow. Remember, to make adjustments to the perspective text, use the Perspective Selection tool.

6 DRAW SHAPE AROUND TEXT
In the movie trailer, the shadow letters are actually inverted to the background, making the shadow appear white. Select the Pen tool (P) and in the Control panel, make sure the Fill is set to black with no Stroke. Draw a shape around the entire area of the perspective text. The shape should be just slightly larger than the perspective text. (Tip: When using the Pen tool, press-and-hold the Shift key to ensure the horizontal lines are straight.) Click on the first point you created to close the path. Once the shape is drawn out, choose Object>Arrange>Send to Back.

7 ENTER ISOLATION MODE; CHANGE COLOR
Choose the Selection tool and click on the perspective text object to select it. You may discover that you can select the object but not change the color. To change the color, you need to enter Isolation mode, so double-click the object and it will screen out everything except the object. The text is still editable, even though it appears as paths in the grid. Select the text object or highlight it with the Type tool, then change the Fill color to white in the Control panel. When done, click the left arrow in the gray bar at the top of the document to exit Isolation mode.

8 CHANGE TEXT COLOR
Now let’s change the color of the upright text and the black background shape. With the Selection tool, click-and-drag to select the upright text object and the background shape (it doesn’t matter if you also select the perspective text since you can’t change its color unless you’re in Isolation mode). Choose Window>Swatches and select a color fill for the objects. We chose a violet blue color, which is similar to the original design. Feel free to experiment with other colors.

9 ADD BLUR
Now select only the perspective text and the shape behind it (leave the upright text unselected). Go to the Effect menu, under the Photoshop Effects section, and choose Blur>Radial Blur. Set the Amount to 15, choose Zoom for the Blur Method, set the Quality to Best, and click OK. (Note: Raster effects are set to 72 dpi by default in Basic RGB documents, so the blur may look pixilated. You can go to Effect>Document Raster Effects Settings and change the Resolution to High [300 ppi] for a high-quality effect, but we wouldn’t recommend changing it until you’re ready for final output.)

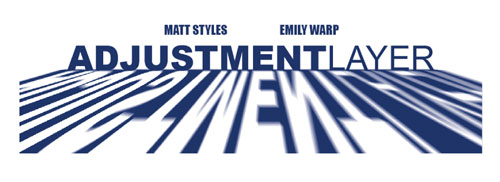
10 MAKE CLIPPING MASK
Choose the Rectangle tool (M) and draw a rectangle over most of the graphic. This is going to frame the art, so make sure all of the upright text is in the rectangle and let the perspective elements bleed outside the box a bit. Choose Select>All, then Object>Clipping Mask>Make. This will crop the graphic, making it only visible inside the box. Add some text to complete the effect.

