
With the portfolio function in Acrobat 9, you can combine documents and images from a wide variety of sources—including text documents, spreadsheets, graphic and image files, PowerPoint presentations, page-layout documents, and even CAD files—into a single, editable, searchable, compressed PDF portfolio. In a PDF portfolio each document can be viewed, edited, and a saved separately.
1 CREATE A PDF PORTFOLIO
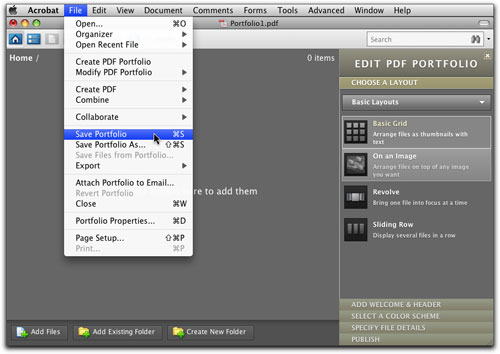
To begin the process of creating a PDF portfolio, choose File>Create PDF Portfolio. This will activate the portfolio workspace. Through this workspace you can gather your various documents; define a layout for how your portfolio will be organized and presented; format your portfolio (with headers, background images, and color schemes); edit existing portfolios; as well as save, preview, manage, share, and publish your portfolios. This Portfolio workspace is a special, separate workspace within Acrobat. Now Choose File>Save Portfolio to name and locate your portfolio (here “50 Hikes–Photo Marketing”).

2 LOCATE AND ORGANIZE YOUR FILES
You may find it useful to use Bridge to locate, gather, name, and organize your folders and images prior to placing them in your portfolio. You can manually organize your files and folders in Bridge and then use the Batch Rename tool for quick alpha or numeric renaming of your folders and files. Using Bridge to organize your files and folders is not required, but may save you some time.

3 ADD FILES AND FOLDERS
You can add individual files, entire folders of files, or you can create portfolio folders in Acrobat into which you place files. You can access these commands at various places: the File>Modify PDF Portfolio menu; the Modify menu at the top of the document workspace; or more easily, simply click on the appropriate buttons located in the lower-left corner of the portfolio dialog. You can also Control-click (PC: Right-click) in the preview area to access a pop-up menu that includes these same options. And finally, you can drag files from any location on your computer into your preview area.

4 DEFINE YOUR DISPLAY COLUMNS
In List view you can display certain criteria, such as file name and size, to sort or to simply view file information. To manage your display criteria, click on the Specify File Details tab located at the bottom of the Edit PDF Portfolio panel (this will switch you to List view). Check the boxes of the criteria you’d like to display. To create your own custom criteria, type in a new column name (here “Document/Image”) in the white text field located at the top of the Specify File Details panel, select the type of criteria from the drop-down menu (Text, Number, or Date), and then click the Plus (+) button.

5 SORT YOUR PORTFOLIO
Use the Initial Sort drop-down menu at the bottom of the Specify File Details panel to sort your portfolio files by any of the display criteria you activated in the previous step. You can also sort by ascending or descending values. If you’d like to create a custom sort, you could assign sequential alpha or numeric values to the various files and folders in the Description column. Just double-click in the Description column next to one of the files to type in a value. Once you’ve entered all your values, simply sort by Description.

6 SELECT A LAYOUT
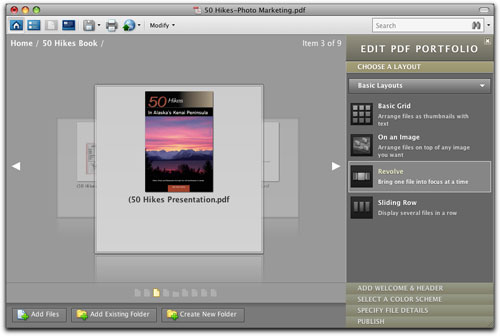
To select your layout, click on the Choose a Layout tab located in the Edit PDF Portfolio panel. You can choose from several layout views, including Basic Grid, Revolve, and Sliding Row. Here we chose the Revolve option, which is a good way to view one portfolio item at a time. You can use the Basic Grid and Sliding Row to view multiple portfolio items simultaneously. To navigate your portfolio in Revolve or Sliding Row, simply click on the white triangles to either side of the preview area. Double-click folders to view their contents and then navigate back using the folder path at the upper-left corner of the view window (here Home/50 Hike Book).
7 ADD A BACKGROUND IMAGE
If you’d like to display your portfolio items over a background image, click on the On An Image layout option located under the Basic Grid option. Then click the Pick an Image icon that appears next to the Create New Folder icon at the bottom of the dialog. To control the scale and placement of the background image, drag the slider directly under the image to scale it, and click-and-drag directly on the image to adjust its position.


8 PREVIEW PORTFOLIO FILES
You can preview many documents and images without having to open them in their native applications. To preview an image, simply select the file and click on the Preview the Selected File icon (it looks like a page) located in the upper-left corner of the dialog. Or you can simply double-click on the item to activate its preview. If Acrobat can display a preview of the file, a large preview will appear. You can control the scale and orientation of the preview using the appropriate icons located at the top of the preview. Click the Open button to open the image in its native application.

9 MANAGE YOUR PORTFOLIO ITEMS
Any document or image in your PDF portfolio can be deleted, exported, edited, or converted to PDF. The easiest way to access these options is to simply Control-click (PC: Right-click) on any portfolio image or document (make sure you’re not in Preview mode). From the pop-up menu that appears, choose the appropriate action. If you need to reduce the file size of any item in the portfolio, convert it to PDF. Good news note: If you open and edit an image or document in its native application, this editing will not affect the original file, only the file contained in the portfolio.

10 ADD A WELCOME PAGE
Click on the Add Welcome & Header tab located in the Edit PDF Portfolio panel, then click on the Welcome Page tab. Choose whether you want Text Only, Image Only, Image & Text, or Flash Movie (we selected Image & Text). Click on the Add an Image and Add Text areas that appear to import images and type text, then use the formatting tools that appear beneath content. When you place an image, you can control its scale, opacity, and background color. Click the Done button to complete the process.


11 ADD A HEADER
Click on the Header icon below the Welcome Page icon. Choose from the various text, logo, and image options (we chose Logo & Structured Text). Click on the active image and text areas and use the format tools that appear for each header element. View the results of your Welcome Page and Header additions by clicking on the Open the Welcome Page icon located at the top of the dialog. Note: All your portfolio contents including your welcome page and headers are searchable though the Search field located in the upper-right corner.


12 ASSIGN A COLOR SCHEME
To control the colors used in your portfolio, click on the Select a Color Scheme tab located in the Edit PDF Portfolio panel. First, click on the various built-in, well-matched complimentary Color Schemes to find a set of colors that works well with your portfolio. If you want to try your hand at assigning colors, click on the Customize Color Scheme area. Color swatches will appear for the background, text, and card colors. To adjust a specific color, simply click on one of the color swatches to activate a color picker.

13 PUBLISHING YOUR PDF PORTFOLIO
You have several output options for your PDF portfolio including saving, printing (whatever portions you like), emailing, placing your portfolio on your own website, or using Acrobat.com. You can access these various output functions either through the Save, Print, and Share icons located at the top of you portfolio dialog, or by clicking on the Publish tab located in the Edit PDF Portfolio panel. Tip: Prior to emailing/uploading your portfolio, perform a Save As and check its file size by choosing File>Portfolio Properties and clicking the Description tab to make sure it’s an appropriate size. Large portfolios can be shared via Acrobat.com.

