
Artistic Expressions: Sweet Delights
Sometimes it’s necessary to use both Illustrator and Photoshop to get a particular effect.
Sometimes it’s necessary to use both Illustrator and Photoshop to get a particular effect. There’s some feature in one application that doesn’t exist in the other. And even if it does appear in both, it might work better in one than the other. Take the Warp function for example: In Photoshop you’re limited to four points, eight handles, and three rows and three columns; on the other hand, Illustrator allows you to set the number of rows and columns you need, thus greatly enhancing the amount of distortion you’re capable of producing.
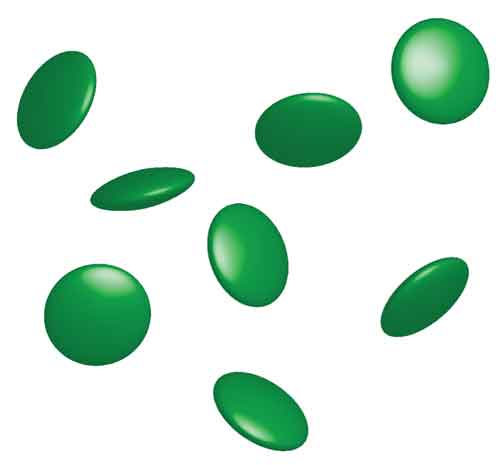
The new 3D functions added to Photoshop Extended allow you to create and alter a variety of incredible shapes but one function that’s lacking is a “lathing” tool—allowing you to create a cross section of a shape and have it revolve to form an entire shape. In Illustrator, that feature exists and it’s aptly named Revolve. For example, in Photoshop it’s quite difficult to create a simple oblong disk—like an M&M.
Cook up some M&Ms in Illustrator
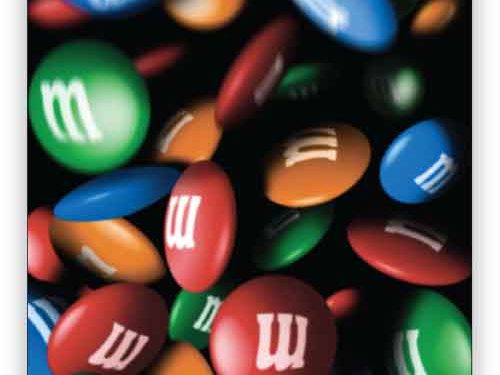
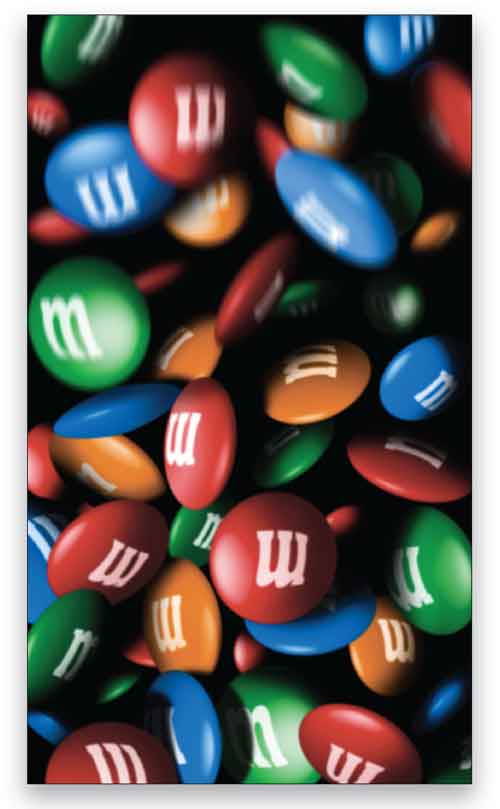
Two giant billboard screens in Times Square display animations to whet onlookers’ appetites for something sweet to eat. These animations switch between little M&M characters in various situations to thousands of M&Ms swirling, flying, and falling around. In the Times Square painting I’m working on, I have an M&M character in one and a bunch of M&Ms falling in the other. Let’s take a look at how to create an avalanche of M&Ms.
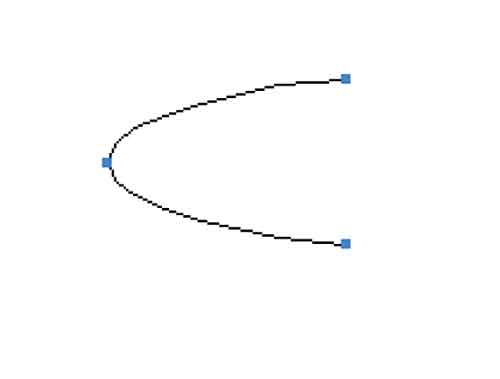
Step One: In Illustrator, start by creating half the shape of one M&M with the Pen tool (P), then choose a green Stroke and Fill color in the Options Bar. This will determine the color of the object being rendered.
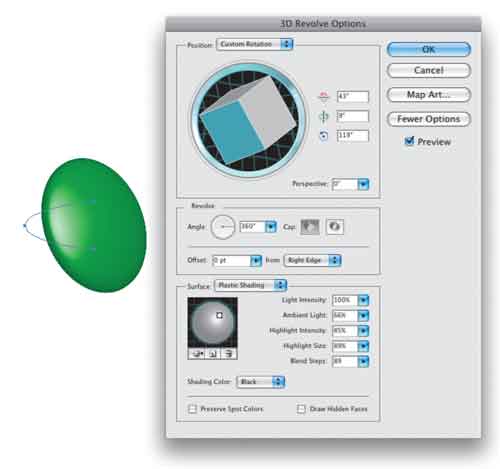
Step Two: To turn the shape into a piece of candy-colored chocolate, call up the 3D function (Effect>3D>Revolve). In this dialog, you can set the viewing angle of the object by spinning the cube in the Position section of the panel or entering specific degrees for the X, Y and Z axes. You can add Perspective too, but in our example, perspective will only add an unwanted distortion. Try using the settings shown here as a starting point (be sure to set the Offset: From drop-down menu to Right Edge to get the proper shape).
To set the lighting controls, click the More Options button (the button changes to Fewer Options once it’s been pressed) and you’ll be able to create, position, and modify multiple light sources to give your object the appearance you desire. We set the Surface to Plastic Shading to simulate the candy coating of the M&Ms. Click OK when you’re finished.
Step Three: To duplicate your M&M, press-and-hold Command-Option (PC: Ctrl-Alt) and then click-and drag the shape. To alter the viewing angle of each duplicate and make it appear to be an individual morsel, go to the Appearance panel and click on 3D Revolve. This brings up the 3D Revolve Options dialog where you can alter the current shape without having to re-establish the lighting.
Note: Once your shape has been turned into a 3D object, you cannot change its shape from the Effect>3D>Revolve menu, as it will override the previous effect and start from scratch.
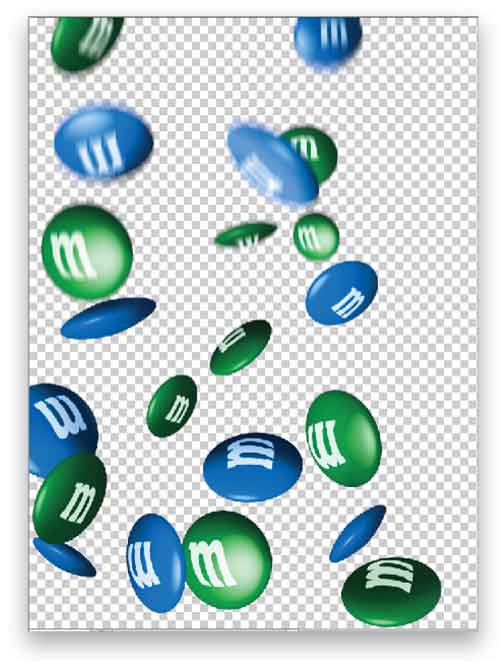
Step Four: Choose Select>All and press Command-C (PC: Ctrl-C) to copy all of the shapes to the Clipboard. Then click on the Create New Layer icon at the bottom of the Layers panel and press Command-V (PC: Ctrl-V) to paste the shapes into the new layer. With all the shapes still selected, click on Fill and change the color of this batch of new M&Ms to blue, and then change the Stroke to blue, as well. As our M&Ms are “falling in space,” no two will be in exactly the same position, so use the Selection tool to reposition them. Then modify the viewing angle in the 3D Revolve Options dialog for each again to add more variety to your candy bits. Tip: This needs only the slightest turn of the shape within the 3D panel. Repeat this step to create a set of red M&Ms and a set of orange M&Ms, each on their own layer.
Bring each color into Photoshop
Once all the different colors have been created, it’s time to bring them into Photoshop.
Step Five: You should have four layers in Illustrator, one for each color: green, blue, red, and orange. (Note: For expediency, we’re only showing blue and green in our examples.) We want to bring each color into Photoshop separately so, in the Layer’s panel in Illustrator, click on the box (now you’ll see a little padlock) to the right of the Eye icon beside three of the layers to lock them. The layer that isn’t locked is the one we’ll copy to Photoshop. Choose Select>All, then Edit>Copy to copy the contents of the unlocked layer to the Clipboard.
Step Six: In Photoshop, make a new blank document (File>New) where you’ll assemble the falling bits of candy. Then Edit>Paste the contents of the first layer into your Photoshop document—the paste function automatically places the contents into their own layer. In the dialog that appears, choose Pixels, then press Return (PC: Enter).
Switch back to Illustrator. Lock the layer we just copied and unlock the next one to be copied. Follow the steps above (selecting, copying, and pasting) until all four layers have been copied to the Photoshop document.
Step Seven: The four layers fall in position directly over each other, so they tend to hide each other in the Photoshop document. Determine their actual positions by selecting each individual candy and positioning it within the canvas to its final place in the scene. (Note: To select an individual piece of candy, just draw a loose selection around it with the Lasso tool and then drag it with the Selection tool.) You may have to scale some (Edit>Transform>Scale) to give the appearance of being closer or further back within the mass of candy bits.
You may also want to duplicate a few here and there to add more candies. I suggest using Layer>New>Layer Via Copy, as this will send your duplicate to a new layer where it can be manipulated without disturbing the other candy bits. This is helpful when you have two overlapping same-color bits and you decide to move one slightly over the other, then you won’t damage the one below.
Adding the M
You could apply the “M” that’s stamped onto each candy as a texture map to the object. Clicking the Map Art button in the 3D Revolve Options dialog allows you to take any Illustrator element that’s been converted into a Symbol and apply it in any specified position onto the surface of the object. For my M&Ms, however, I wanted every M to look slightly different from the others because real M&Ms have slight variations to the way the letters are stamped onto the surface of the candy.
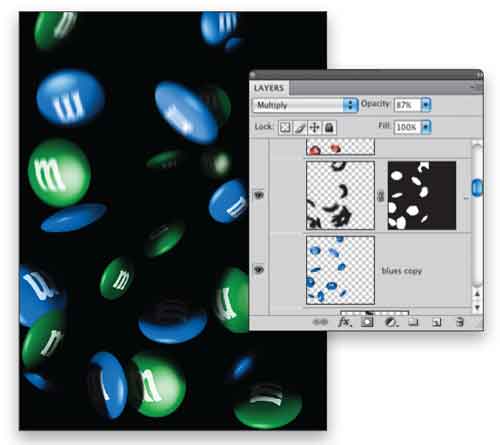
Step Eight: So, create your “M” in a separate document and add it to the candies within the Photoshop document by placing your “M” layer above the candy shape that will contain it. Then use the Warp command (Edit>Transform>Warp) to distort it into position. Finally, press Command-E (PC: Ctrl-E) to merge each “M” layer down into the layer with the candy shape.
Get the shapes a’movin’
To make the M&Ms appear as if they’re falling together, we need to add some motion blur and shadows.
Step Nine: To get the effect that this image is a moving animation, select the candy bits toward the top of the image and choose Filter>Blur>Motion Blur, choose your settings, and click OK. Use different Angles and Distances in the dialog to make the top candies appear to be falling faster than the ones below.
Step Ten: One final touch to make the M&Ms appear to be falling together is to add shading. Create a New Layer above each colored candy layer to contain “shadows.” With this layer active, select a soft black Brush (B) and apply strokes above the individual candy bits. Then add an inverted (black) Layer Mask to this layer and use a soft-edged white brush to reveal and refine the strokes. We added a Filter>Blur>Gaussian Blur using different amounts to make them seem to be at different distances from the candies they’re casting the shadows onto. You can clip the shadows to the candies below by holding the Option button and clicking between the shadow layer and candy layer.

Step Eleven: For the final figure, we filled the Background layer with black (Edit>Fill, then select Use Black, and click OK) to complete the sense of depth to the image.
I hope you’ve learned a few tricks (without causing you to break your diet by downing a few bags of M&Ms). Bon appétit.

