
With each new version of InDesign (or any Creative Suite product), we usually hear about its new features and start using them right away. However, there are always features that don’t make it into the marketing materials. So, I’m going to cover 14 InDesign features you may not know about.
1 MULTIPLACE FROM BRIDGE
Although you can use File>Place in InDesign or simply drag-and-drop images into your InDesign document, I find it much easier to bring in multiple images at once. Open Adobe Bridge, select the images you want to use in your layout, and choose File>Place>In InDesign. This will automatically switch you to InDesign and give you a loaded place cursor to insert your selected images. Use the Arrow keys to cycle through the images in the cursor and simply click to place them. Then use the Object>Fitting options, if necessary.

2 GO BETWEEN CHARACTER AND PARAGRAPH
To toggle between Character and Paragraph Formatting Controls (located in the Control panel), press Command-Option-7 (PC: Ctrl-Alt-7). Doing this right from the keyboard without having to reach for your mouse is very handy for verifying settings while in a text frame.

3 AUTOMATIC CONTINUED ON AND FROM
If you start text on one page and then continue it on another page, chances are you’re going to want to have “continued on page [xx]” or a “continued from page [xx].” InDesign can manage this for you automatically. Select the Type tool (T) and create a new text frame. Once created, drag the new text frame to touch the original text frame. In the new text frame, type “continued on page [leave a space]” or “continued from page [space].” Go to Type>Insert Special Character>Markers>Next Page Number (or Previous Page Number.) Then InDesign will automatically insert a dynamic number.

4 CREATE AUTOCORRECT MACROS
I often have to type Adobe Systems, Inc., so I set up an Autocorrect entry that automatically corrects ADBE to Adobe Systems, Inc. Go to InDesign (PC: Edit)>Preferences>Autocorrect. In the Preferences dialog, click the Enable Autocorrect checkbox and click the Add button to bring up the Add to Autocorrect List dialog. In the Misspelled Word field, type “ADBE” and then in the Correction field, type “Adobe Systems, Inc.” Click OK. Click OK again and now every time you type ADBE, InDesign will autocorrect it to Adobe Systems, Inc.

5 TEXT WRAP ONLY AFFECTS TEXT BENEATH
One of the most frustrating things that new InDesign users run into is when they try to place a caption on top of a photo that has text wrap on it. By default, text wrap also tries to text wrap your caption. Luckily there’s a one-click fix. Go to InDesign (PC: Edit)>Preferences>Composition. Enable the Text Wrap Only Affects Text Beneath checkbox and click OK. Now you can place text on top of your images with the text wrap where you want it.

6 COMPOUND PATH FRAMES
Everyone knows that you can place a single image in a single frame. However, few know that you can actually place a single image in multiple frames for a visual effect. Select the Rectangle, Ellipse, or Polygon Frame tool and create two or more frames. Choose the Selection tool (V) and Shift-click each frame. Choose Objects>Paths>Make Compound Paths. Go to File>Place, select the image of your choice, and click Open. InDesign will automatically place the image inside your new frames.

7 CONVERT SHAPE
It never fails. You create a rectangular frame for your image and then you decide that you’d like to see how it would look in an ellipse. There’s no need to start over. Go to Object>Convert Shape and choose the shape of your choice. InDesign will convert your existing shape into the one you want.

8 MATH IN THE CONTROL PANEL
Let’s say you have a frame with an image in it on the page and you know that it would probably fit better if it were 1.25″ bigger. No worries. In the Width field up in the Control panel, type +1.25 next to the existing size. When you’re done, press Tab or Return (PC: Enter) and InDesign will do the math for you to adjust the size of your frame. You can also use different operations, such as subtraction (–), multiplication (*), and division (/).

9 COPY EFFECTS TO ANOTHER OBJECT
If you’ve spent a bunch of time creating the perfect effect on an object and then decided that you want that exact same effect settings on a different object, my first advice would be to create an object style (Window>Object Styles). However, if it’s a one-time thing then it may be easier to copy the effects to the other object. Select the object you want to copy, then open the Effects panel (Window>Effects). Click-and-drag the Object effects icon (fx) onto your new object. Release your cursor and both of your objects will have the same effects.

10 STORY EDITOR SHOWS OVERSET TEXT
When you’re doing layout, more times than not you’re going to place text into your document and there will be more text than fits your design. However, the real question is how much more text is there. You can find this out quickly and easily by bringing up the Story Editor from Edit>Edit in Story Editor (or Command-Y [PC: Ctrl-Y]). Look for the red line to the left of your text. Everything next to this line is overset text.

11 CONTROL YOUR PHOTOSHOP LAYERS
It’s great that InDesign can place and output layered Photoshop files, but what makes it even better is that you can turn on and off layers in that placed PSD directly within InDesign. You can even have the same PSD in your document multiple times with different layers turned on and off for different looks. Go to File>Place, navigate to your PSD, and click Open. Now choose Object>Object Layer Options and in the dialog that appears, turn on Preview, and click the Eye icon on and off next to the desired layer to control visibility.

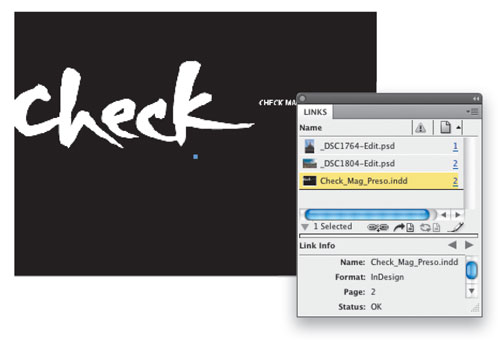
12 PLACE INDESIGN DOCS IN INDESIGN
One of the most powerful collaboration features in InDesign is the ability to place InDesign documents into other InDesign documents. This means that you could be working on one master document while your colleagues work on other sections. Once they’re done, you can place their InDesign documents into yours as you would any other graphics (File;Place). If you need to edit the placed InDesign document, choose Edit;Edit original.

13 ROTATE YOUR SPREADS
I often get the question, “Can InDesign do vertical spreads for say a calendar layout?” The answer is no; however, now you can do a typical left and right spread, and rotate your spreads by 90° to make it easier to lay out your content. This way you can still lay out the calendar as it would look, but it would still be a left and right spread on the press. To rotate your spreads go to View>Rotate Spread and make your selection from the list.

14 CUSTOMIZE YOUR LINKS PANEL
The Links panel (Window>Links) has always been useful; however, in InDesign CS4 it became much more customizable to show you not only more info about your links, but exactly and only the information that you want to see. Click the Links panel’s flyout menu and select Panel Options. Click on the checkboxes of the info that you want to see in the Links panel, and click OK to apply your changes.

ALL IMAGES BY TERRY WHITE UNLESS OTHERWISE NOTED
